Hawaii "Owner-Builder" Construction
March & April, 2024
Most of these pictures will be of the construction from March through April, 2024 although there may be a few earlier pictures.
The Beginnings of a New House!
We hope it isn't too ambitious - guess we will find out?

An official building permit!
(getting it was another whole saga, but I'll work on writing that later)
We finally got our building permit! Yay! It's even printed on official orange paper and posted on the jobsite. They used to issue orange paper ones, but now they show up digitally. We still printed it out on orange paper, just to be 'old school' about it. I don't know if they actually require the orange color or not. Seems a festive touch, though, don't you think?
May, 2024, this is beginning of the actual construction, although a lot of work has gone into the planning and site preparation. The site prep was started in late October of 2023. It was mostly clearing and leveling the jobsite, but it was with a beginning equipment operator so it went slowly. We were also waiting for the permit to appear before getting too far into the project so we couldn't progress much past the initial site leveling. Quite a bit of "grading and grubbing" can be done without a permit and it was good to get started.
The original permit application was in December of 2022. The actual drawing of the plans is another saga, but lets just say when it's your own house you're drawing up, it's way more complicated than when it's someone else's house. I don't really know how many hours are into just the drawing phase of this project, perhaps thousands of hours. It's been redrawn and revised multiple times. Hmm, I may not know, but I can find out. Ha! According to AutoCAD, who keeps track of such things, there's 1,440 hours in the last set of drawings, although there were at least three sets before the final version so more hours than that, but at least that many.
Anyway, I digress. The original building permit application was in December of '22. It got kicked back in early spring 2023 because the property wasn't big enough to have two "dwellings", so we had to ask for an "ohana". Which, in Hawaiian, means more or less "family" so it's a "family house" or what would be equivalent to a mainland "granny flat", perhaps? In any case, it had to become an application for a "New Ohana" which has some different requirements than a "New Dwelling". The building department is extremely sensitive about nomenclature although there's also some different rules for New Ohana versus New Dwelling. So, early last spring, the whole enchilada had to be redrawn yet again! to meet the "Ohana" requirements.
It not only had to be redrawn, but we had to send letters to everyone within a certain radius of the jobsite to let them know we were planning on building an Ohana. That was forty letters! Then we had to wait a period of time for anyone to make complaints and then send out a second set of letters. Had anyone complained, there would have been even more delays. However, there were no complaints so we were then approved to apply for an Ohana Permit. Kinda like getting a permit to get a permit? Once the revised plans were in the Building Department, it was about six months to get the approval for the New Ohana so we are now FINALLY able to officially start building. Not all the delay was on the Building Department, but they have been having difficulties switching over to the new digital only version of getting permits in Hawaii county and that didn't help.
Clearing the Jobsite First

Happy Flower & Cypress in Waimea
now they have many more sheepy friends
The beginning of construction also meant the relocation of our two lawn roombaaahs, er, sheep. Flower and Cypress had been eating down all the Guinea grass, but there isn't room for heavy equipment and sheep in one work site.
Since their sheep pasture has now become a construction site, Flower and Cypress have moved to Waimea to live with John Bohr's sheeps, so they are now going to be very happy sheep. John is a great sheep keeper and Flower & Cypress will have a lot more sheepy friends than just themselves. Which, in the world of sheep, is a really good thing. One sheep is a sheep in a panic, two sheep are okay, but many sheep are much happier sheep.
I had hoped to have sheep AND a new house, but construction really wrecks a pasture so at the moment; no sheep. Perhaps, if we end up with enough grass, they will be able to come back, but we will have to see how much grass we end up with after covering their sheep pasture with a new house.
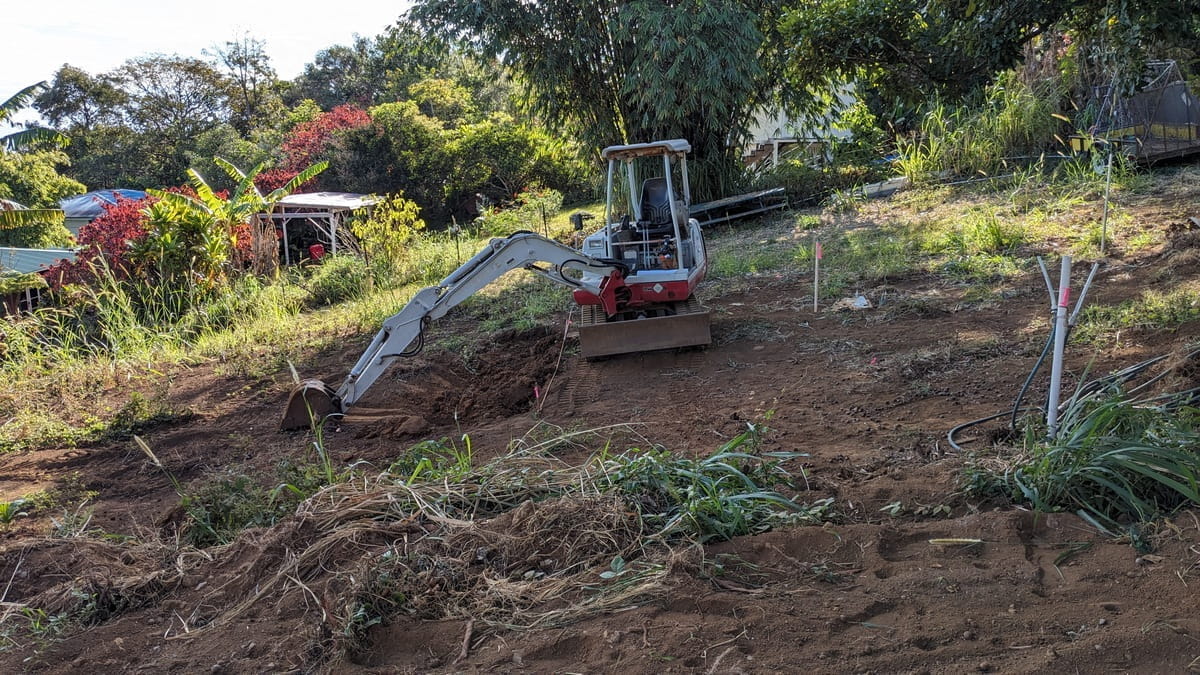
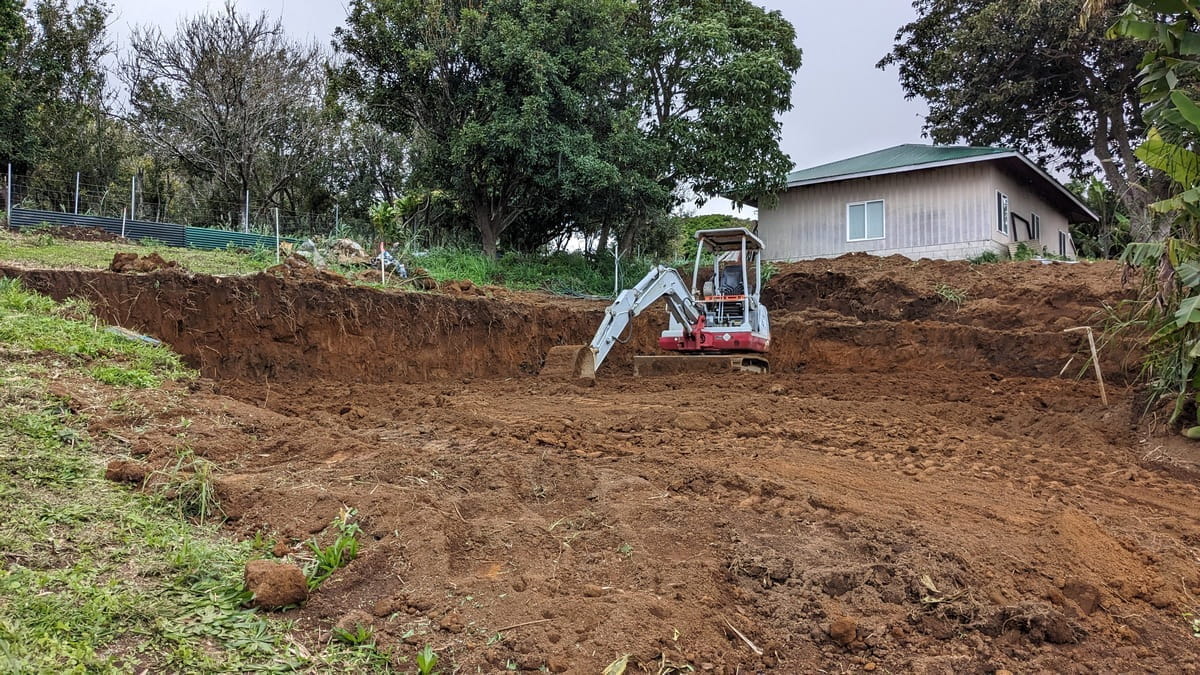
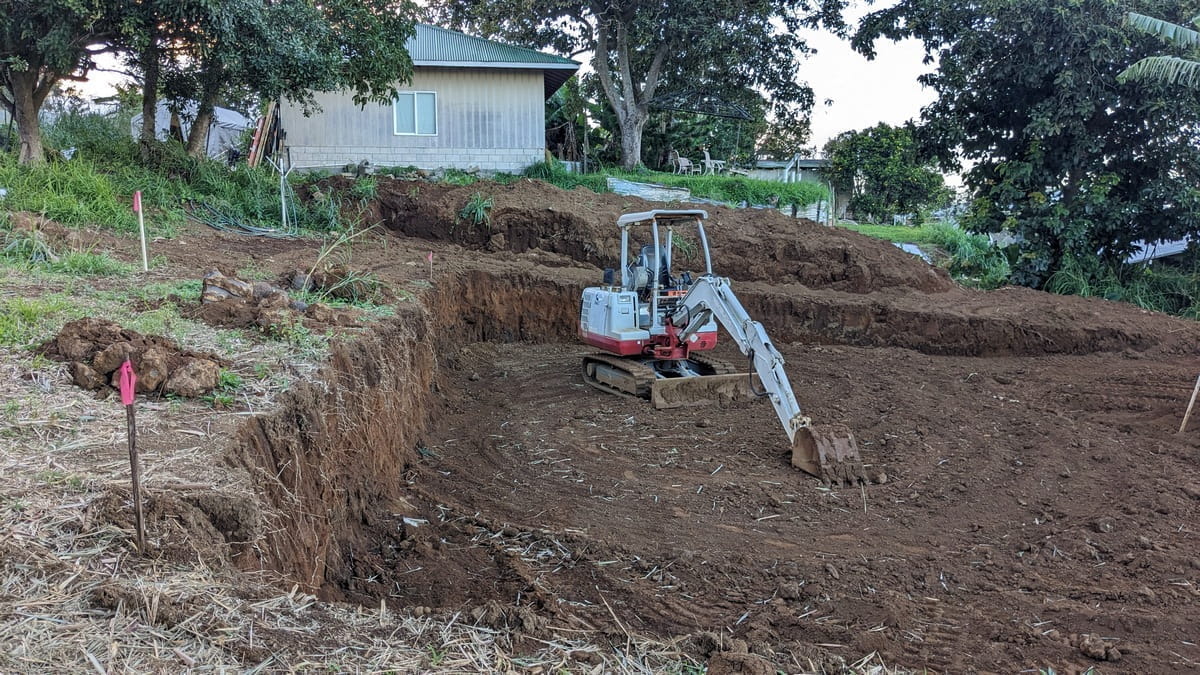
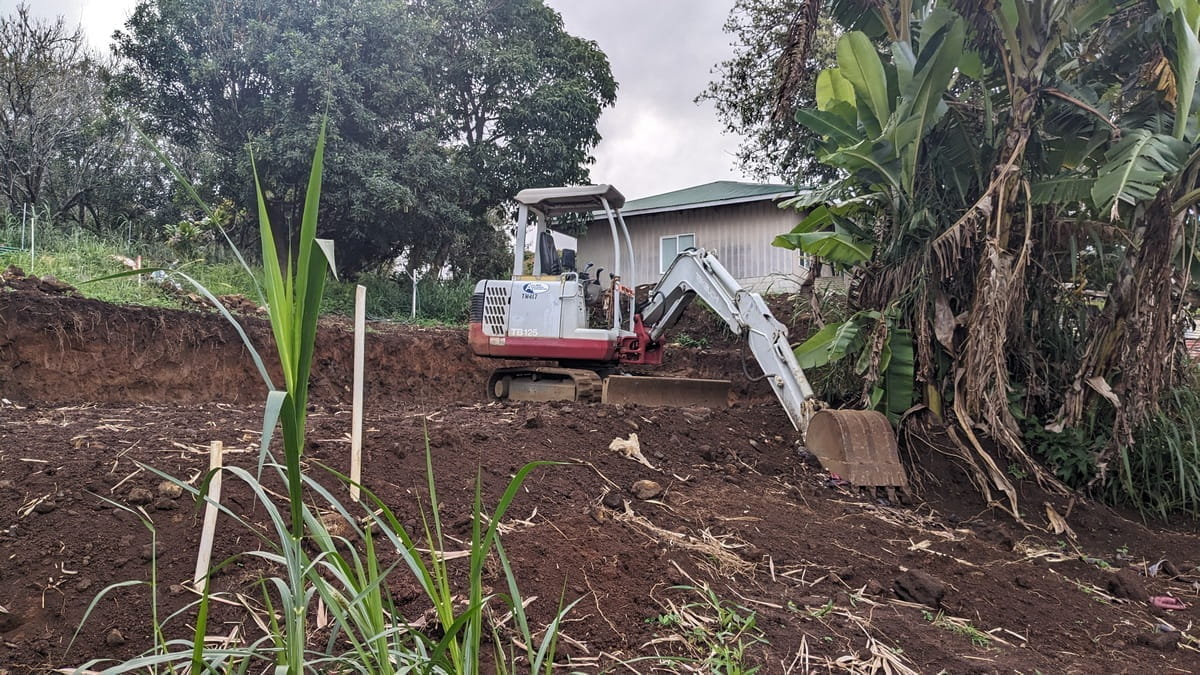
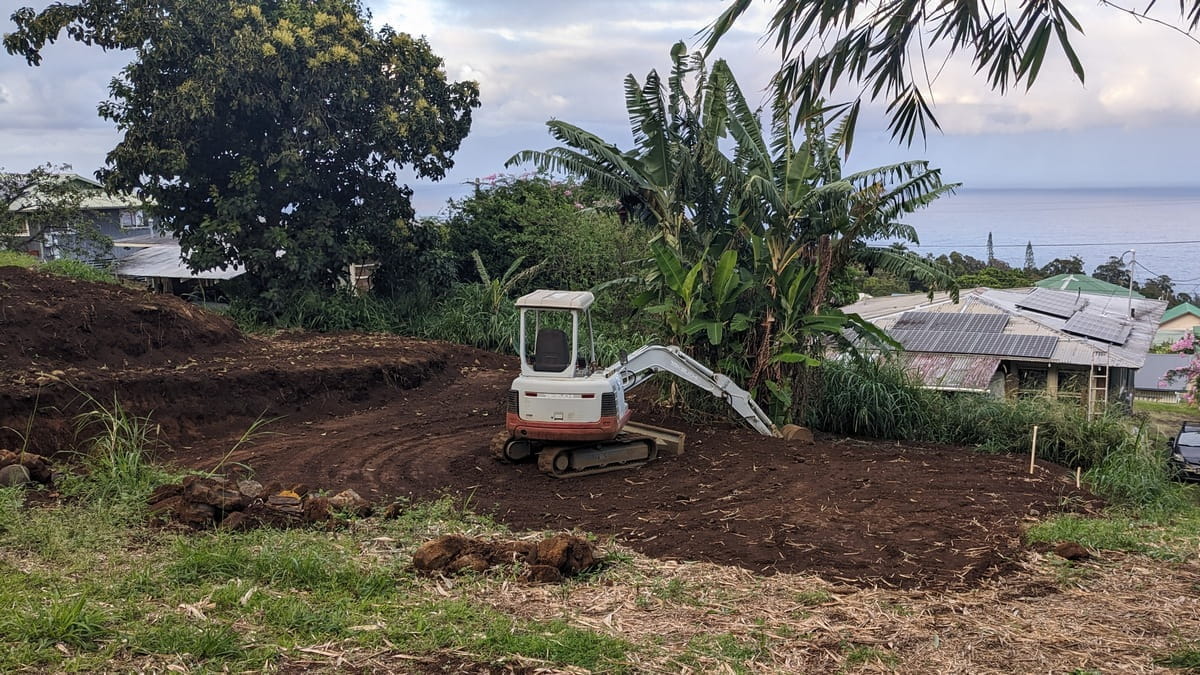
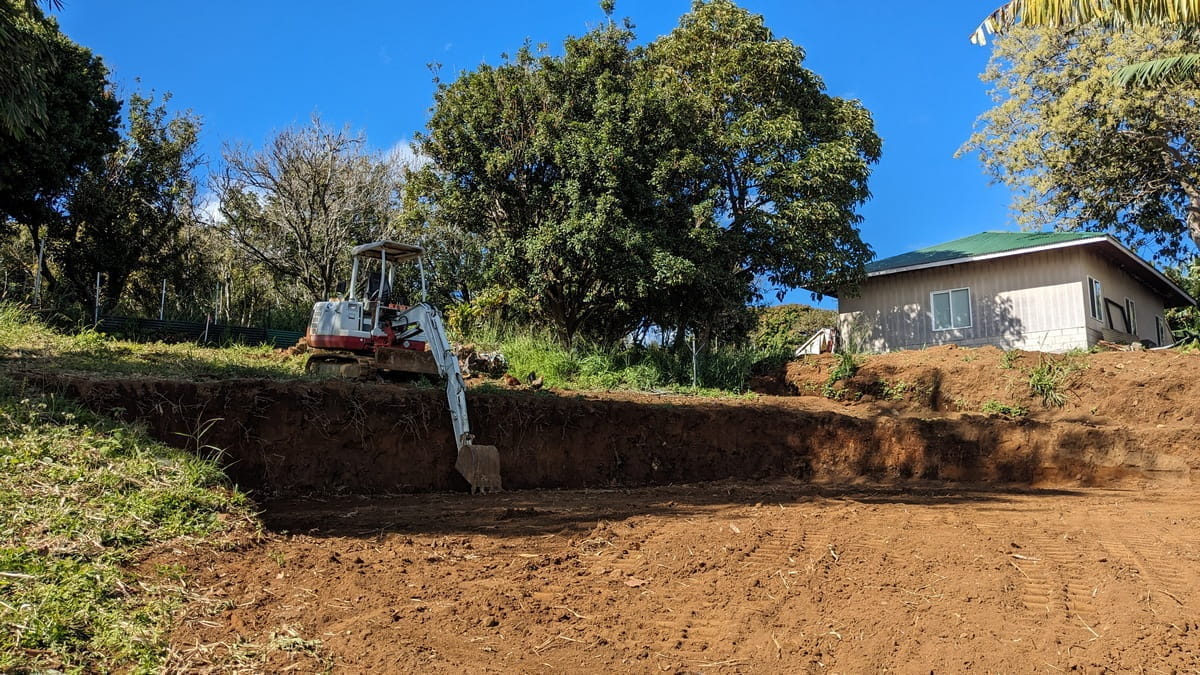
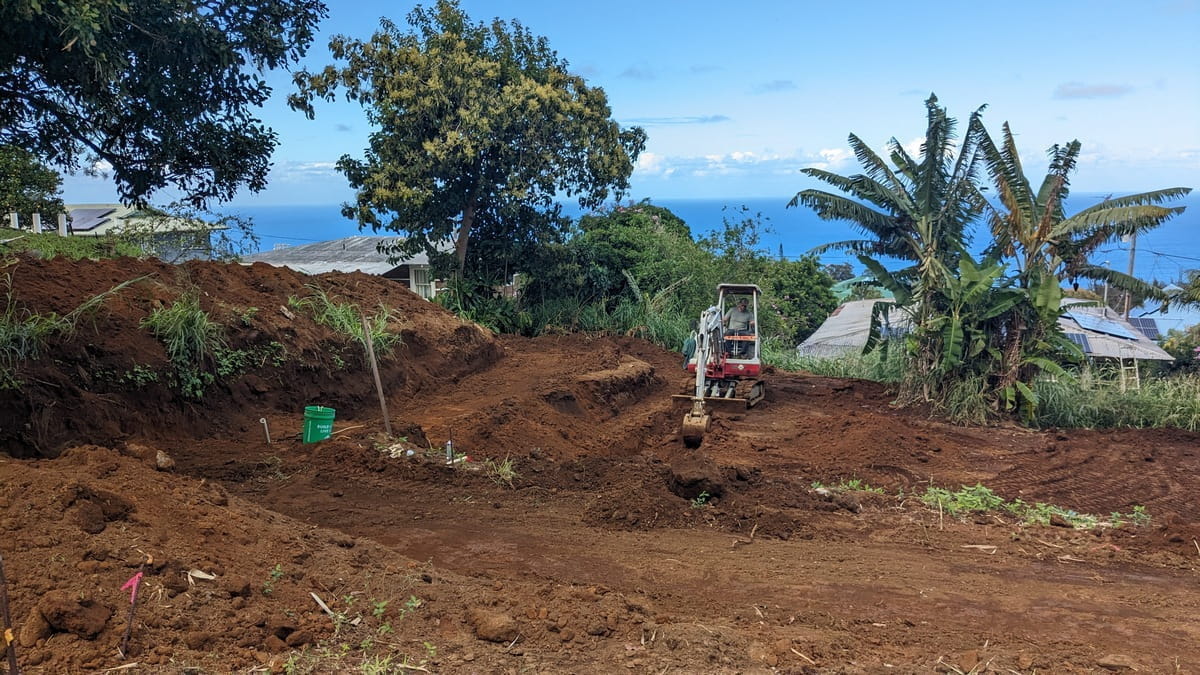
Breaking Ground
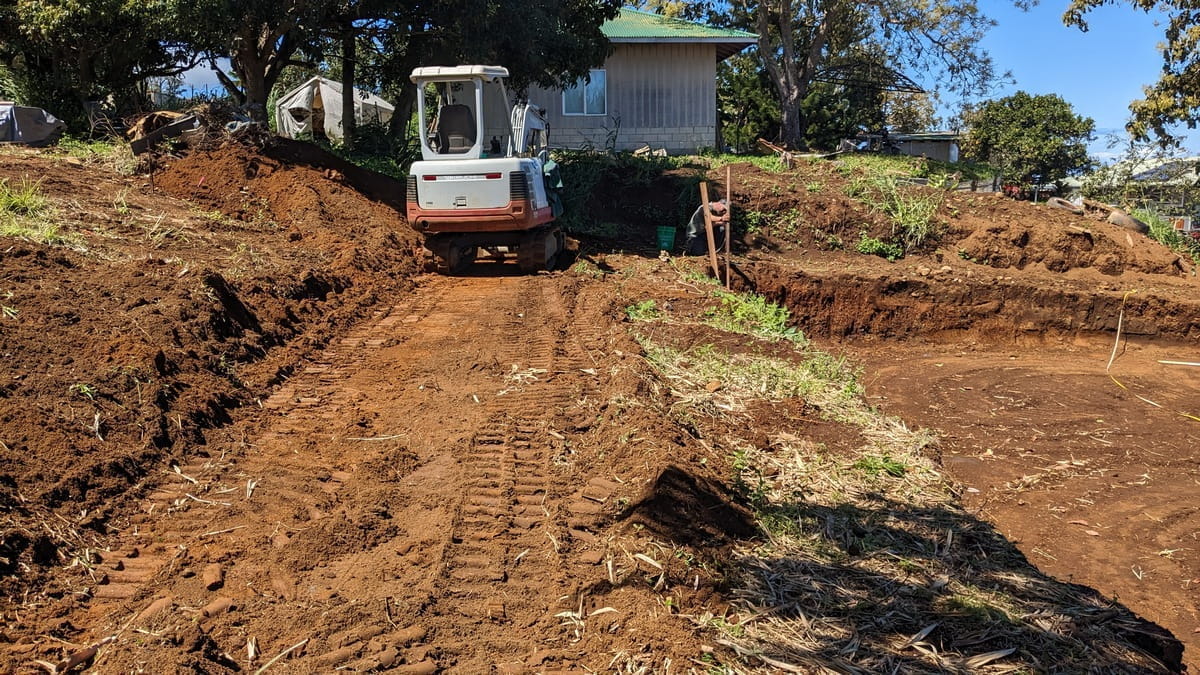
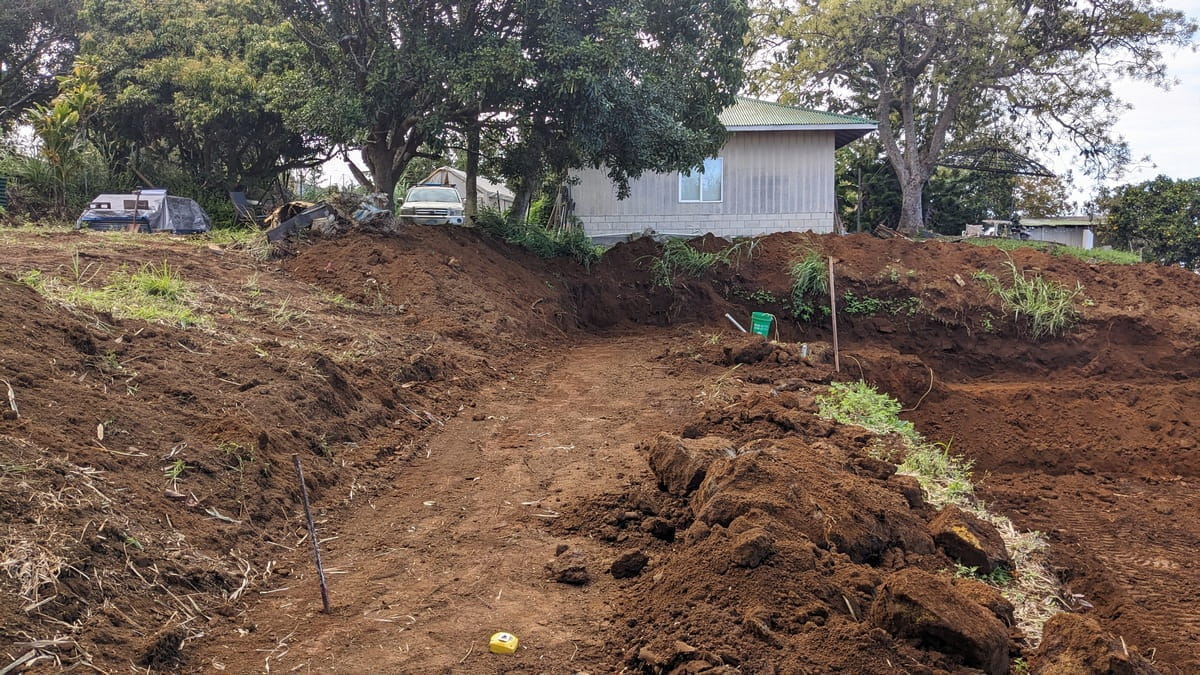
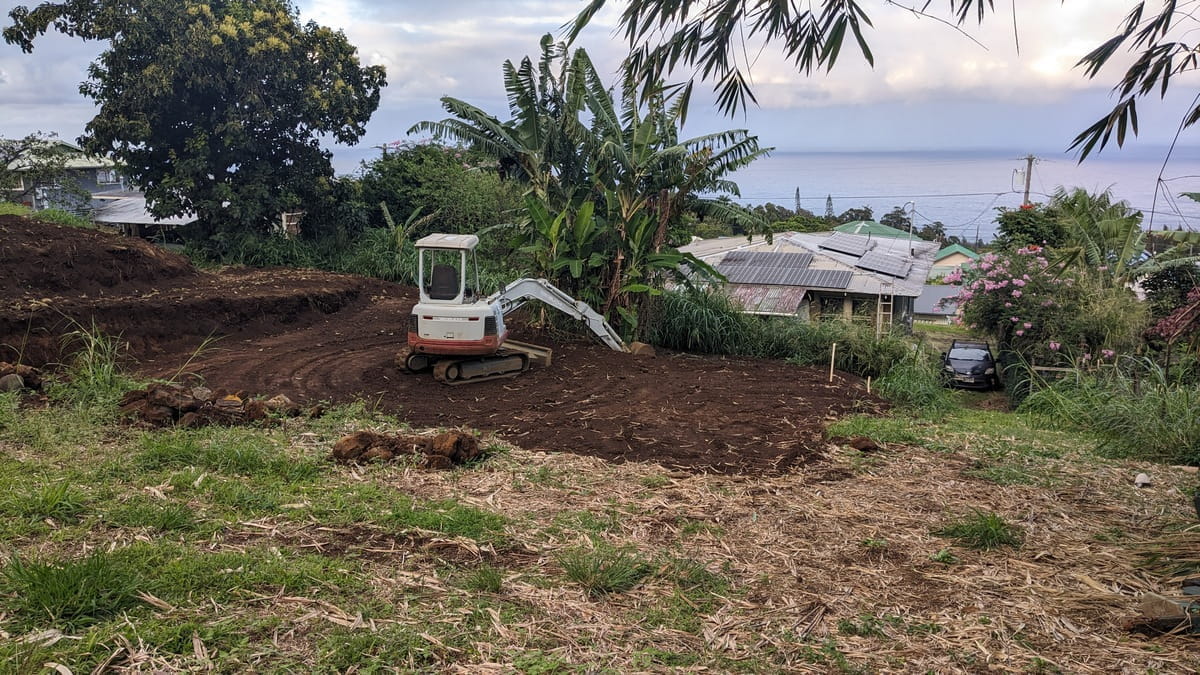
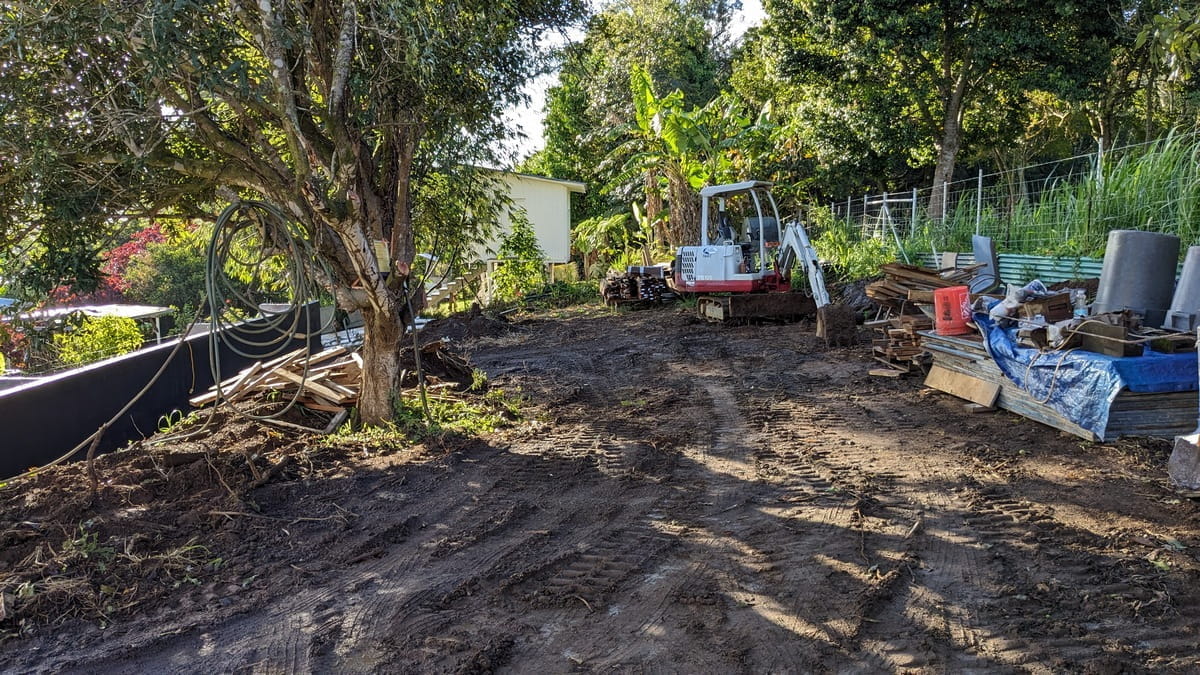
This is a slideshow of eleven pictures which will automatically scroll through and then start over at the beginning. It's mostly the site preparation, which was digging into the hillside to get the place to build the new Ohana. Hmm, I suppose I can call it a "house" since a "house" can be an "Ohana". On the website, we don't have to be as fussy about nomenclature as the Building Department. Anyway, these pictures are from around late October of 2023 to March 2024. We took some vacation time in there and were mostly waiting for the building permit but it's permissable do quite a bit of grading and 'grubbing' without a permit.
Perhaps the first and most important thing with this build was buying an excavator. Should anyone be planning the same thing, I can't recommend anything better than buying your own equipment. There's been hours and hours of site prep as well as construction time so far with a lot more to go. Hate to think how much it would cost to hire someone to do it. Plus, excavators are really fun to run! Two joysticks! Lots of knobs!
(Don't tell anyone how fun it is, it's a secret. Especially with audio books and headphones. Jane Austen is great to listen to while digging, no real drama in her books.)
The Beginning of Actual Construction
late November 2023
January 2024 Digging
aka "learning to excavate while digging"
January 2024 Digging
still slow at digging, but still learning
February Digging
trying to find level with bananas in the way
February Digging
another angle of looking for level
A week later
it's a small bucket but persistence pays off eventually
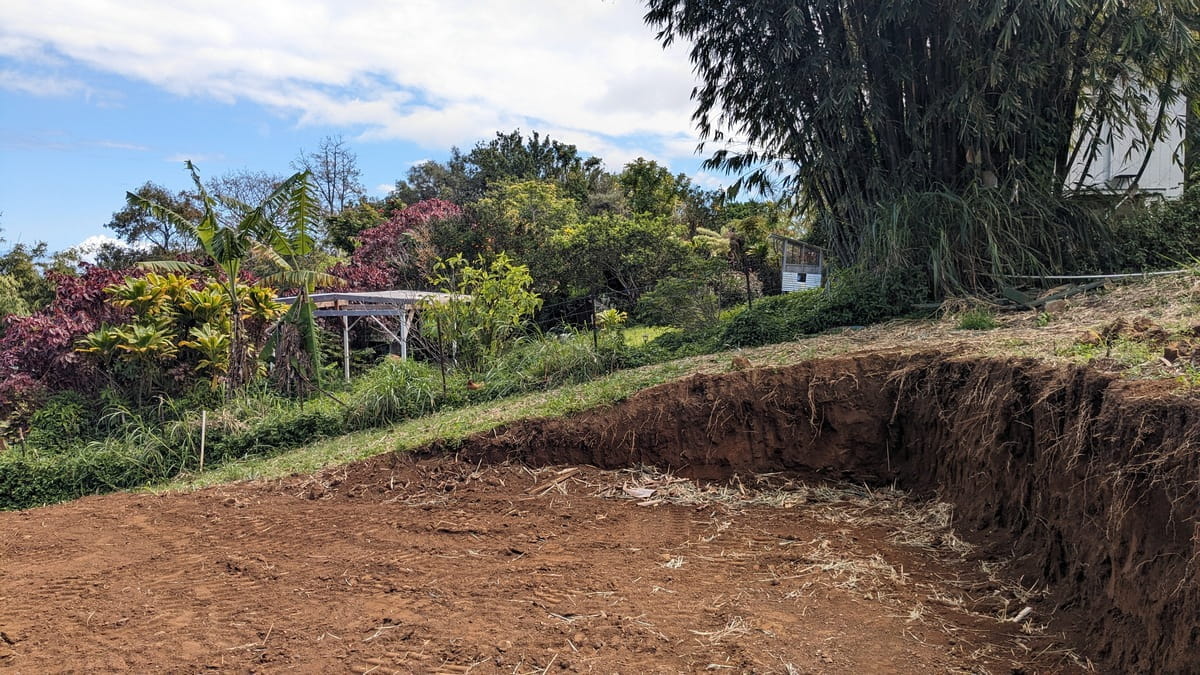
Cutting into the slope
everything is on a hillside around here
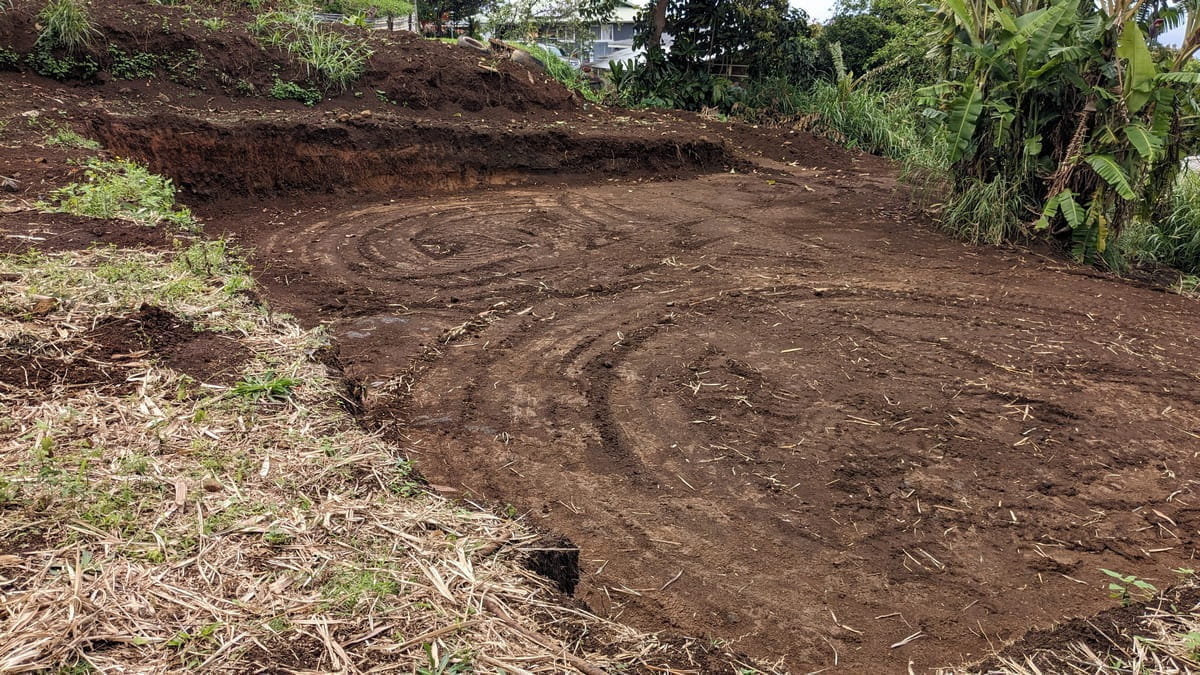
Ready for the Workers
we hope flat and level enough for Nick & his team
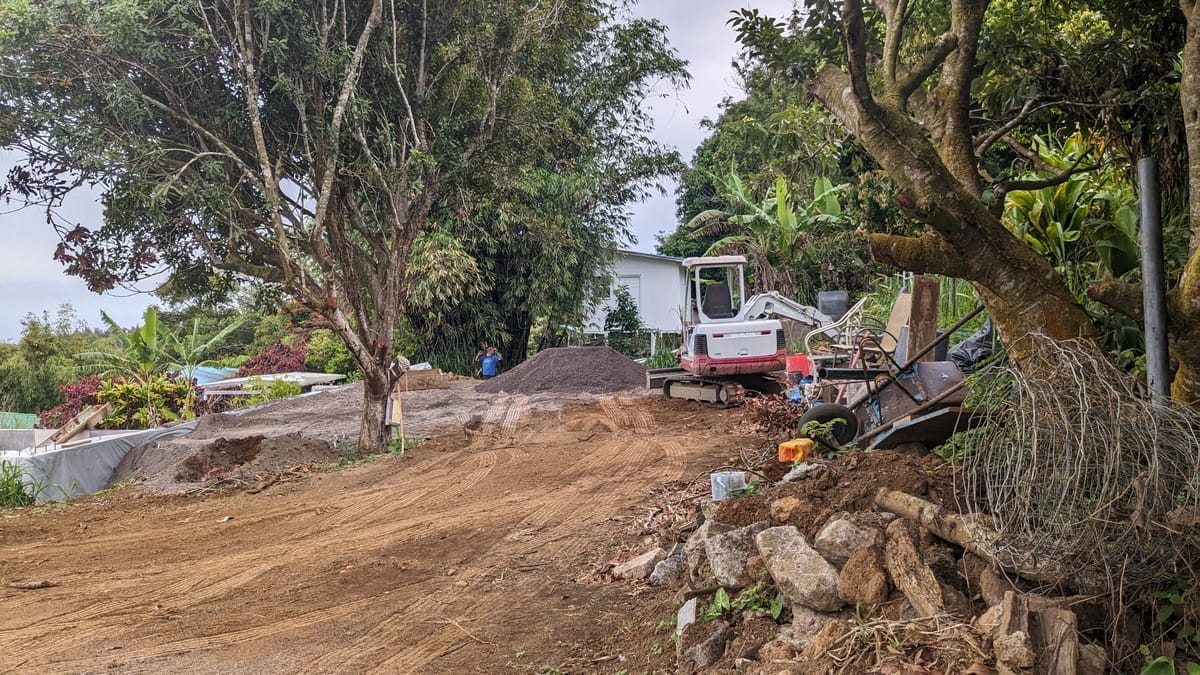
Nick Cook Starting the Foundation
Most of the work is done by Nick & his cousin, Ethan
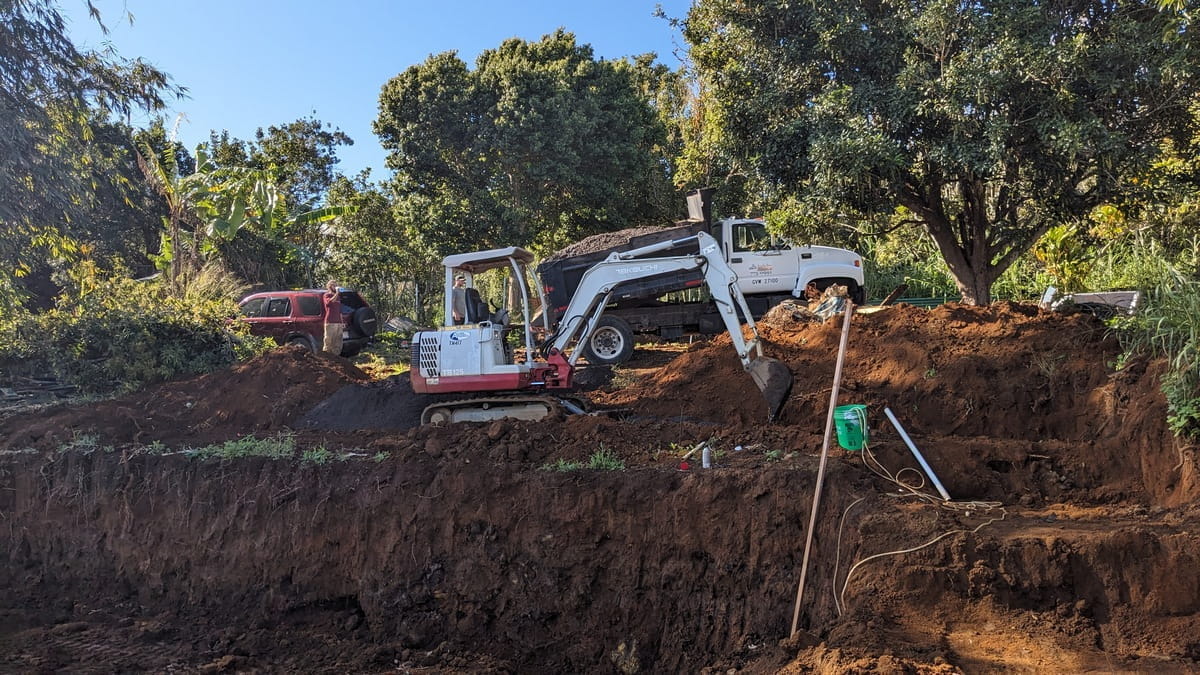
First Gravel Delivery
First of many times Tyrone will bring gravel
Gravel!
Filled in the lower level foundation area with gravel. Easier now than after walls are built.
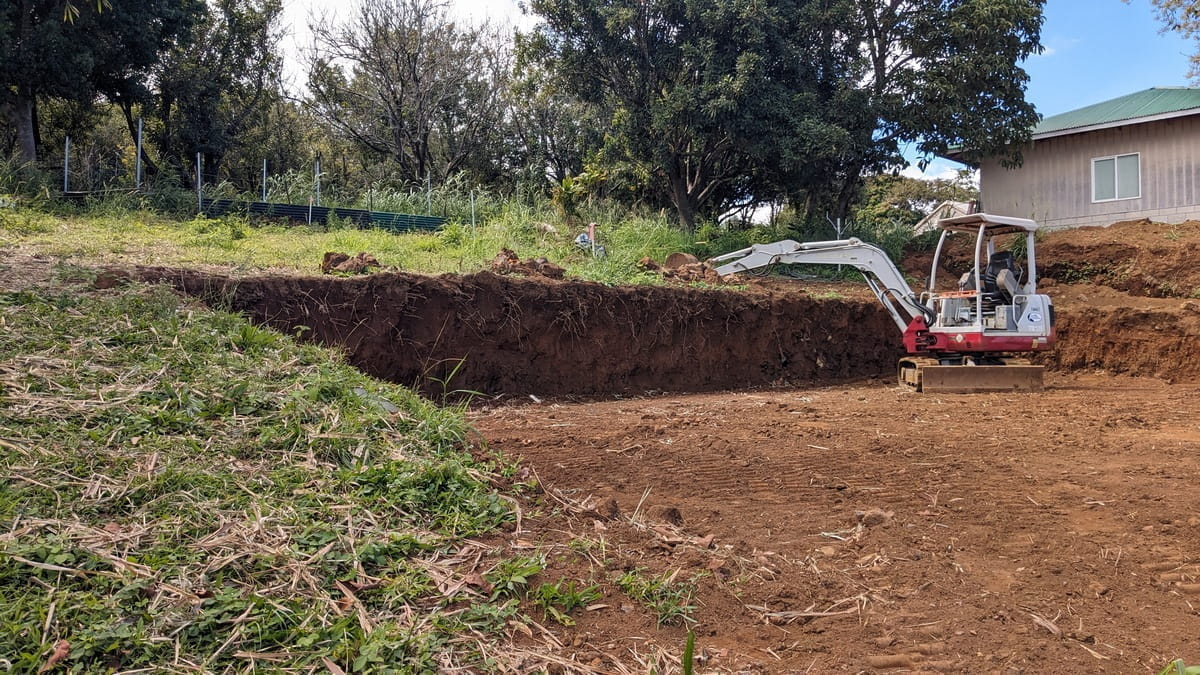
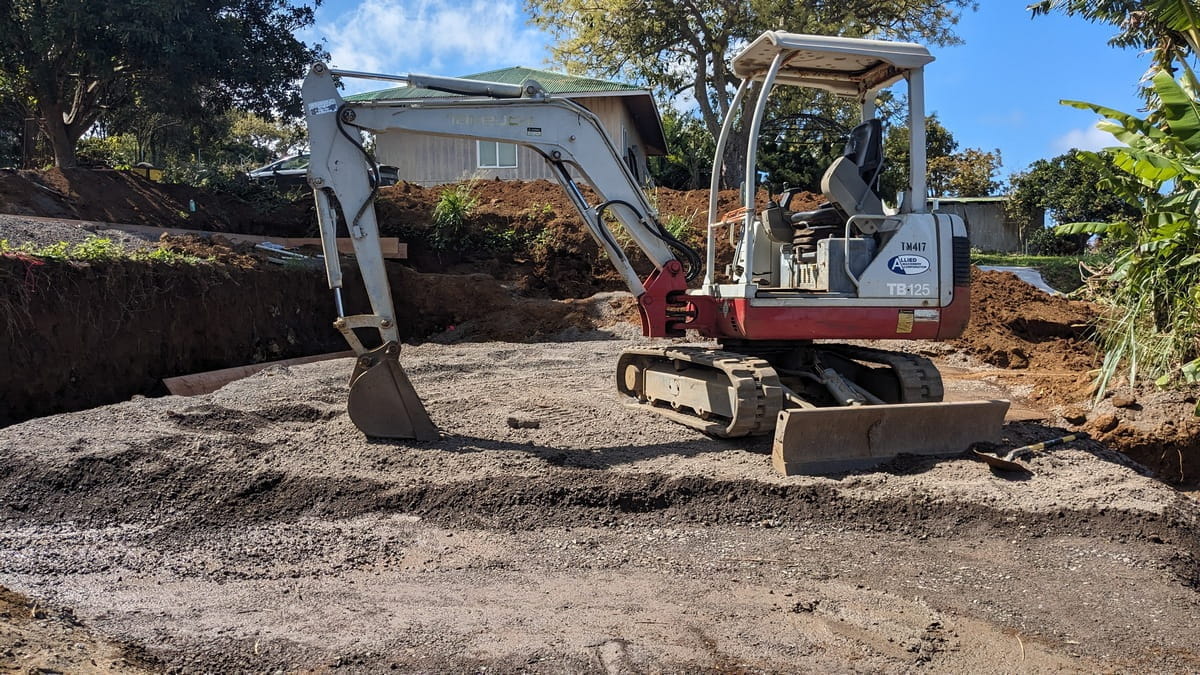
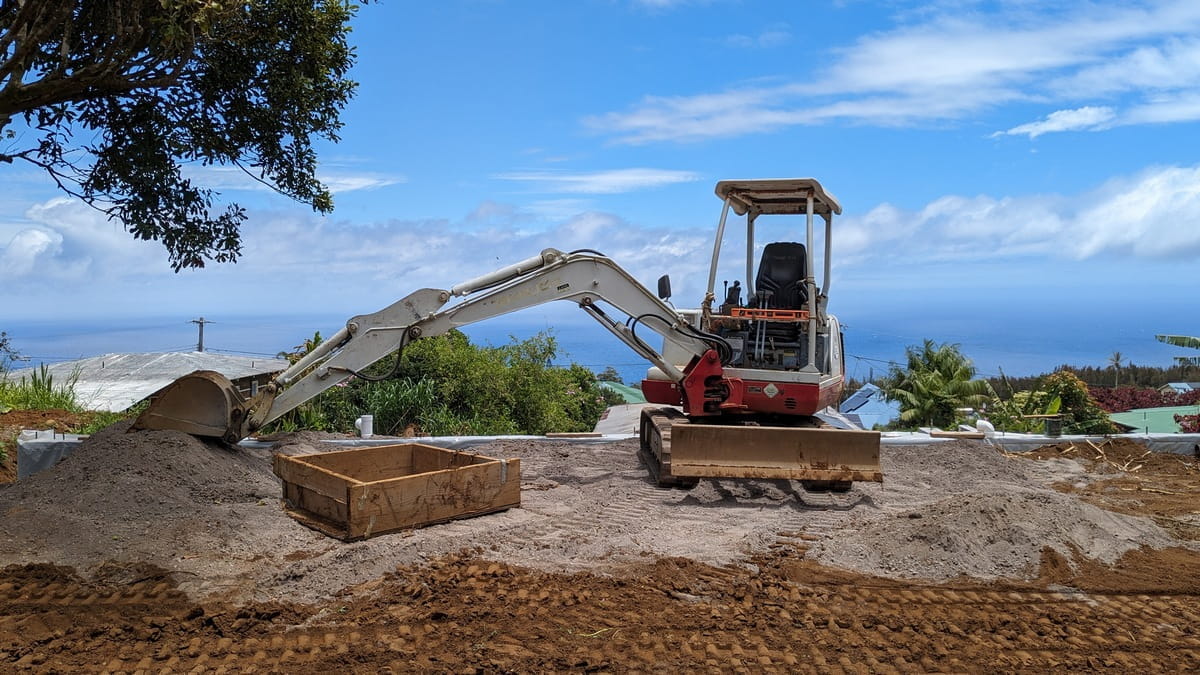
Other than getting the site prepared, this was an excellent opportunity to learn to use an excavator. By the time we got around to actually building things, it has become second nature to operate all the knobs and joysticks. This is about the perfect size excavator for the project, a Takeuchi TB125. It fits into pretty small areas, yet is big enough to get work done. It has a 'wide' bucket which is somewhere around two feet wide and a 'narrow' bucket about a foot wide. Mostly we use the bigger bucket, but the narrow one is good for trenches for underground utilities.
The other thing with an excavator versus a backhoe is that the excavator mostly stays put and spins around in one place. Since we're working on a hillside that is just under a 10% slope, heavy equipment moving across the slope can be very dangerous. Well, more dangerous than usual, anyway, with heavy equipment one must always assume some level of danger. Most anything you bump with it is gonna get dented or worse. Plus, on a hillside, gravity is NOT your friend. Well, there's more on the excavator further down the page.
Job Site Equipment
gearing up to 'git 'er done!
"New" Excavator!
When building, hydraulics are your friend!
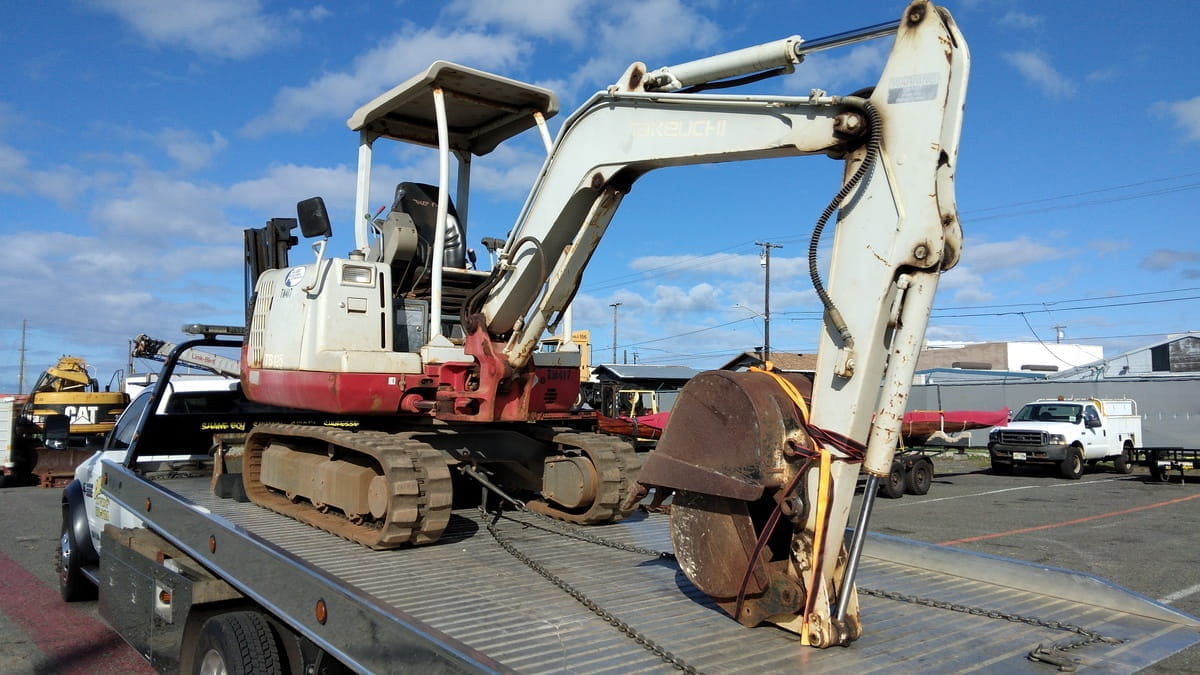
Since there's a lot of excavation work to be done with this construction and hiring an excavator along with an operator is REALLY EXPENSIVE we bought a used excavator - a Takeuchi 125B - and had it shipped over from Oahu. It has two buckets, the one we usually use and a narrower one. Wish it had a 'thumb', but it's still useful without it. It's a nice size since it can be shifted around on a car carrier, unlike some heavy equipment. It also fits around the project site, which is kinda compact what with all the trees, existing buildings, etc. The official plan is to sell it once the project is done and there's already a half dozen folks who want it, but it's great fun and maybe we will keep it instead? (Probably not, but we still have loads of work to do with it first.)
The basic difference between a backhoe and an excavator is that the excavator generally sits in one spot and spins around to move stuff while the backhoe trundles stuff around in the big front bucket. Both of them dig things with the arm and both of them can shove things around with their blade or front loader bucket. The backhoe can shift things by scooping it into the front loader and then trundling around to somewhere else with it. The backhoe stays in one spot and can spin around and move things using the smaller bucket on the arm. On a hillside, especially a somewhat steep hillside, the excavator is much safer since it sits in one spot and doesn't move around as much. In a compact jobsite, the excavator also has an advantage, I think, for basically the same reason. Although, I've not had anywhere near as much experience as many (if not most) builders, so choose which one you prefer for your project.
This excavator is a lot newer than the backhoe we had a few years ago. Instead of several long rows of knobs on long levers, the excavator basically has two joysticks and only a few levers. The joysticks mostly move the arm, although they also spin the cab around. One lever is for engine speed (it's a diesel, actual speed really isn't it's thing) and the other lever raises and lowers the front blade. Two other levers release the arms on either side of the seat to make getting in and out of the cab easier and there's a few buttons, but those don't get used much since we don't have a thumb for it. A switch to turn it off and on, a light switch for the headlight. There's a 'rabbit' button (it actually has a picture of a rabbit on it) for moving faster, but that doesn't get used much. I think that's about it for all the controls.
It's great fun, though! Fairly easy to learn and being able to shift pretty much whatever one wants is kinda amazing. Digs up banana trees effortlessly, gets rid of the bane of our yard - Guinea grass - with amazing ease. Faster than sheep, too, although does make a bit more noise - especially when making a very annoying BEEP BEEP BEEP when moving around on the tracks, but other than the annoying beeps there's not that much actual noise. The diesel engine itself kinda makes a fairly quiet humming purr, but a fairly quiet purr.
It is official 'heavy' equipment although not as big as some excavators. I have been finding the limits of it's hydraulics. It took a few hours to dig up a big avocado stump since it couldn't be done at one swoop and individual roots had to be dug up. But, picking at smaller roots one at a time eventually got 'er done. Picking up the stump and moving it was also, hmm, let's call it "interesting"? The stump when held out from the machine rather tried to tip it over, but held in close, it stayed upright. Safety around heavy machinery is critical.
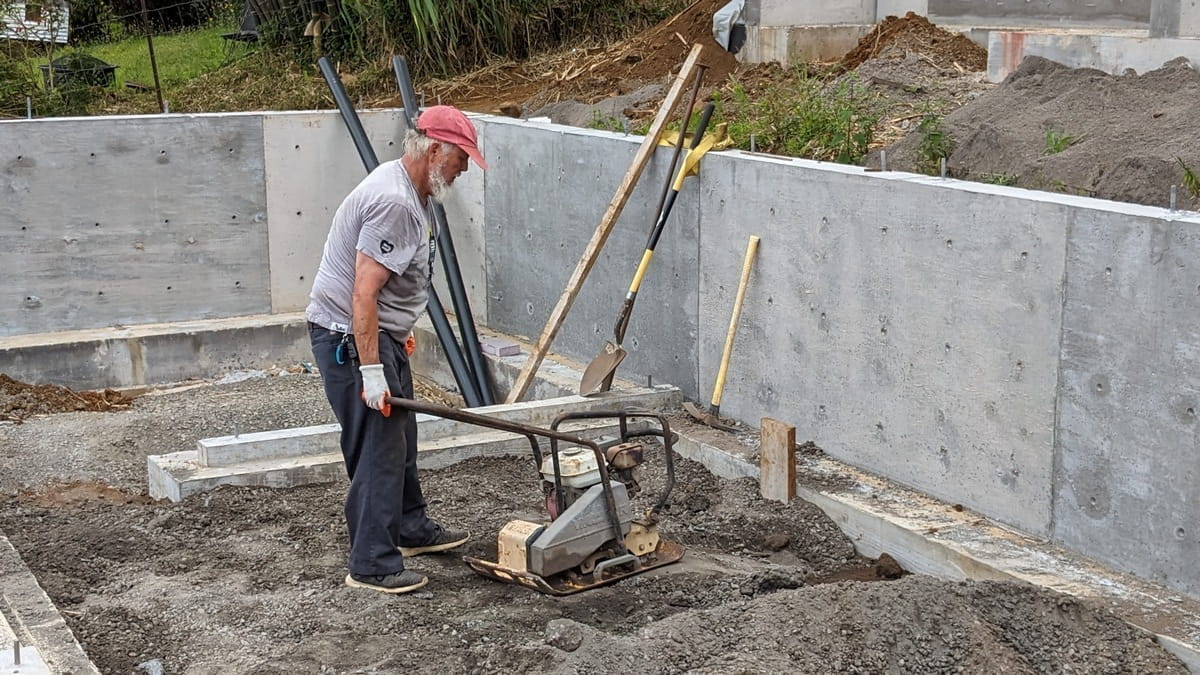
"Whacker?", "Flat Plate Compactor?" or maybe "Jumping Jack?"
not quite sure what it's called, but it flattens gravel really nicely
It's always good to get various bits of machinery when building a house. If it's bought used and kept in good condition, it can be sold for basically the price paid, so we're hoping to save quite a bit on construction costs this way. Since we're still on the foundation part of the construction, we've been looking at oddball equipment. The latest one is a "jumping jack" gravel compactor or I think it is also sometimes called a "wacker"? That may be a brand name, though. I think Whacker" is written on the side of the machine.
This gravel stomper is older and needed a bit of work to get it going again, but it now works great. It's basically a one trick pony, though. It flattens and compacts gravel really well. Not sure if there's anything else that it can do, but it saves having to rent one.
If it has been raining and you should happen to use the thing on wet gravel it will dig itself into a hole. Somehow the wet gravel shifts much easier than dry gravel and the thumper machine will end up in a very wet and muddy hole. Fortunately, we had the digger there so the gravel whumper was pulled out of the hole with the excavator and held up to be hosed off. Somewhat like fishing and holding up the fish after it was caught, maybe we should have taken pictures? I think there's some pictures around here somewhere but can't find them now, I'll put them in later when I find them.
Digger with box sledge
its just made from scrap lumber, but its very useful
The excavator is good for digging, but moving dirt from point "A" to point "B" doesn't work really well unless it's within the swing of the machine. A wooden sledge box was built to move more than one scoop at a time, but it's still not the best way to move sand or gravel. Also, any time the excavator - or any heavy equipment would do the same, I expect - barely nudges something, it can break it. So far the box has been repaired three times, but since it's just scrap wood, it's not much of a problem.
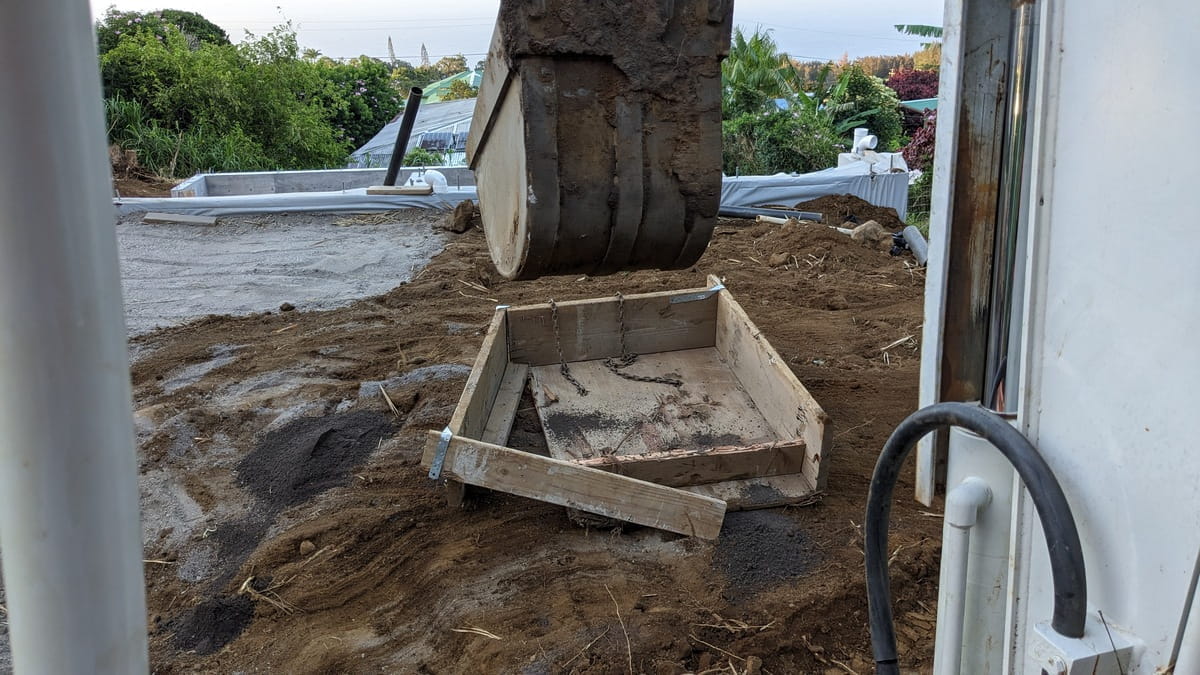
Wrecked (again) box sledge
I only nudged it a little bit!
It's a box that's about 4 foot square and about a foot deep. Made of scrap 2x12 with a 1" thick plywood bottom. There's a chain that lifts it and that chain goes through holes in the bottom of the box. There's a bit of rebar going through the end links of the chain to hold it on as well as reinforce the bottom of the box a bit. Once the little tractor with the front loader on it shows up, we probably won't use the box sledge much anymore. It does shift a load of gravel from point "A" to point "B" in one trip instead of the digger clanking back and forth with multiple small bucket fulls of whatever we're moving around.
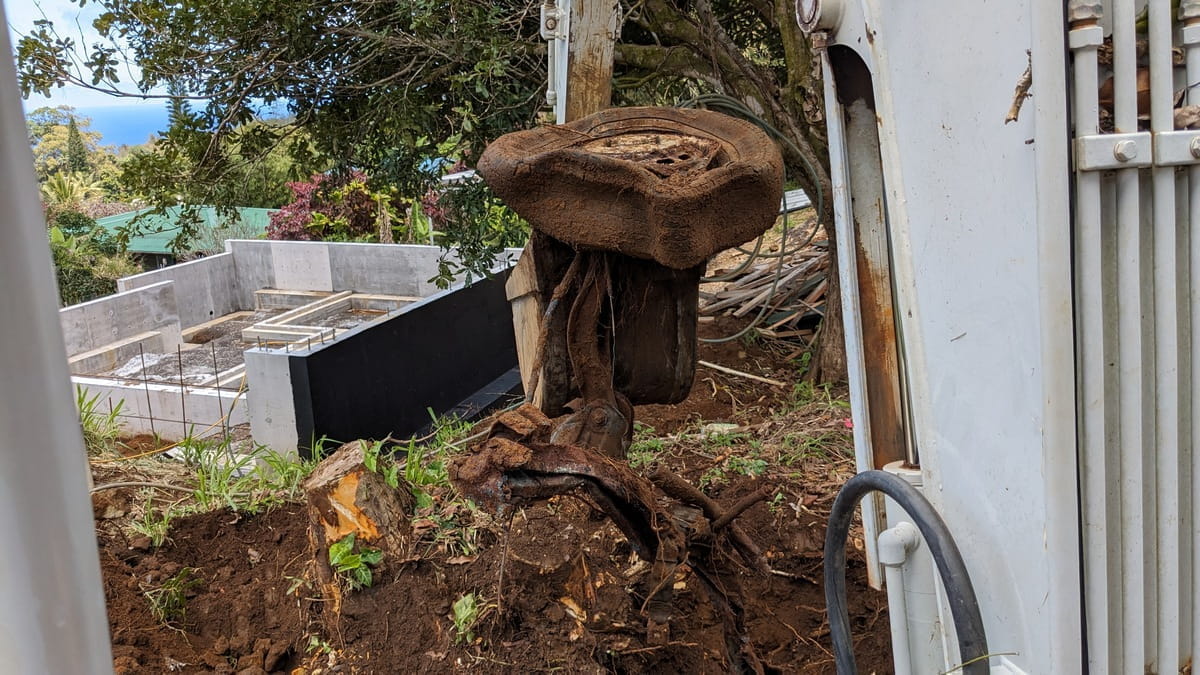
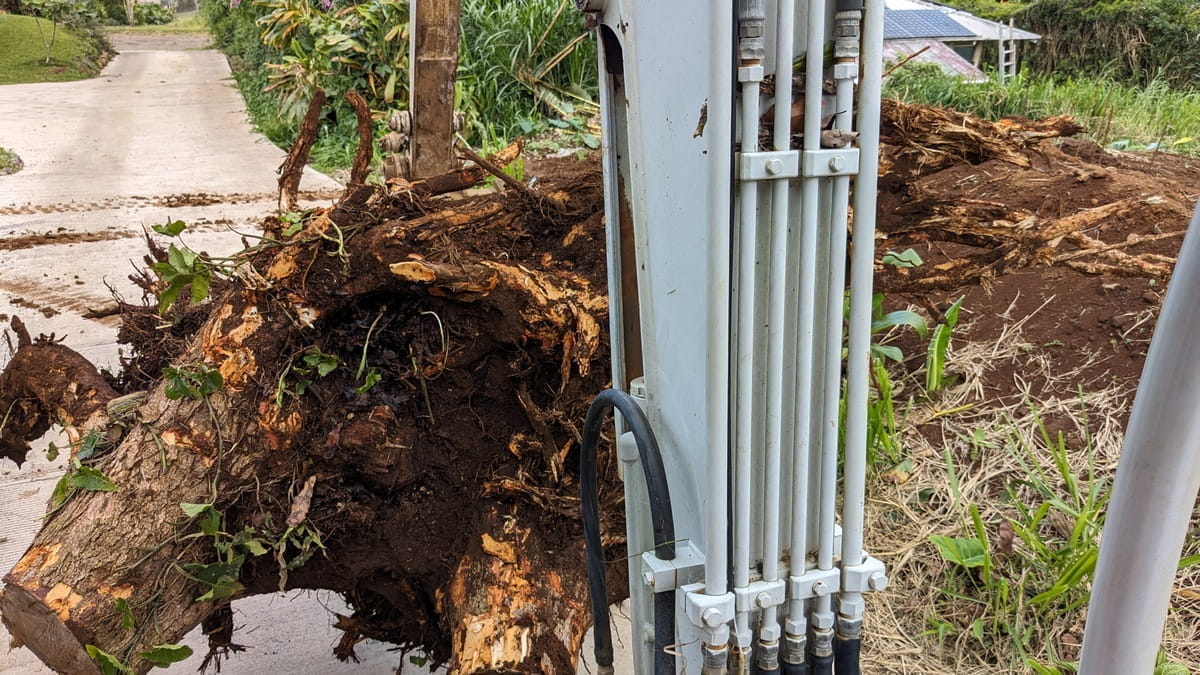
We dig up all sorts of odd things. Someone at some point bothered to actually bury a car as well as various refrigerators on this property. Dunno who, but they probably had heavy equipment. I can't imagine anyone would bury a car using a shovel. The picture there on the left is a tire with front axle/arm from some sort of car. The picture on the right is a very large avocado tree stump. It would overbalance the machine if it were held out very far.
Other than actual construction work, the digger (aka the excavator, although it's generally just called "The Digger"), anyway, the digger is really useful for all sorts of other things. Wanna move around a big rock? Take down a fair sized tree? No problemo! It did take longer than expected, though, to dig out the pair of avocado tree stumps. They were attached and pretty big. Moving them with the digger almost unbalanced it unless they were kept close to the digger's tracks.
There had been a pair of fair sized avocado trees up at the top of the driveway. It was making it very difficult for any sort of delivery truck to make the turn. Even smaller passenger cars had trouble with the tight turn. The tree limbs interfered with the top of the taller trucks, too. Initially, the two avocado trees were cut down and there was just under two feet of stump left. Which here in Hawaii, wouldn't have actually killed the trees, they'd have just sprouted back again. But, they were too close to the mac nut tree (which I am really trying to keep, even though my S.O. seems to think we don't need a mac nut tree there. BUT! It takes A Very Long Time to grow a tree so it's better to keep it if we can) anyway, I digress - there were two stumps left and that still caused trouble for the delivery trucks. Well, not for Tyrone, his truck could just drive over them, but the other folks had smaller trucks and had problems. So it seemed a Good Idea to dig up the stumps.
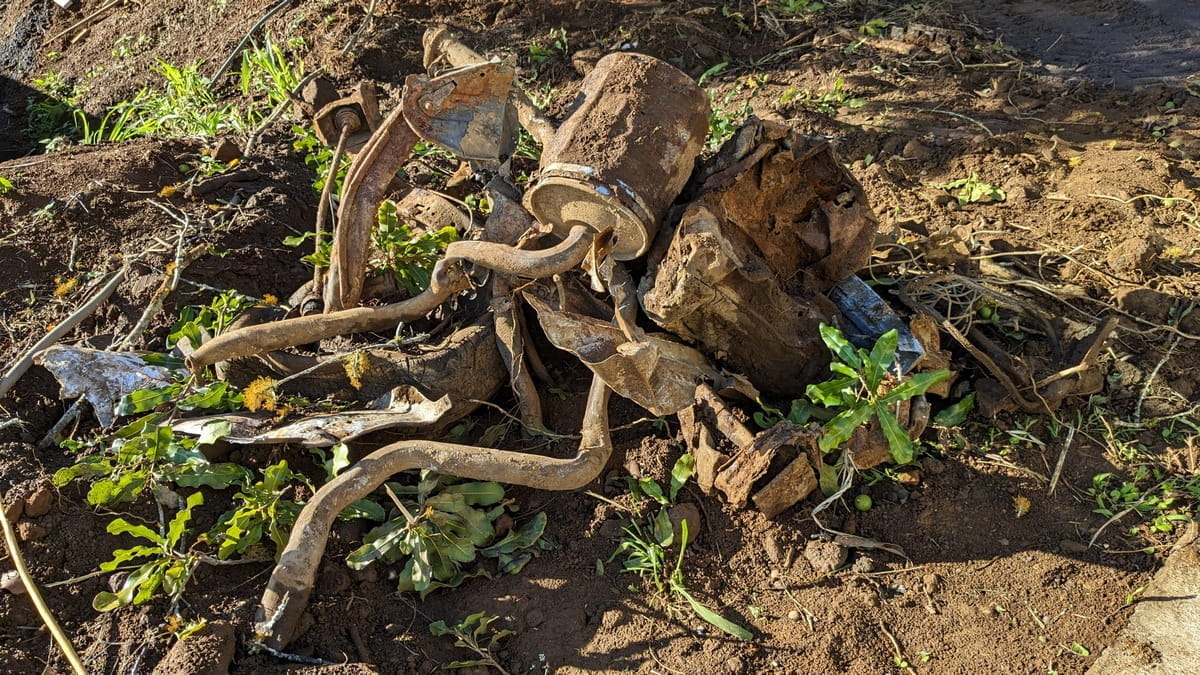
More Rubbish!
A buried Toyota?
While digging up the stumps, more rubbish was found. In this case, part of a car - the front swing arm with tire attached as well as some of the exhaust system. The amount of rubbish dug up has been appalling. So far the dead refrigerator count is up to 46. Most of them were small 'cube' refrigerators from some sort of hotel renovation. They were all dead and most of them were just the remains that we found on the surface of the ground when we cleared out the tall Guinea grass. The last three refrigerators, though, were full sized and dug up with the excavator from several feet under ground. Which to me, seems to mean it was done with either way too much shovel work or someone with heavy equipment was using this yard as a rubbish dump. It had been a vacant property for twenty six years or so before we bought it and the whole back yard had been so overgrown I'd not go back there without a cellphone in case I needed to call for rescue, but that doesn't mean it should be used as a rubbish dump. Oh well, we're digging the rubbish up as it's found and hauling it off.
Some of it was buried on purpose, though. All around the "Avocado Plateau" it is lined with old tires, cut off laundry line posts, dead ladders, etc. to reinforce the hillside. All of that then had old tin roofing strapped over it with some hefty steel cables. So far it's still holding, but at some point that will all be removed and replaced with some sort of stone or brick wall. But, that's a project for later. Back to the project at hand, which is building a new house.
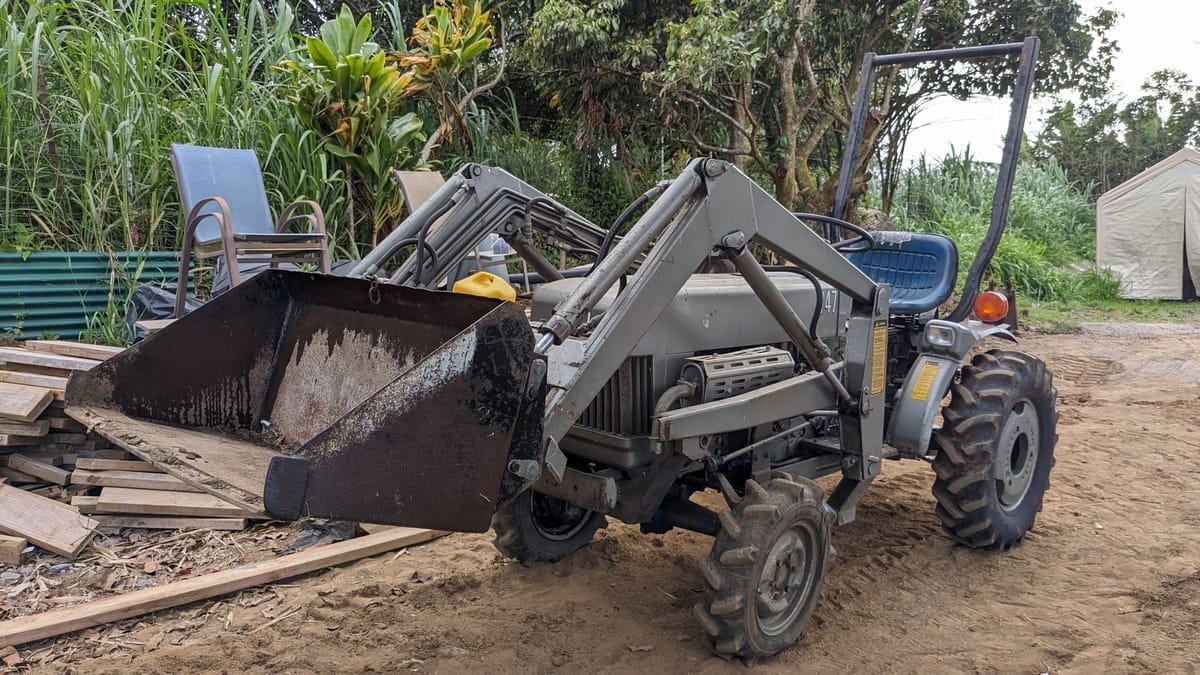
Baby Tractor!
Has a nice front loader, too
Rossini's superpower is acquisitions and today's newest acquisition is a cute new tractor. It's a small Ford tractor, a "1200" I think?, in pretty good condition with a front loader on it. It'll be really useful (after I figure out all the knobs and levers) to move the soil from the bottom of the hill to the top of the hill. Kinda the tractor version of a skid steer.
It's a true tractor, but quite small and cute. From the mid-80's, I think. Runs on diesel, so should have enough torque. Four Wheel Drive, too, that's a huge plus. Also has a three point hitch on the back, not that we have accessories for it (yet). Maybe there's a manual for it somewhere online? I don't want to start it unless I know how to stop it, just turning the key to "off" doesn't shut it down. I think I found the brakes, but not certain. The excavator is easy, no brakes on that! Unless there's power to the tracks, it just stays put. I don't think this little tractor would do the same thing?
At some point, someone painted over the Ford blue with a really nice gray paint job, not sure why? It's got "747" on it's nose and sides. Is that it's nickname, manufacturer's number (not) or from some entity that had a LOT of tractors? Maybe ex-military? They generally like to paint things gray. It might be nice to rig up a sunshade on it somehow. Weld a couple arms out from the roll-over bar and sew up a nice fringed cover? Or just weld on a couple of arms and fasten a bit of plywood to it. Or not do anything and get a farmer straw hat? Every time a bit of new equipment shows up, it takes awhile to integrate it into the herd.
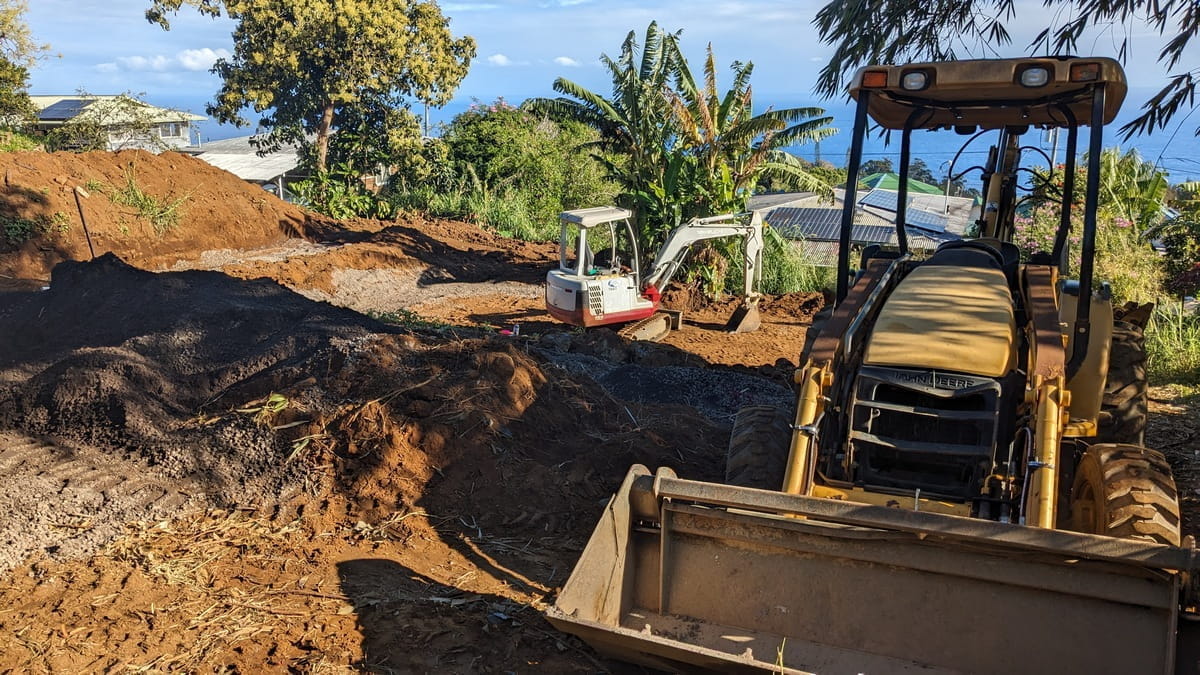
Digger & Friend
A visiting backhoe is very useful
When shifting a lot of gravel, it's really good to have something with a bigger bucket than an excavator. Our friend loaned us his for a couple of days and saved loads of time. Thanks, Miles!

Caterpiller
Every construction site needs a Caterpillar!
So that's a Takeuchi digger and a John Deere backhoe, doesn't every job site also need a Caterpillar? Well, okay, so our caterpiller isn't an official Caterpiller or even an official Cat, but at least we have one? I think this one may become a monarch butterfly at some point, but I'm not certain on that.
Job Site Folks
more important than heavy equipment
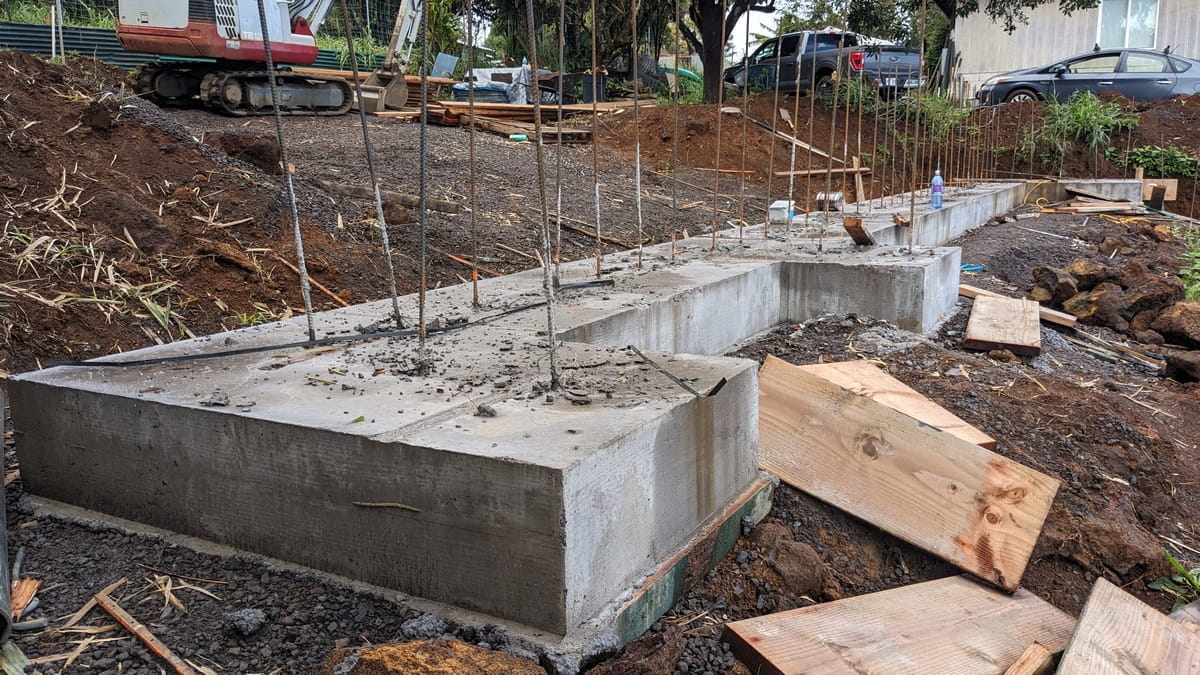
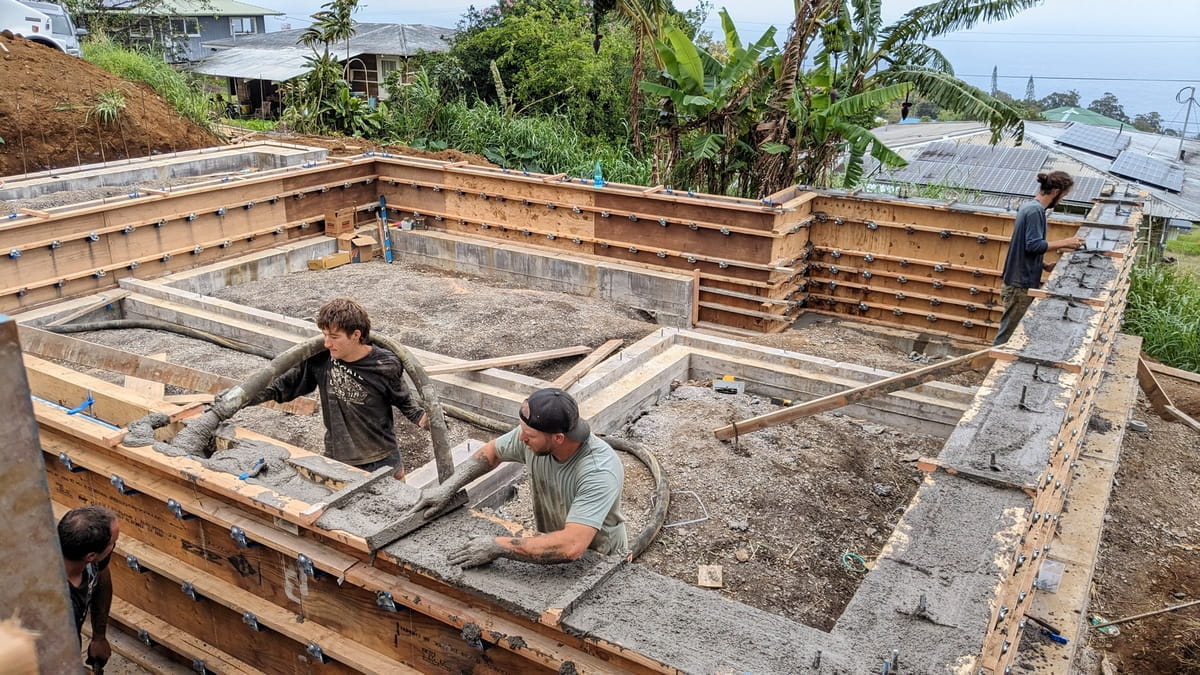
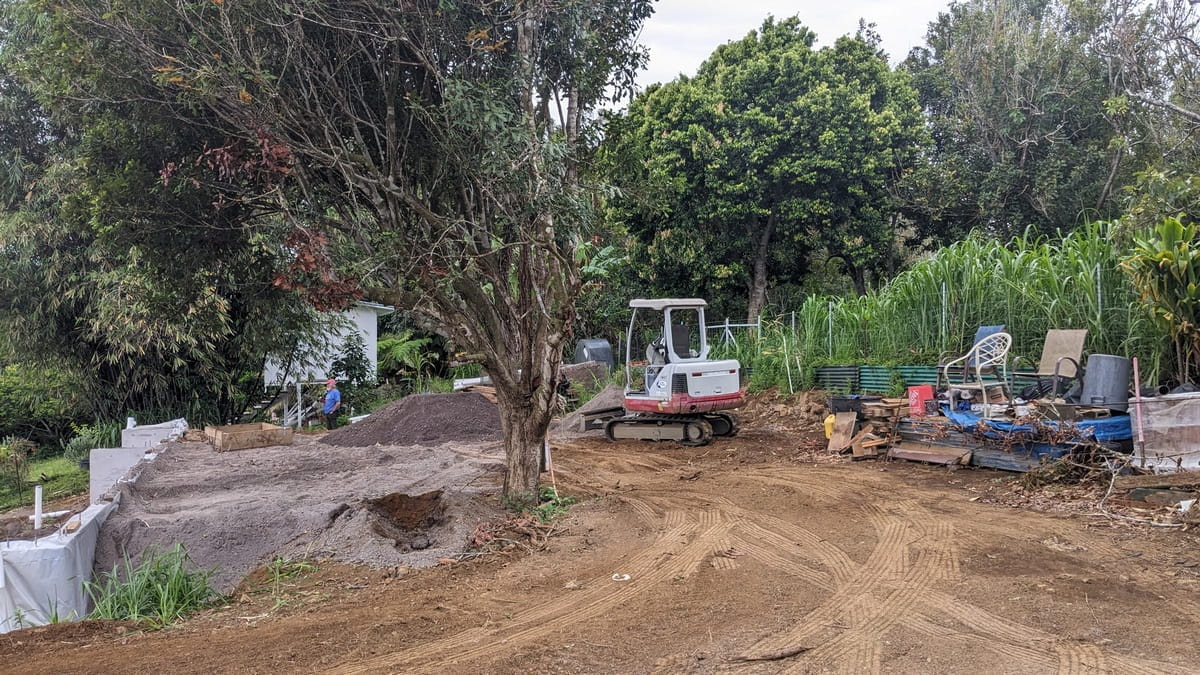
This foundation is a poured concrete foundation. What, on the mainland, would probably be called a "basement". Generally basements aren't common here in Hawaii, not quite sure why. Finding someone to help build it (actually, to build it for us) takes a bit of sleuthing since not everyone is familiar with intricate concrete foundations. Since this build is on a hillside with a slope just under 10% and the Hamakua soil can be slippery, some pretty massive concrete footings are necessary. Not that we're complaining, a lot of places on this island don't have any soil at all, just leaf litter on lava and the soil here is many feet deep. But, it seems slippery and we want the house to be stable. It's got pretty much overkill concrete foundations. This isn't a spec house, we're gonna live in it so it's worth it to us to build it right and not build it for profit.
Since we're building this house as "Owner-Builders" we don't need an actual official licensed in Hawaii contractor. Owner-Builder is a bit more complicated than hiring a contractor and letting him or her find the workers and fuss with all the details but Owner-Builder saves tons of money even though we have to either build it ourselves or hire help for the various parts. The State of Hawaii and County of Hawaii do require that we hire licensed plumbers and electricians, for safety reasons.
This being a fairly small rural island and all, we asked around and one of our a friends had a house built by Nick. Actually, he'd had several houses built by Nick and he's not ready to build the next one so he let us know about Nick. ( Again, "Thanks, Miles!" )

Nick Cook
our main construction man
Nick Cook is our main construction guy along with his cousin, Ethan. Should you be building something in the Hamakua area, give Nick a call at (808) 854-1490. (He's good with texts and email, too.) Here's his email: Mail to: Nick the Builder. It's always good to get someone who knows what they're doing when you're getting a house built.
Generally, the majority of the work is done by just Nick & Ethan so it's careful skilled work although since it's mostly just the two of them, it's not overly fast work. They can go faster when needed, though.
There's other assorted cousins, hanai brothers and others who show up depending on the amount of folks necessary for whatever task is at hand. Most of them are from Paauilo (a nearby small town, not that our town - Honokaa - is all that big) and they seem to be pig hunters in their spare time so other than a source of tasty pig - we will probably need one or two for the house warming party - they're also hardy and will work in almost any weather. They're also pretty adaptable and don't get stressed by much at all. Hmm, I did see some signs of pig digging by the avocado plateau, maybe they can work and pig hunt at the same time? With a side hunt of feral roosters, that'd be really useful! Anyway, I digress (yet again) so back to the builders.
Nick has built quite a few houses and done some on the mainland so he's familiar with complicated concrete foundations. At least, I think it's complicated, I should ask him what he thinks of it. He may not consider it complicated at all. He does seem to end up wearing bits of concrete, though, after each pour as you can tell by the picture.
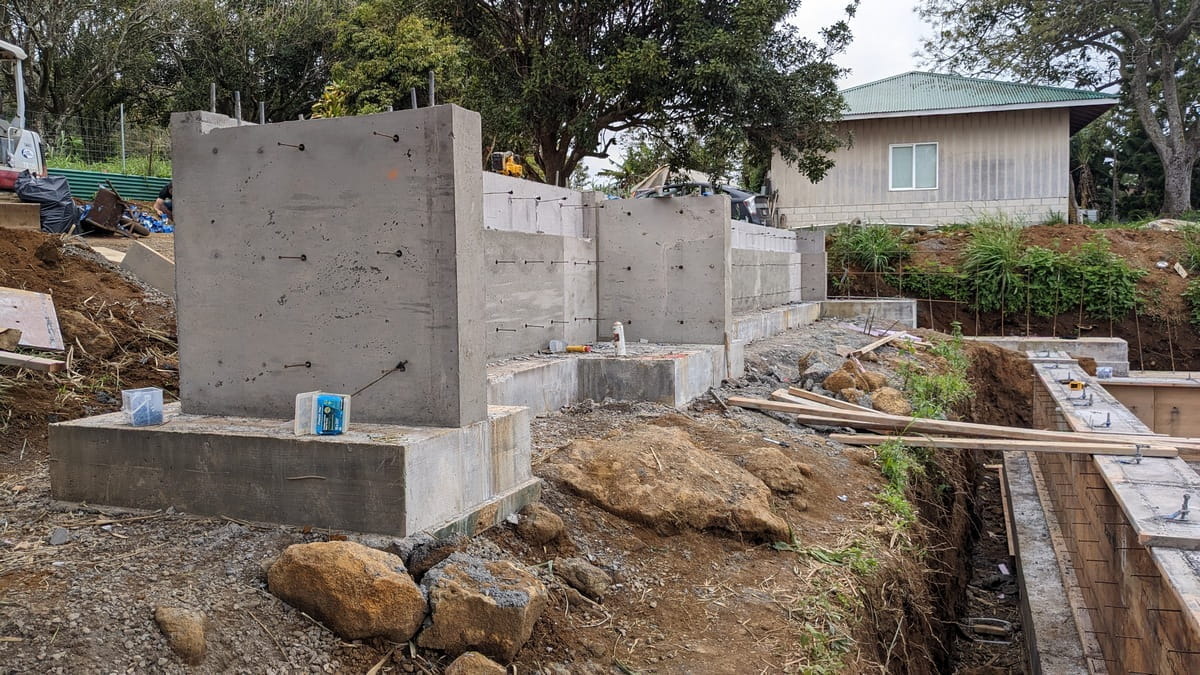
Back Wall Pictures
kinda looking at one spot as it evolves
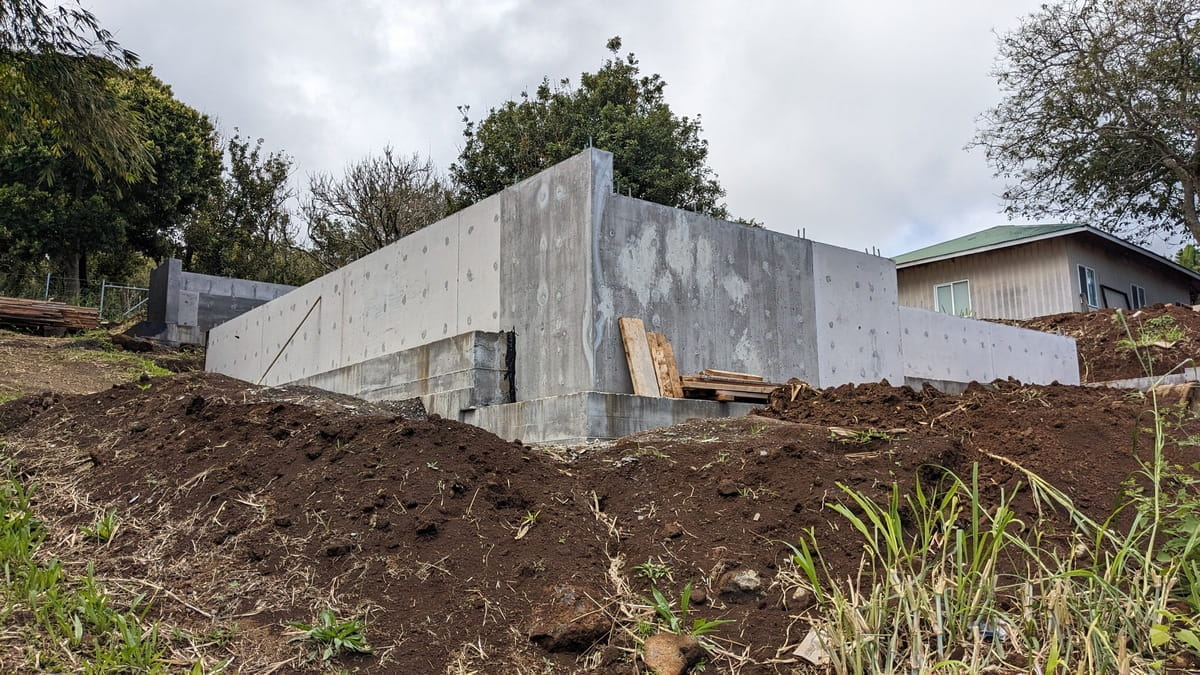
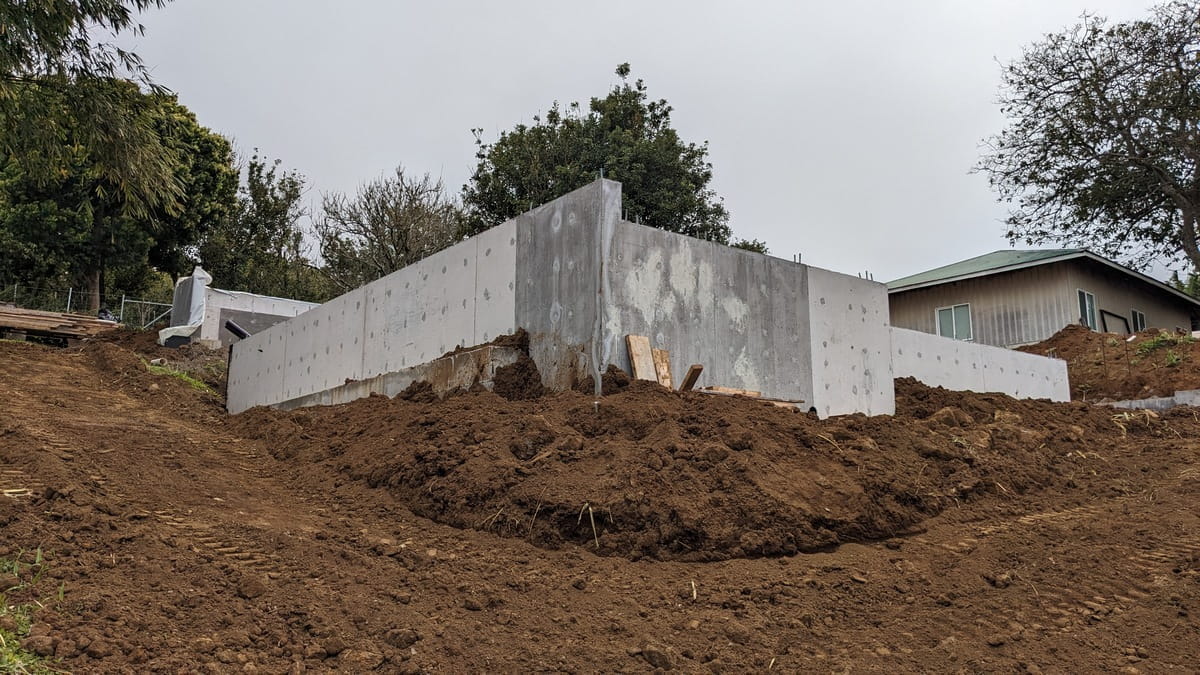
Here's a bunch of pictures of one corner of the foundation from "before" to "now" and "now" is May 20th, 2024. This is the back Mauka corner on the Hilo side of the property. (Standing at the top of the property facing the ocean it'd be on the upper right side.) Basically, this is the main bedroom corner, looking towards the workshop and the avocado plateau. The big tree to the right side of the building (workshop) in the background is the official avocado tree on the Avocado Plateau.
February 19, 2024
the back wall area before concrete
February 19, 2024
digger in the back wall area before concrete
March 13, 2024
forms and rebar ready for concrete
March 16, 2024
footing for the back foundation wall
March 16, 2024
the foundation is at two levels
the upper level is the wall between the house and carport
The horizontal 2x4 sticking out into the air from the upper foundation is approximately where the bottom of the mainfloor floor joists will be. It was placed there to help determine how high the back foundation wall should be in order to have the main floor level with the front lawn. We want a very wheelchair friendly house (just in case) so we will be happy twenty or thirty years from now. We hope to not have any steps to go in or out of the house. Carport floor will hopefully be level with kitchen floor, lanai floor will hopefully be level with interior floor, lawn will hopefully be level with lanai floor decking. No steps anywhere. Well, except up to the loft, there will be steps there. But, we will hopefully be able to get to and all through the main floor of the house without any elevation changes whatsoever. Not even a thresh hold bump if possible.
March 16, 2024
measuring height for back foundation wall
it's best to check these things as the project goes along
March 17, 2024
still taking form boards off
This picture also shows the horizontal 2x4 which is approximately where the bottom of the floor joists will be. The floor joists are 2x12s since they span from the upper back foundation wall at least 12 feet to the back of the lower foundation walls. The area that has the big flat form boards laying on it (in the foreground of the picture) will be half height under house storage for things like kayaks. Might have a water heater there, too.
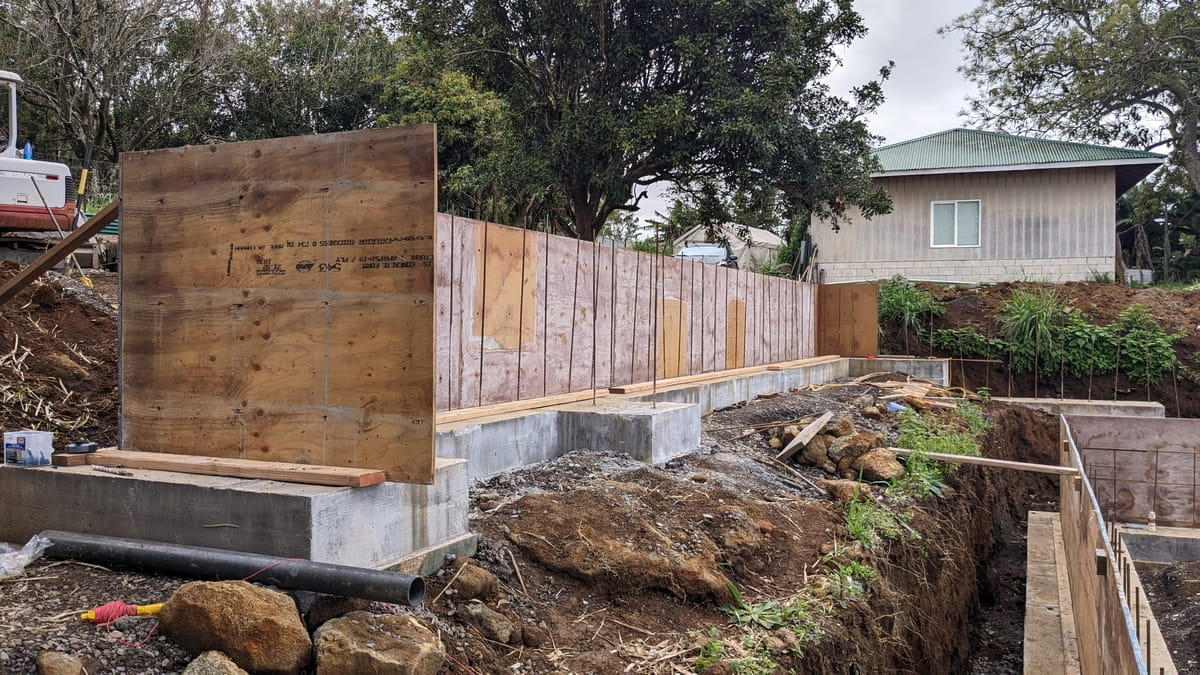
March 19, 2024
forming up the four foot tall back wall
this wall will be between the house and carport
The top of this back wall is the floor level of the carport, kitchen, lanai, interior of the main floor of the house, etc. In front of the back wall will be some underhouse storage area and it will help keep the house cool with ventilation under it. It also provides a wooden floor which is much kinder to feet and knees than a concrete floor.
Snap Ties

March 23rd, 2024
Snap tie brackets but no 2x4 boards on this end of the mauka wall yet
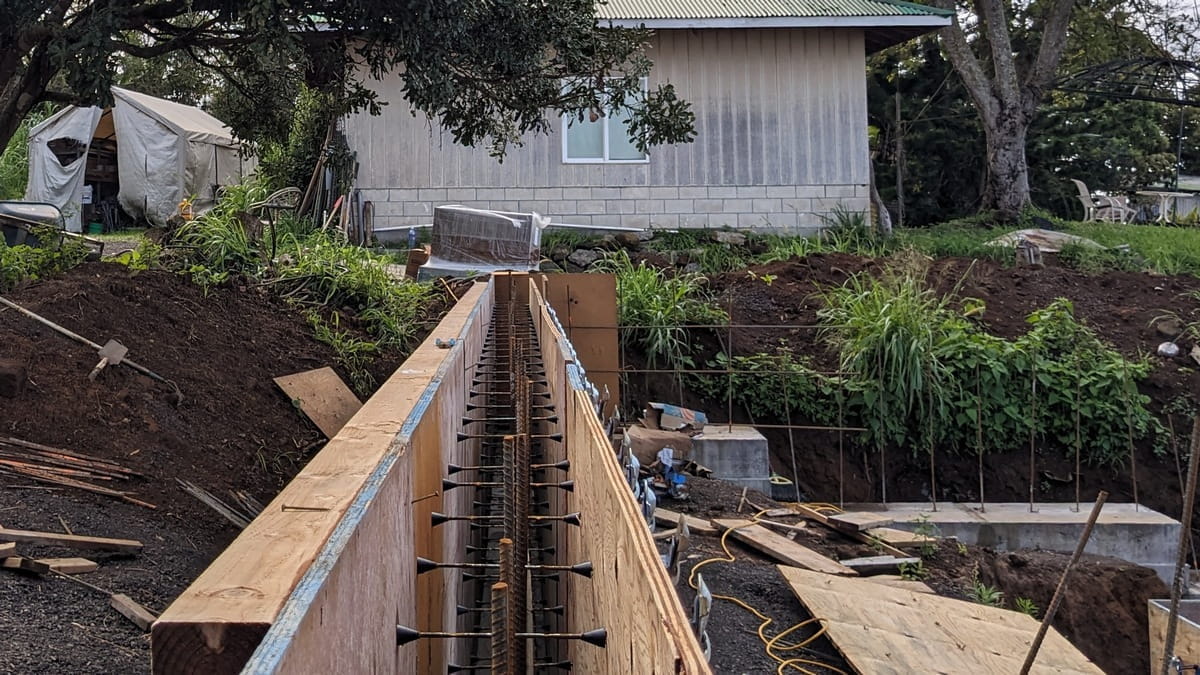
March 22nd, 2024
form boards take awhile, there's a lot of "snapties" which have to be installed
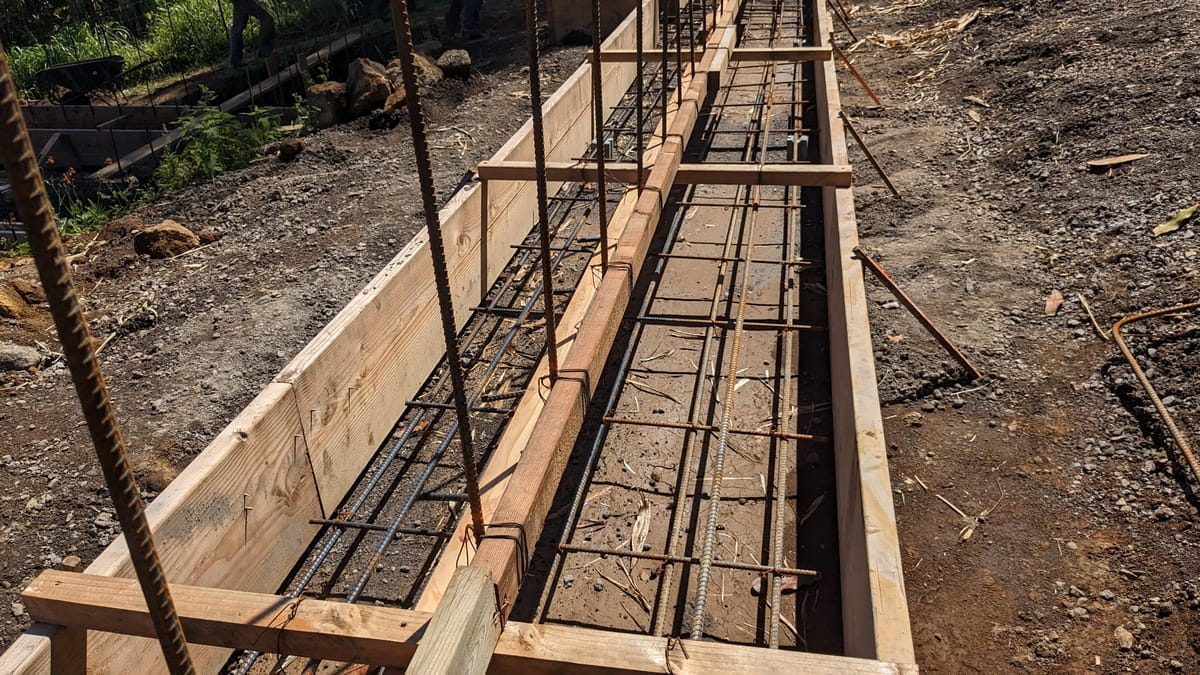
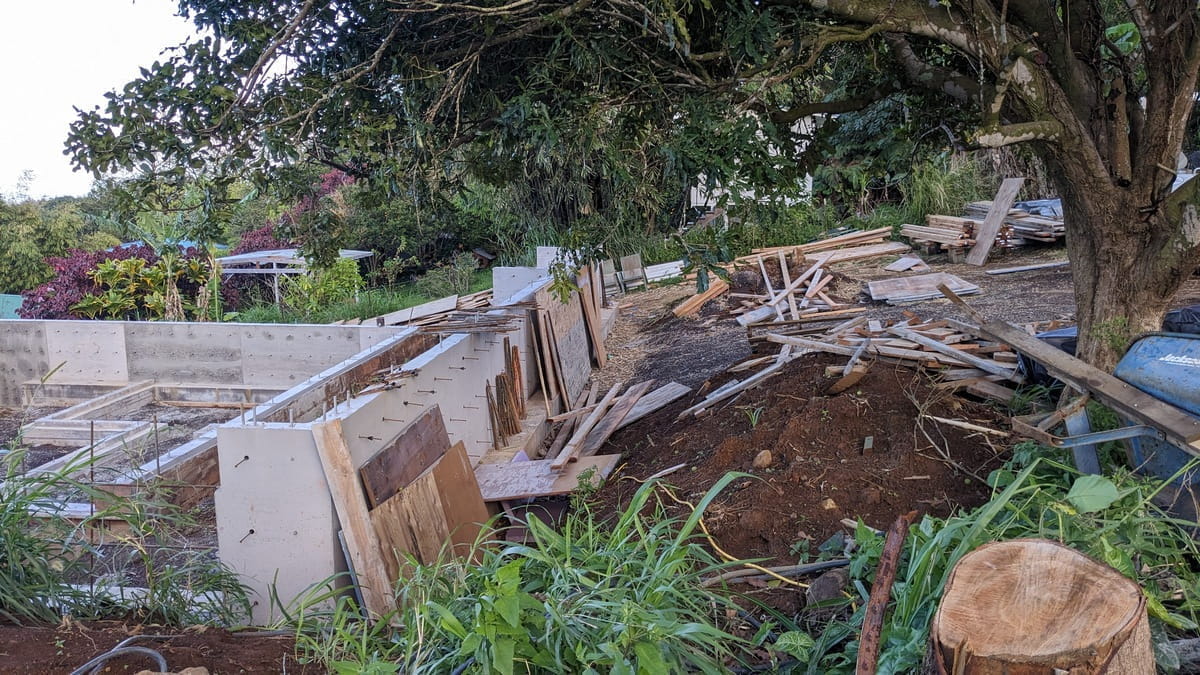
Apparently, there's quite a few different methods of building concrete form boards. Nick, our nice Paauilo builder guy, has a lot of experience building concrete forms since he's done quite a bit of construction work on the mainland. However, this wasn't a system he had used before. This is a "Snap Tie" system and there's basically a bazillion little wire "snap off" ties which hold the form boards apart at a specific width.
Each snap tie is a bit of fairly heavy wire, about the same as three wire coat hangers, if anyone uses metal coat hangers anymore. There's a flattened spot which is supposed to make them easy to snap off. They're put in place, the concrete is poured and when the forms come off, you have a cactus wall with a lot of spikes on it. Each one gets the little black plastic cone pulled or pried out of the hole it makes and then the wire can be bent to 'snap' it off. It takes a bit of a push to get the wire to bend, but not too much. Each individual wire isn't too bad, it's just that there's the basic bazillion of them.
March 22nd, 2024
each one has to be attached to the end of a wire snap tie
There were probably around five hundred of these metal fittings used to hold the form boards and not even the entire job was formed up. Each of these things have to be set on the end of the snap tie as it sticks out of the pukas in the form boards. One on each side of the wall being formed up. Which means there's a LOT of these suckers. Fortunately, they can be rented and we didn't have to buy them all.
The plastic sheeting - which is also in the picture - goes under the concrete slab and the form boards are slathered with the vegetable oil - also in the picture - to help the boards peel off of the concrete afterwards. Some folks use diesel, but cooking oil doesn't smell as much afterwards.
March 22nd, 2024
Very blue snap tie holders
March 22nd, 2024
Very blue snap tie holders with the 2x4s added
Each of the snap ties attaches to the end of the snap-tie wire and then clips onto a 2x4. If there weren't so many of them, it'd not be terribly bad, but the sheer quantity necessary to form up a wall is really rather appalling.
April 11th, 2024
"Cactus" wall after the forms are removed
After the forms are removed, it's basically a cactus wall. Loads of somewhat rusty metal stickers all over it. There's a black plastic cone an the base of each metal snap tie sticking out of the concrete. (Plus each one of these silly things have the other end sticking out on the other side of the wall, remember. There's a lot of them!) Some of these cones come out easily, others need to be yanked with a pair of needle nosed pliers. After the black cones are out, then the snap ties can be bent enough to break them off. Which they do after just a little bit of somewhat forceful but not horridly forceful persuasion so it's a workable system, it's just that there are so many of them so each 'easy' step has to be repeated over and over and over.
After the snap ties are broken off, then the wall ends up being covered with little holes that have a bit of broken off and frequently somewhat rusty wire at the bottom of each one. Which then means some mortar mix is mixed up and smooshed into each hole. One after the other after the other, etc., ad nauseum. Again, not a difficult task but there's so many holes to fill! Nick says he had a better method when building these sorts of foundations on the mainland, but apparently the parts for that method aren't available on island. Somewhat typical with islands, actually.
March 26th, 2024
it's finally beginning to look like a construction site!

March 21st, 2024
It was a really rainy spring
Fortunately, Nick & Ethan are waterproof. They worked for almost a week in solid all day rain! They didn't shrink, melt, catch cold or even slow down the work. Amazing! What you don't see in the picture is their boardshorts (Hawaiian swimtrunks) that they wear on rainy days.
This picture is the other end of the back wall between the carport and house, this is the same wall that has been in the past few pictures. In this picture, the form boards are up but those crazy blue brackets aren't there yet. In the rain, Nick and Ethan were installing hundreds of the crazy things.
April 26th, 2024
black waterproofing paint for the concrete
The back wall got black waterproofing paint as well as plastic wrap and a french drain, but you can't see the drain or wrap in this picture.
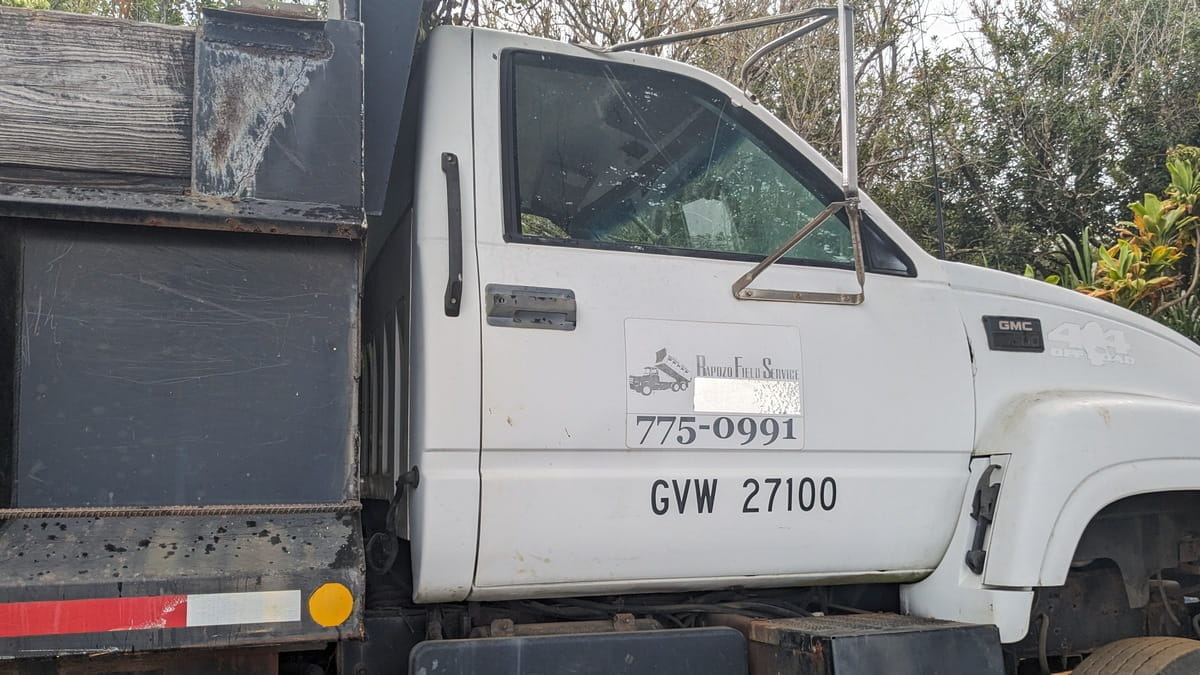
Tyrone Rapoza
Bringer of Rocks
That's should be his official name, don'tcha think? The 'Bringer of Rocks' is usually Tyrone with his white truck. He's brought us a lot of rock so far. He's really responsive, sometimes within a half hour of calling him he's here with a load of rock and his truck can make it up our steep driveway as well as up the rough patch of not-quite pavement at the front of our road. There have been a few delivery trucks that haven't been able to make it but Tyrone is dependable.
Whenever we call him, he appears quickly!
"Rapoza Field Service" is written on the truck along with "775-0991" although now folks have to use the area code of "808" in front of phone numbers. If you're in the Hamakua area and need a load of gravel or rock, Tyrone can help you out.

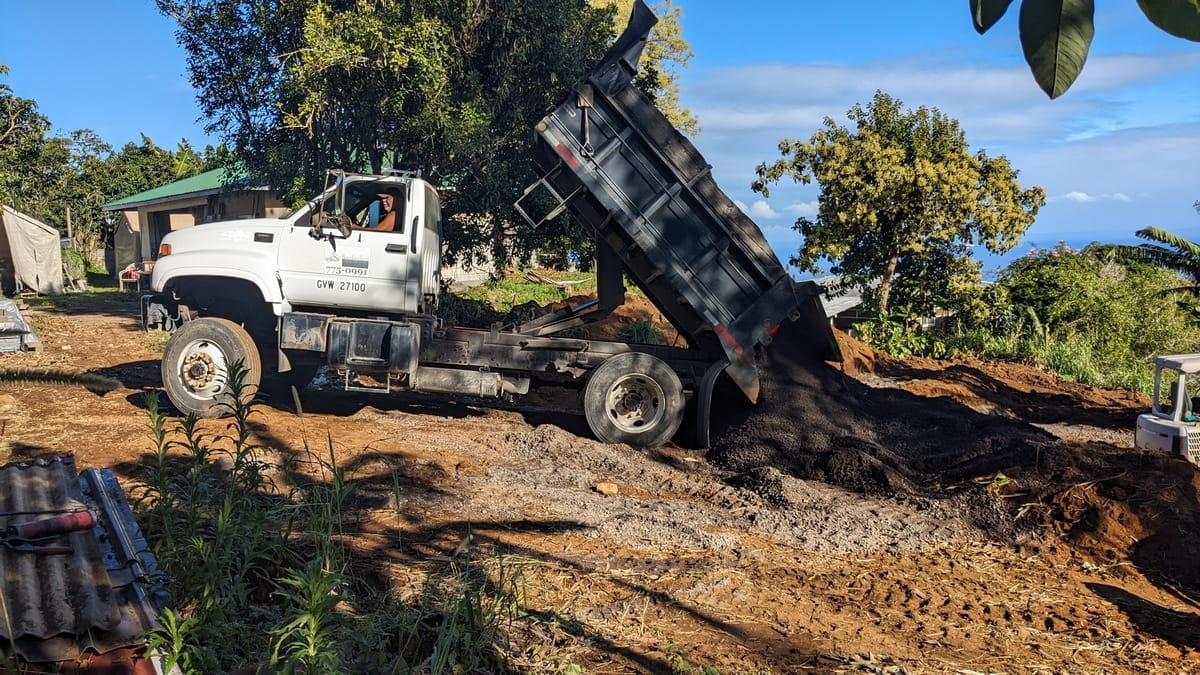
April 23rd, 2024
it's a truck eating mac nut tree!
It had been raining for several days and the whole place was muddy. Tyrone got the truck up the hill and delivered the load of rock. However, when he was heading out, he'd not known that I'd dug up a big pile of rubbish as well as a big pair of tree stumps out from near the mac nut tree so the soggy ground had a soft hole area as well. The hole had been filled in, but not compacted. Between the mud, the hole and the grabby mac nut tree, he was stuck for a bit. Didn't take long to convince the tree to let go, though. Tyrone is pretty resourceful and we also had an excavator with tracks and a long heavy chain, so a bit of work and *poof* he's off to get another load of rock.
April 22nd, 2024
one of the first loads of rock

May 10th, 2024
other rock truck who can get up the driveway
The other truck delivery drivers who have been able to make it up the driveway are the Deluz drivers. Sometimes there's some sort of aggregate that Tyrone can't get - it seems to depend on which quarry's rock crusher is functional or some such. Apparently, the different trucking companies sometimes keep a supply of different types of rocks and if the rock crusher isn't working for whichever type of rock is wanted, if they have some at their base yard, they can still bring it.
That dark pile of aggregate in the picture is 'sand'. Not the yellow stuff you may expect, but finely ground lava rock. This is a volcanic island - the only type of rock we have around here is lava rock in all of it's various forms and colors. None of which are sandy yellow.
The sand crusher was broken and waiting for parts from the mainland. Tyrone didn't have a stash of sand but the Deluz folks did. They initially sent up a much bigger truck, but it wasn't able to make the tight turn at the bottom of the driveway so it wasn't able to get to the job site. The next day, a smaller truck was able to arrive so we had the sand to put under the drains. Deluz is a bigger operation than Tyrone so there's more scheduling involved than just calling Tyrone and having him appear. I guess all job sites have their own logistic issues.
In the picture, his back tires are just about ready to go across the area that used to have the two big tree stumps. That whole corner has been cleared out so it's more truck accessible, but it's still a pretty tight project site. Not sure how the big lumber trucks are gonna do when they start trying to deliver 24 foot long (6 meter) 4x12s for the roof beams. But, that's further in the project and we're not worrying about those just yet.
When doing a project of this nature, it's best to sorta think of the overview of the entire enchilada but stay focussed on the project at hand. Otherwise it can become pretty overwhelming. It's a monster project, but ya only gotta do one step at a time.
No specific day, 2024
Various piles of rocks
Takes a lot of different types of rocks to build a house. There's "drain" rock, which is bigger rocks - those lighter colored ones in the back. There's also "3/4 inch minus" which seems to be the general purpose to be put under foundations and concrete slabs. Then there's "sand" which is really finely ground lava rock and that seems to mostly go around pipes. There's also the big rocks we dig up occasionally, and I carefully save them for landscaping use later. They aren't particularly hard rocks, but they will be good for hardening edges of hillsides, maybe stacking up for a short garden wall or who knows? I'm sure we will find something for them to do eventually.
The various rock piles seem to shift around and come and go in a surprisingly fast way. Tyrone can drop a load of rocks and they can be shifted into place before he has time to come back with more. Then, sometimes, the pile of rocks will be hanging out for a much longer time before it shifts away to where ever it is supposed to go. I think our acquisition of rock piles will slow down pretty soon, though, once we shift away from foundations and get to framing. But, we're not quite there yet.
April 24th, 2024
Ready for Drains
Drainage is pretty important and frequently isn't really thought about much on this island. For most of the island, instead of soil there's lava rock with just a thin layer of some sort of decayed leaves on the top. This doesn't hold water well at all so drainage isn't really a problem for those areas of the island since all the rainfall just vanishes. Here along the Hamakua coast, though, we not only have soil, but we have deep soil so we want to put in a drainage system.
We are also building a non-standard house which has ZERO elevation changes between the exterior and interior. Since we don't want rainwater wandering into the house, it's pretty critical to put in some good drainage.
The back foundation wall is four feet high and has a layer of drain rock along the bottom edge. It's also been painted with black waterproof paint.
Initially, we had thought the French drain on top of the foundations for the wall would be okay, then decided it would be better if they were below the footings so we had to go back and dig them deeper. Which, with the digger, isn't that bad of a task. It's actually kinda fun to run the digger, especially with an audio book and a pair of headphone. Jane Austen is a good author to listen to while excavating, nice mellow plots without a lot of chaos are a perfect accompaniment to excavation.
(Note: there's a nice app called "Libby" which is free and will let you go to your local library to borrow audiobooks. When they're due, they go home automatically, so never any late fees. You can also access your local library from anywhere on the planet that has internet.)
April 28th, 2024
Ready (again) for Drains
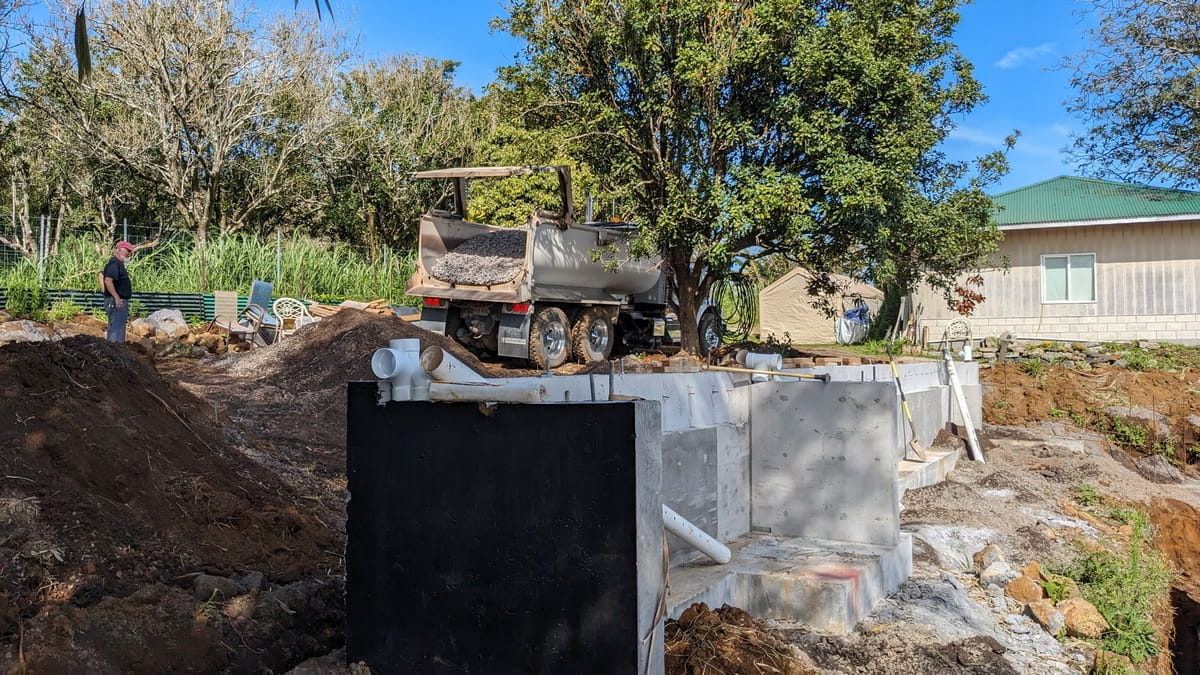
There's drain rock, the perferated pipe, some weed mat cloth to keep out debris, more drain rock, more 3/4" minus (basic gravel) and then lots and lots of 3/4" minus to fill in to the top of the wall in the area which will have the carport. Generally, we've been doing the drains. Nick & Crew have been doing the concrete stuff.
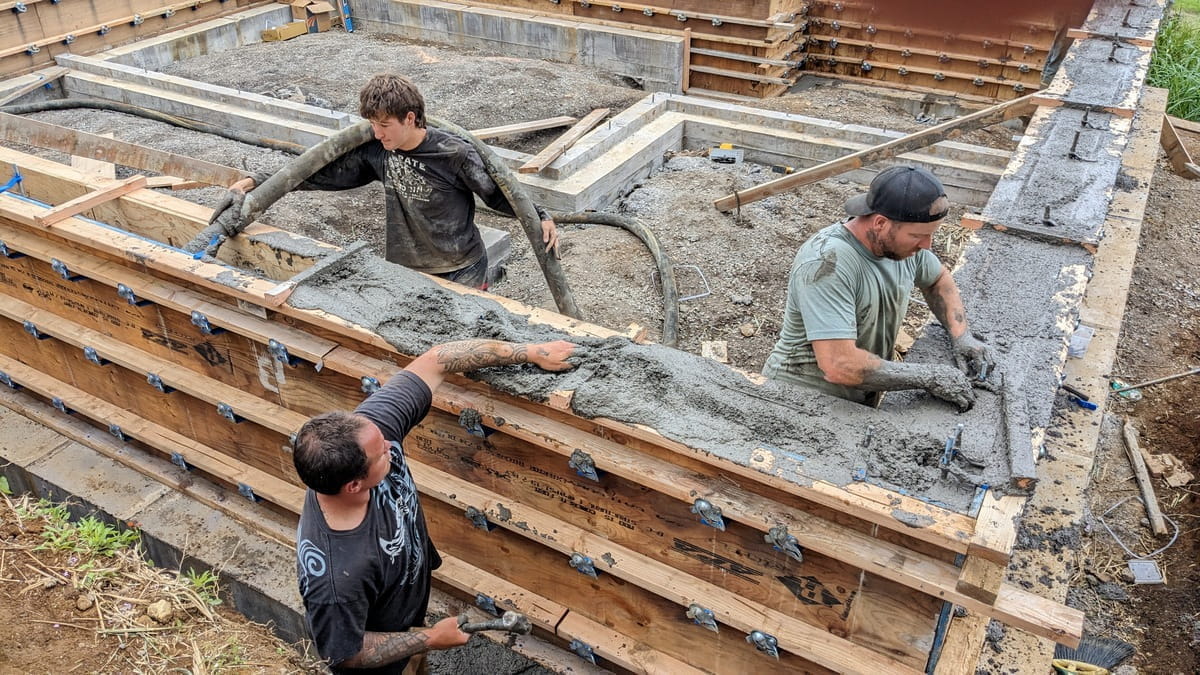
Pouring Concrete
Messy!
March 13th, 2024
First concrete pour for the wall foundations
March 23rd, 2024
second pour - playing with 'mud' again
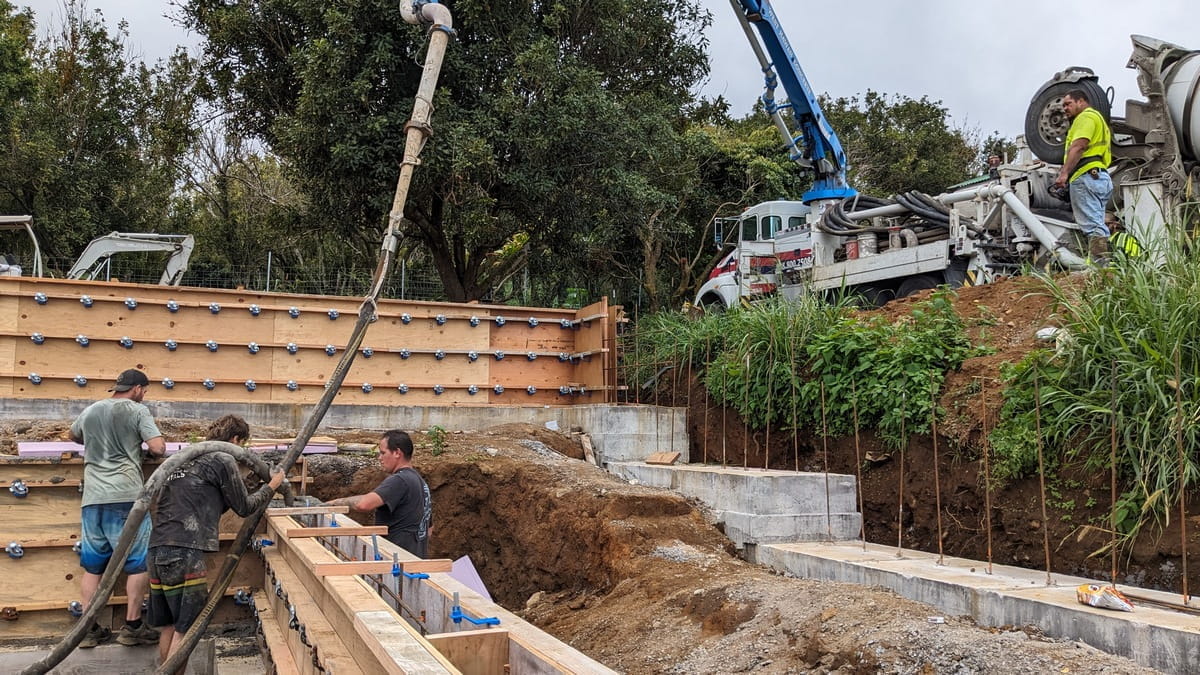
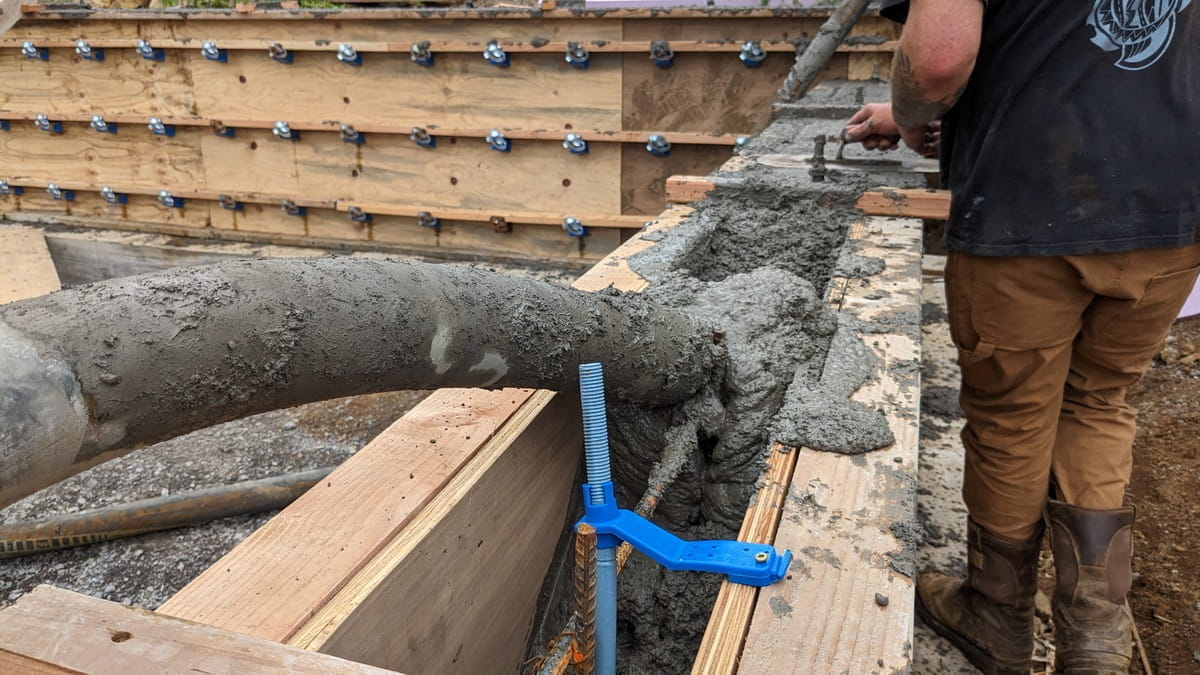
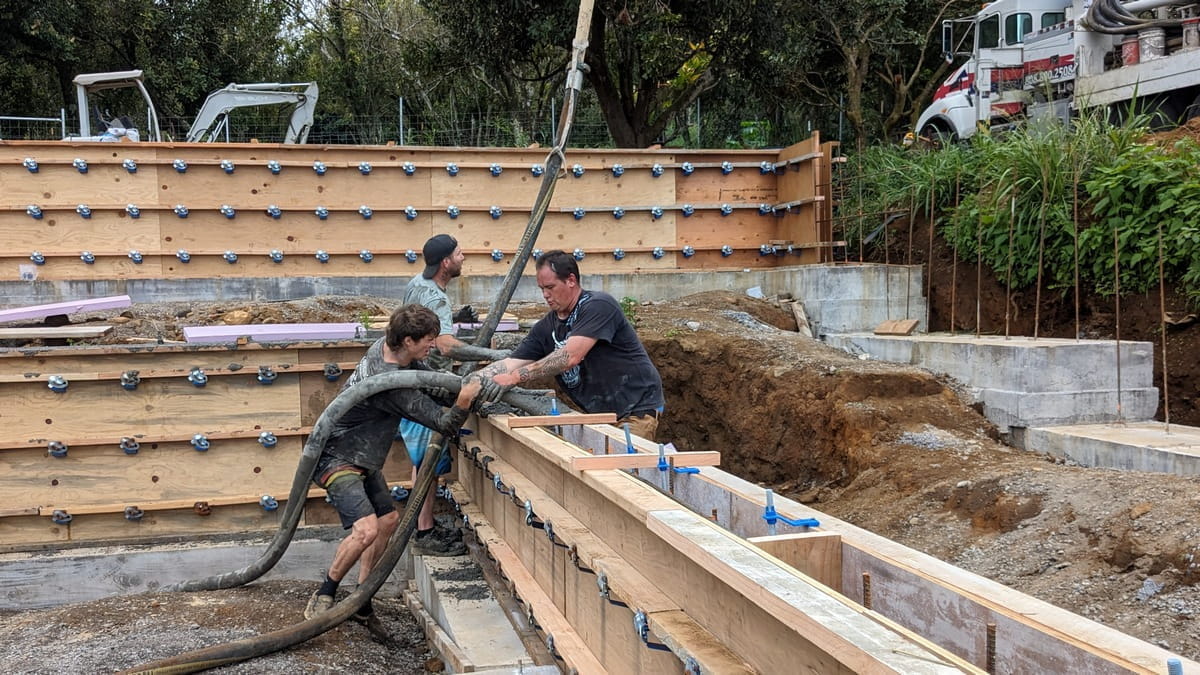
Any more, it seems concrete trucks show up in tandem with a pumper truck. This makes it seriously way easier to install concrete - which is really, really heavy when it can be dispensed out of a hose instead of pushed around as it comes out a chute. It still takes a bit of horsing around to move the end of the hose, but it's way easier than moving the concrete with a shovel. The pumper truck driver has a joystick on the control module which regulates the speed of the flow as well as the big boom that holds the hose way up over the jobsite.
March 23rd, 2024
the business end of the concrete hose
March 23rd, 2024
March 23rd, 2024
March 23rd, 2024
It's a pretty messy business to get concrete installed. Should you be doing it yourself, afterwards it's useful to rinse your hands or whatever body parts got covered with concrete 'mud' with vinegar to re-acidify your skin's pH balance. Concrete is very 'base' and the vinegar helps balance it back to the proper "acid/base" balance. I'm surprised there's not a specific handcreme for concrete workers.
Another note is to wrap the threads of the anchor bolts with masking tape before the pour. It seems inevitable that someone with concrete all over their fingers will need to adjust the bolts and that gets concrete into the threads which will then be a major PITA to remove later. Just sayin'.
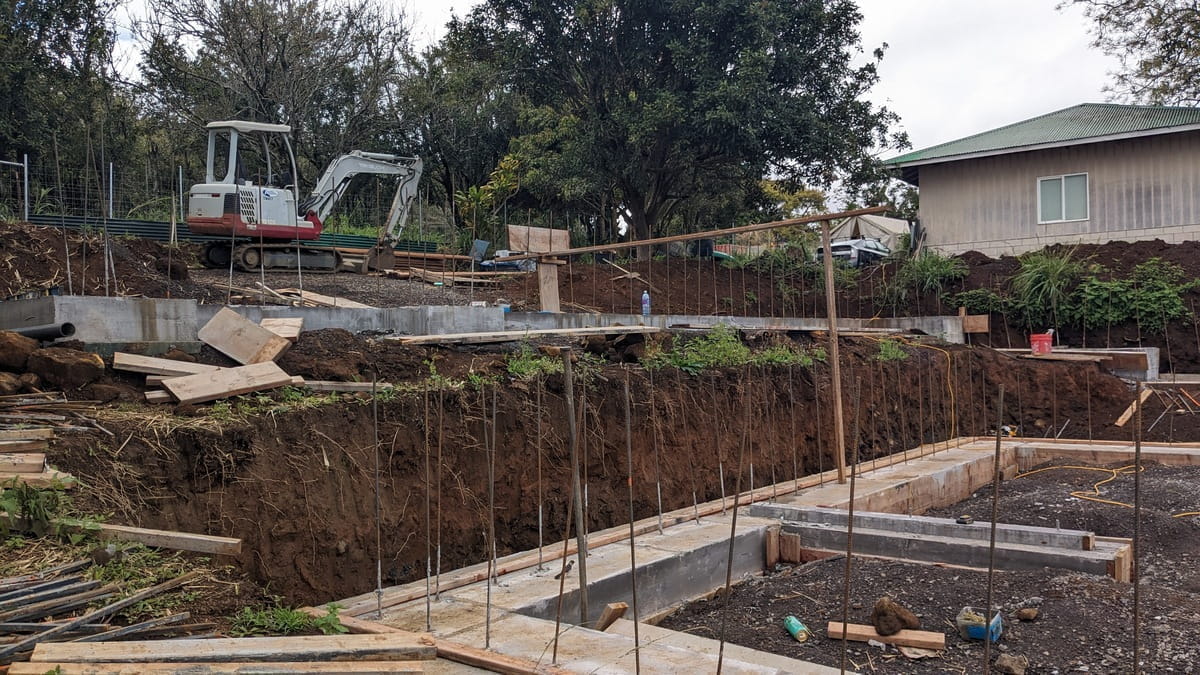
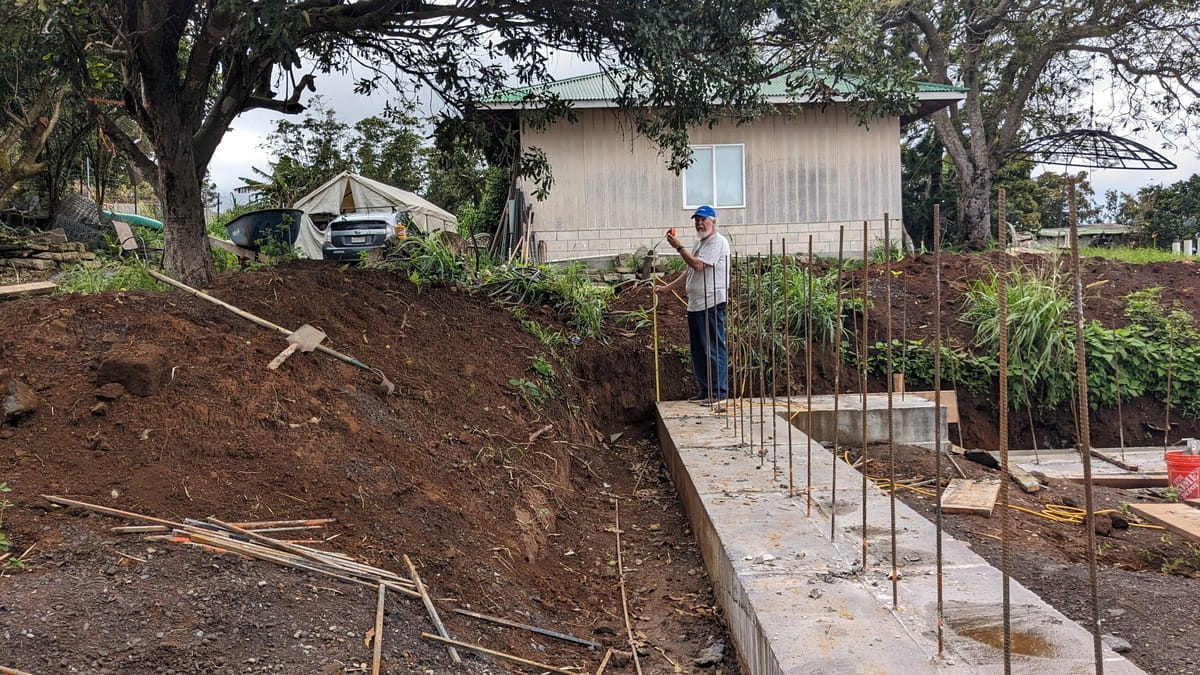
Makai Hilo Corner
For those of you who don't live on islands, especially Hawaii Island (AKA "the Big Island") you may not have run up against the terms "mauka" and "makai". When you live on a more or less round island which has roads which go in a circle around the outer edges of the island, the cardinal directions of "North", "South", etc., used on the mainland aren't so useful here. Mamalahoa Highway (it also has a number but nobody remembers it) goes through all of those mainland cardinal directions at some point in it's circle around the island. It's way more specific to use "Mauka" which means "towards the mountains" or "mountain side" and "Makai" which means "towards the ocean" or "ocean side" when giving directions. We then add in a nearby local geographic feature or town to fill in the other two directions. For this build, if you were standing at the bottom ("makai" ocean side) and looking uphill (mauka), "Hilo" is on the left and "Waipio" is on the right. So the "Makai Hilo" corner is (if you're at the bottom of the hill looking up mauka towards the mountains) the lower left corner.
Of course, for proper 'local' directions, you have to use some sort of long gone local geographic feature when giving directions. Such as "turn mauka at where the avocado tree used to be".
😁
Here's a progression of pictures of the lower left (Mauka Hilo) corner of the new house. I'll not scroll these pictures, so they will stay put until you scroll past them yourself. Not sure if folks like pictures that change or not?
February 3rd, 2024
preparing the initial job site
February 10th, 2024
Still doing the inital ground leveling
During the initial ground leveling, the front corner had a lot of loose soil piled up and compacted, but it still wasn't all that solid. With Nick's advice, the front lower corner was dropped two feet so it would reach undisturbed ground. That's something which is usually called out for under foundations and footings.
February 11th, 2024
still searching for level ground
(it's harder than you'd think with an excavator)
February 19th, 2024
Nick starting digging the footings for the foundation walls
March 3rd, 2024
Searching for the 'undisturbed' soil meant some "interesting" framing at the Hilo Makai corner.

March 19th, 2024
Nick & Ethan just blithely nail 2x4s to the existing concrete footings. Guess I don't do much renovation with concrete, but to me it seems amazing that they can just attach things to concrete without what seems any effort at all.
March 21st, 2024
form boards but not blue fittings yet
Not sure if you notice, but some of those form boards are 1" thick black walnut veneered ply. We'd bought a bunch of fancy plywood for kitchen cabinets, but the walnut veneered ply had termites all through it so it got demoted to concrete form boards. Kinda a one use and trash it out, but there wasn't anything else we could do with it. We'd tried to have it frozen to kill the termites but the ice house anti-termite storage area was booked for the next few months.
March 27th, 2024
doesn't seem alot of progress from the earlier picture, but they've got a big jobsite to work on
April 16th, 2024
looks pretty massive!
April 22nd, 2024
finally took out the banana trees
April 16th, 2024
starting the backfill
There's still a lot of landscaping and back fill which will happen in this corner, but that will happen as the job progresses. Actually, that will happen after the drainage, plumbing and electrical utilites are buried. There will probably be a driveway in there somewhere, too. Most of the delay in backfilling has been the effort to move soil and aggregate with the excavator but now that we have the cute baby tractor with the front loader, it will hopefully be faster to shift soil around.
It's also pretty early in the build to do any sort of final landscaping since there will be trucks, materials and workers all over the place so any plants would be in danger. One rock truck squished some of the neighbor's flowers into smushed green goo (howling ensued, and rightly so!) while making the turn at the lower end of the driveway and that was not good at all. We're taking that as an advisement that we need to wait for a lot less incoming trucks before adding any greenery we want to keep.
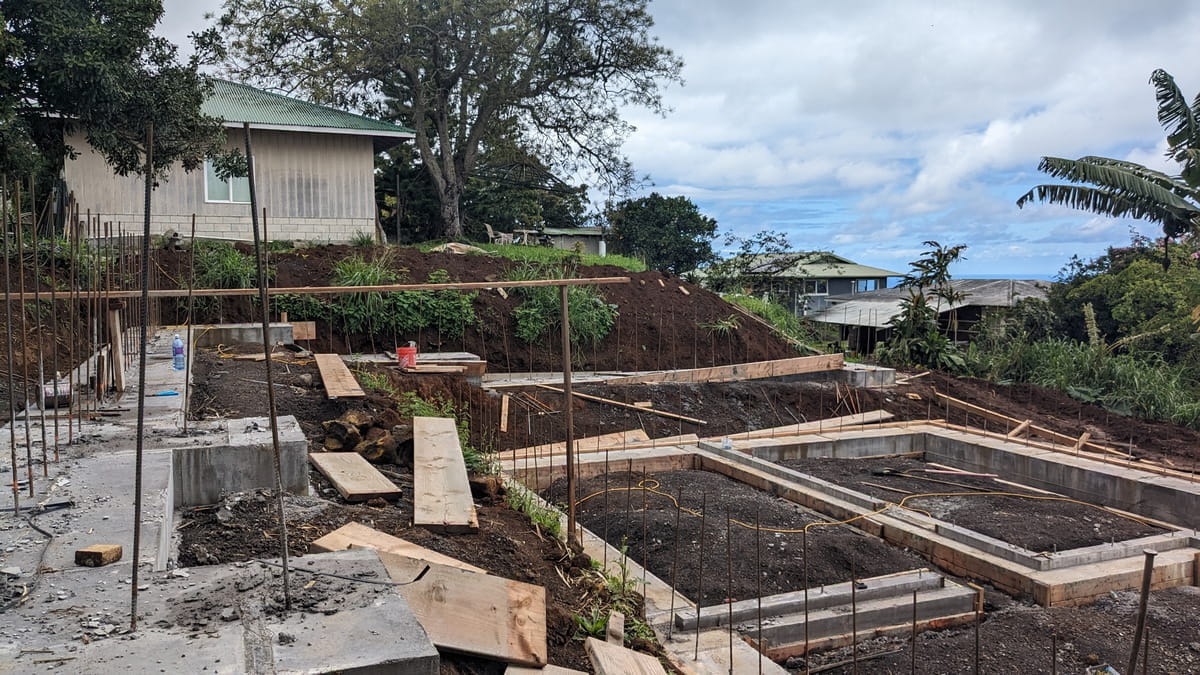
Back Yard
(well, eventually a Back Yard - we hope)
The next set of pictures is of what will eventually be the back yard. Currently, it's the part of the construction site where loads of gravel get dropped, assorted heavy machinery wanders across it and assorted building materials stay for a time. There isn't a lot of room on the jobsite so things are rather in a pile. Periodically, the pile shifts so equipment can get through, then it piles up again. I guess that's actually typical of smaller construction sites?
March 22nd, 2024
it will eventually be a backyard
I envision a garden along the back edge - where the green tin roofing is located at the moment. Probably some sort of raised bed because of the elevation change between this lot and the one in back because the elevation was cut down to make the back yard flat. Maybe a nice raised herb garden outside the kitchen door? Oregano, basil and cilantro? The kitchen door will be under the carport - kinda behind the mac nut tree and the blue wheelbarrow- and to the left of the picture. It will be awhile, though, before any gardening happens here. I can't even put in any trees yet, because of wandering construction vehicles.
April 2nd, 2024
looks more construction site than backyard
The concrete has been poured, the forms are off. The whole area behind that concrete wall will be filled in and made flat. Actually, hopefully, the entire backyard will become flat.
April 24nd, 2024
a rainy month later
The black waterproofing is on the wall and some of it has been backfilled. It's also been raining and it's a muddy, mucky mess, but other than that, things are going along all jolly.
The white building in the background is our neighbor's office. He's up there writing computer programs sometimes. Hope the digger's beeps aren't too annoying. They're good neighbors and we don't want to bother them. The neighbors on the other side are good neighbors, too! The fence on the left is for a mac nut orchard so they're also good neighbors.
May 19th, 2024
filled in some of the back wall
This is about a month later, we've been letting the concrete walls harden up and have been waterproofing, adding a layer of plastic wrap and backfilling them.
The house will be on the left with a driveway on the left of the tree and the back yard to the right. The tree in the foreground is a lychee which may stay but will be pruned short so we can reach the fruit. There will be some gardens in here somewhere.
May 19th, 2024
filled in some of the back wall
Not that you can see it, but there's a french drain at the bottom of the back wall. There will also be a trench drain where the carport slab meets the back house wall. We occasionally get loads of rain, hence the interest in drains. At some point, it may be very important to have them and they're easy enough to install before backfilling the walls.
The tree in the foreground which has had quite a few limbs trimmed off is a mac nut tree. I'm hoping we can keep it since it makes nice dense shade and it takes a long time to grow a tree so saving one is much quicker than growing one.
May 19th, 2024
another view of the back wall
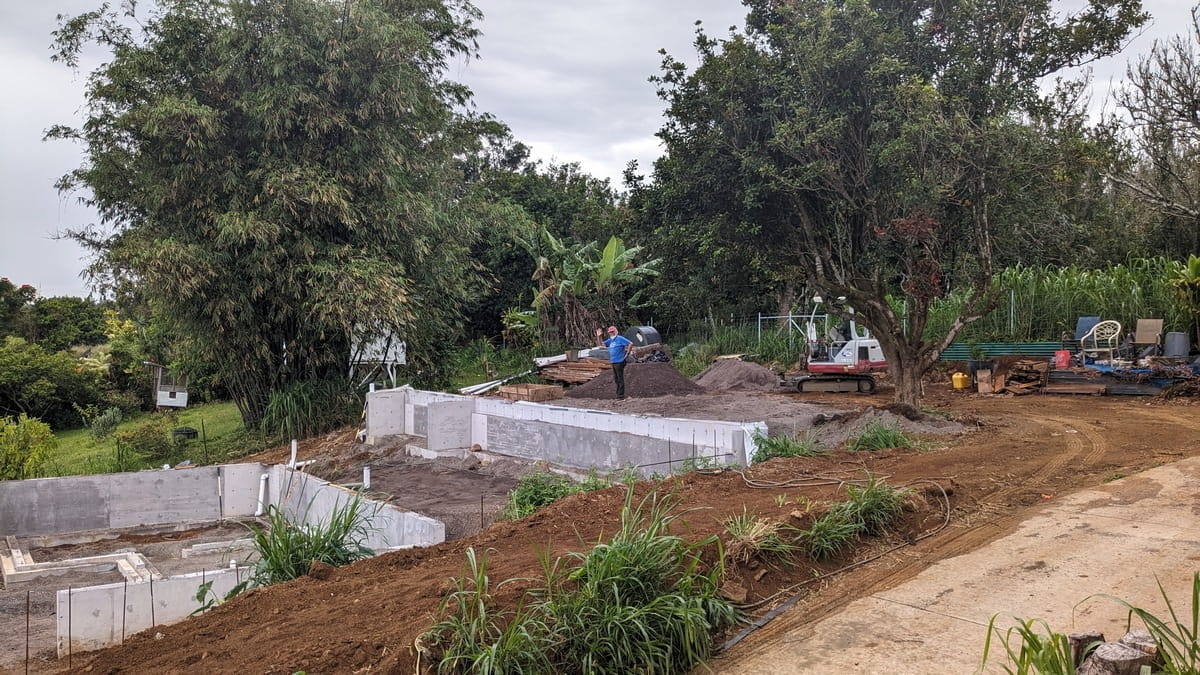
The upper concrete wall is the 'back' wall, it's the foundation wall between the house and the carport. Other than supporting the back wall of the house, it also holds back the hillside, although it's only four feet tall so it's not an official "retaining" wall. In construction, that's an important difference. There will be some wood framing on top of the lower level concrete walls (2" x 6"s @ 12" o.c., should you be interested) to bring the top of those walls up to the level of the upper back wall. Those walls will support the floor joists coming out from the top of the back wall which will be the level of the main floor.
Starting on the right, there's the flat gravel area which will be a covered carport. Ross in the blue shirt is sorta standing in what will be the carport. Then, coming forward from there (towards the ocean) is the back wall which will be supporting the back wall of the house. The floor joists fit on the ledge at the top of that wall so the house floor will be level with the carport slab. No steps. None. Park in a covered rain free area and then wheel whatever groceries or whatever else from the car into the kitchen easily with no steps.
The whole side of the house facing the viewer will be a lanai. There will be a big concrete wall there which isn't framed up or poured yet although you can see some of the rebar sticking up where the wall will be. Eventually, that wall will be waterproofed, drains added and backfilled with gravel and soil. That will be brought level to the top of the wall to make the 'front' lawn, although it's on the side of the house. Sort of in the middle of the lanai will be the dining room 'bump out', which is a big half circle of windows. To the left (and oceanside) of the dining room is the living room. All this will be easier to 'see' when the framing starts.
If you like, you can send us an email and ask about bunnies, yarn, construction, renovation, Hawaii things, what we should have on our webpage or just about anything else.
Mail to: Hillside Farm Hawaii