🔨 📐 The Chandelier Project 📐 🔨
Every construction project needs an oddball sidekick
Or it could be to answer the question: "to bling or not to bling?"
The Chandelier
(after a "bit of work")
The "Bit of Work"

Chandelier in Avocado Tree
(every avo needs a chandelier, don'tcha think?)
I'm not sure if this is a restoration or a resurrection, considering the starting point for this project.
Ross's superpower is acquisitions and there's no telling what will appear next. This chandelier was intercepted on it's way to the landfill a few years ago and Ross originally rescued it for the recycling value of the brass, I think. For awhile - possibly as long as a year or two, it lived in the pile of other acquired things that was in the front yard. Fortunately nasturiums grew over the pile so it wasn't all that noticeable.
However, we got a new yard worker and the nasturtiums got weed whacked so then there was this chandelier sitting in the front yard. So, I took it uphill and hung it in the avocado tree. I thought it would be fun to get some solar lights and have it light up as a chandelier in the avo tree, just never got around to finding solar lights so it mostly just hung there in the tree.

Chandelier no longer in the Avocado Tree
(rust and gravity always win)
After a year or so hanging in the tree, the threaded steel rod in the center of the chandelier obviously rusted through and the whole thing fell apart. Poor thing, I was gathering it up thinking it was time to send it off to the recyclers. It's about forty pounds of brass so it's worth recycling.
Then, I thought about the dining area we're building. It's a half circle and it's going to need a fairly sizeable light fixture in order to fit the space. Light fixtures of that kind and size are expensive and well, there's sorta one here. So I figured I'd take a stab at resurrecting the thing. Worst case scenario, it doesn't work out and forty pounds of brass go off to recycling.

Taking the pieces apart
Just because it fell apart when it fell out of the tree, it didn't all fall to individual pieces. Some of the parts were a bit stubborn about coming apart, but eventually it was all taken down to individual parts.

A Lot to Polish
Once it was all taken apart, there were a lot of pieces to clean and polish. It's got eight arms, eight fat spindle things, three major body parts and an assortment of other bits and bobs. All of which were really tarnished and needed some serious cleaning and polishing.
But! After years of abuse, it is reviveable! Ha! Try that with the cheap stuff being sold everywhere these days. At one point, this would have been an expensive light fixture - it is forty or more pounds of solid brass, after all - and replacing it with something similar would probably not only be expensive but be very expensive. Although I haven't a clue where we would go to find one, this being an island and all, we don't have a whole lot of chandelier shops just laying around.

Testing Polishing Methods
(not that any of them were easy)
Due to the level of original corrosion, it took a bit more than Brasso to get it cleaned and shiny. Salt & lemon worked to cut some of the corrosion. Steel wool worked pretty well, too. 00 steel wool to start and 0000 steel wool to get it shiny worked fairly well. A buffing wheel didn't work as well as I'd hoped. Brasso is good to polish clean and almost shiny brass, not so good for abused brass. Most of getting it clean and shiny was just sheer persistence, though. So, I learned that if you're polishing brass, as long as you're persistent, pick whatever method you like best.
It will probably be allowed to go back to an "old brass" finish, the sort of golden brownish brass color of unpolished brass and not the shiny golden brass that requires a lot of polishing. Clean and shiny is a good starting point but a lot of work to keep it there. If I really wanted it to stay shiny golden, I'd clean it and then gild it with gold, but I've never tried gilding anything before so I don't know how hard that would be. Gold is a touch expensive at the moment, too, so I'll save that for the next time I want to restore this light fixture, if it ever needs it again.
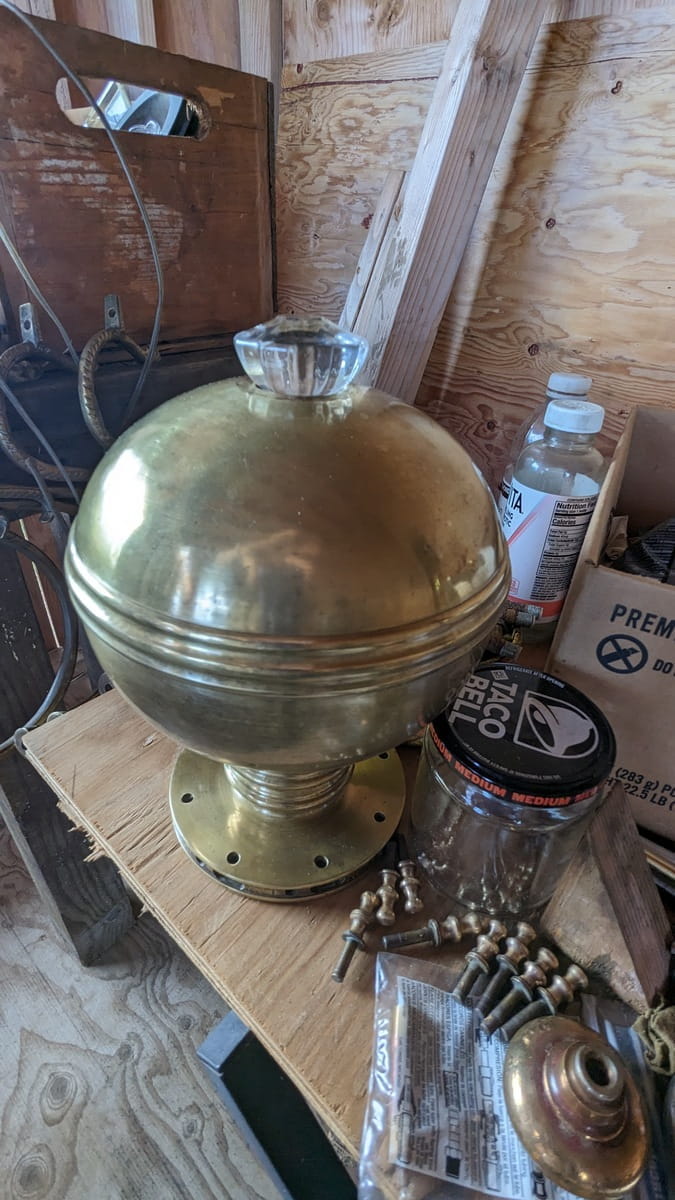

Missing Bottom Loop Replacement Options
At this point, it was discovered that a part was missing. There's a big brass loop which originally was on the bottom of the chandelier. Very similar to the one on the top of the chandelier. That is a threaded loop that attaches to the threaded steel rod through the center of the chandelier that holds the whole thing together. It's 3/8" threaded rod so a door knob would fit on it. There's a choice between a glass or brass door knob unless the original loop can be found somewhere out in the yard but the area had been mowed and some landscaping had been done.

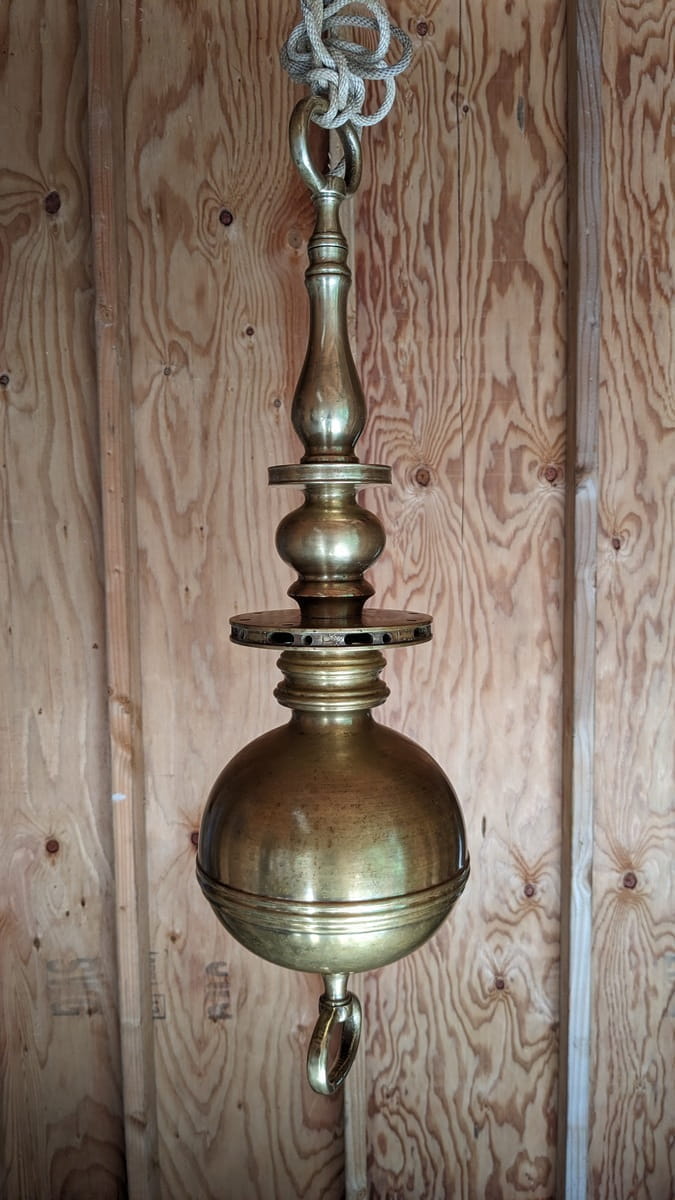
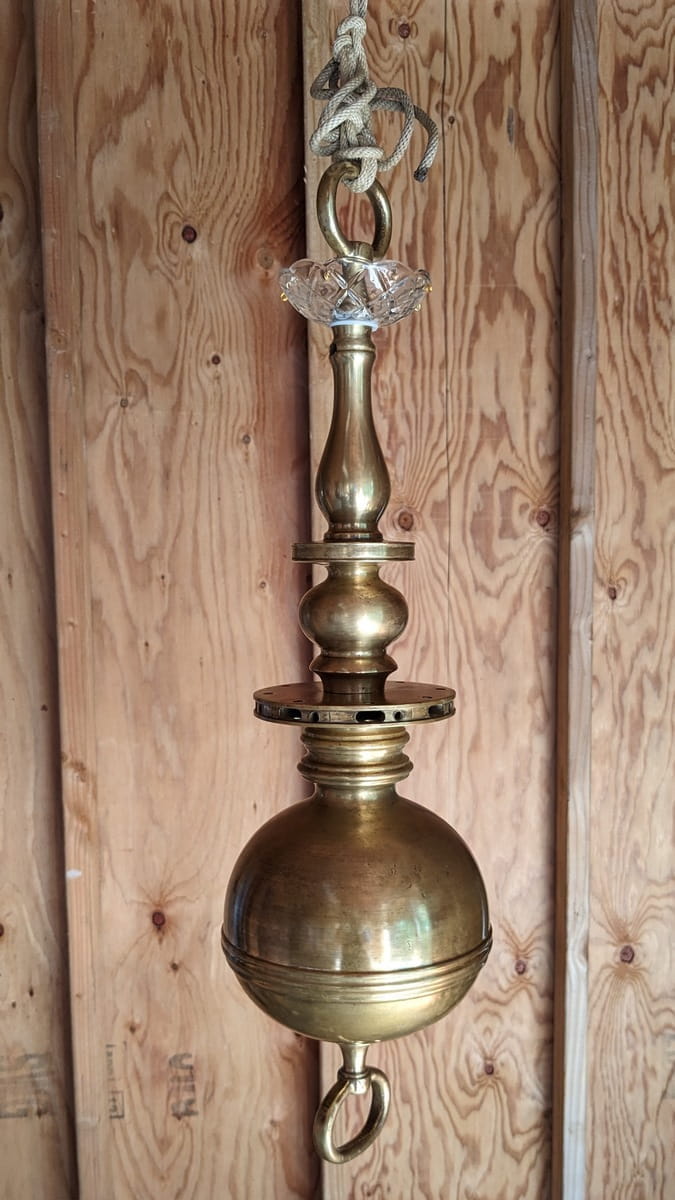
Starting Reassembly
(or just hanging around?)
The steel rod is still way too long in the picture, but until the final parts are all together, it's unknown how far to trim it back.
Most of the light fixture is made of very heavy brass, but there is a steel rod that goes through the center which holds the whole thing together. The steel rod is also the part that rusted through (after years of chandelier abuse) when it fell out of the avocado tree. It was actually easy to get another steel rod from our local hardware store since it's a standard size and not anything specific to chandeliers or other light fixtures.
The brass doorknob almost looks okay, although it should possibly have some sort of collar or something. It seems a bit more "squashed" than the rest of the fixture. It needs to have something on the bottom of the steel rod to hold it all together and the door knob has the right inside threads to fit the rod and sorta matches the chandelier. Better looking than a plain nut and washer at least.

Missing Bottom Loop
Serious "Yay!" The Missing Loop is found!
At some point, most of the Avocado Plateau had been carpeted. Yup, carpeted. I suppose it's a good way to keep weeds down and not have to mow as much? It probably came from a hotel renovation, but it's been there for years and it is now covered with leaves and a layer of dirt and grasses and it shows through in areas and it just doesn't seem right. So, it's being dug up and put in a pile. While that pile was being moved, the missing chandelier loop fell out of it. Woot! The Missing is Found! Ha!
Fitting it all back together
Now that all the parts are found, cleaned, and polished, it's time to try to fit it all back together again into some sort of chandelier shape. To make it more interesting, during the polishing parts phase (it took several weeks to get them all polished), we went to a yard sale and found even more chandelier parts. There was also a box and a bag of chandelier crystals from a previous yard sale from several years ago, those have been found and added to the "chandelier parts" pileup. It's probably gone from about a forty pound light fixture to at least a fifty pound one. (Which is 22.37 kilograms for most of the world.)

Yard sale treasures!
(and your new word for today is "bobèche")
You can find anything at a yard sale! And what we found were bobèches. New word for today! It's the little candle drip collector that you find under candles. Looks like a French word to me and it's kinda fun to say, too, should you be really bored? Well, in any case, we found six of them at a yard sale along with some other chandelier parts.
Testing Various Configurations
("to bling or not to bling?")
Since it's been taken down to just a pile of parts, it can be reassembled in a variety of different ways. The original fixture was all brass with brass bobèches. Rather plain looking and a brass bobèche won't let light through so there'd be dark spots on the table below. Not that we have ever seen it lit up before, but it seems there would be. Plus, I like "bling" so why not have crystal bobèches?
Since we only found six of them at the yard sale, we needed two more. Even though there's no chandelier shop (that we know of) on the island, there's still the internet so we looked around there and voilà! Grand Brass Lamp Parts! They have the exact same ones as we found at the yard sale. They also had lovely braid covered wire to rewire the fixture as well as other assorted parts. We needed new candle sockets as well as the candle shaped socket covers, hanging chain, grommets, a whole list of oddball parts. And Grand Brass Lamp Parts had them all.

New Parts
(times eight arms)
Each part of this chandelier was assembled several different ways to see which way looked best. There are an assortment of washers and grommets that were shipped in from Grand Brass Lamp Parts and they really improved the candle arms on the fixture.

Brass AND Crystal Bobèche?
I didn't really think this was going to look good, but all the parts were there so it seemed worth a try. But, no, not a good look. Plus it's then back to the solid bobèche which will make shadows on the table. Assuming of course, that this thing gets finished, working and hung up.

Crystal Bobèches are Best
(Ha! We knew that!)
Well, just as suspected, it's way better without the metal ones. It seems a lot more airy and less cumbersome without the metal pans. So, now the basic assembly is figured out, it just needs to have all eight arms assembled and put into place.
Fitting it into the Dining Area
Now that the fixture is pretty much sorted, it's time to see if it fits into the dining area. If it isn't the right size for there, then all this has been wasted work.

Chandelier in Dining Area
(view from the loft)
Ha! It fits! It's a perfect size for the dining area!
Since the dining area has a tall ceiling, the chandelier fits into the space really well. Had it been a standard eight foot ceiling, I think the fixture would have been too big. However, the ceiling starts somewhere around ten feet at the outer edge and goes up to twelve and a half feet so there's a lot of head room up there for the chandelier.

Chandelier in Dining Area
(view from the bottom of the stairway)
The stairway to the loft is centered on the dining area so as you come down the loft stairs, it's to the center of the dining area and the chandelier is dead center as well. (IMHO, symmetry is important in architecture, although I sometimes think a lot of folks have forgotten that.) At the moment, the light fixture is hung up in approximately the area it will be. When it is put in it's official place, it will be absolute dead center of the dining half circle.
The chandelier also needs to be adjustable up and down. Partly for ease of cleaning, partly for possible light reflections on the windows. In the picture, it's just hanging by the green rope, so it doesn't go up and down very well at all. But it doesn't light up yet so we can't tell how it's gonna reflect on the windows yet. Not that the windows are in yet, either.

Adjustable Chandelier
Now it's hung on the old mainsheet from my first sailboat. Boat tackle is really useful stuff, it gets used for all kinds of oddball tasks since we have it. The mainsheet is basically a four to one pulley system so pulling heavy things is easy. It also has a nice jam cleat built in, so it stays put until the rope is pulled and releases it.
The chandelier can now be moved up and down by rather a long distance. Once it's installed, it will be able to be brought down to at least as low as the table top, but it's not going to be on the same mainsheet as it is now. Grand Brass Lamp Parts had some nice thin black steel cable, so it's going to be hung on a steel cable threaded through the brass chain. The brass chain will be a fail safe in case something happens to the cable.
Now that the basic chandelier has been cleaned and restored and it's been determined that it will fit in the dining area, it's time to make this thing light up and function.
Let there be light!
It was pretty straightforward to rewire it, there's only a few ways that it will work. The eight arms are solid brass so the wire to the sockets has to go along the outside of the arm. The wire starts at the sockets, goes through the hollow brass spindle - which is held to the arm by a brass threaded pipe. They're inexpensive and something we got from Grand Brass Lamp Parts. We may have been able to source some steel ones from the hardware store but brass to brass is better if we can manage it.
The arms were assembled before they were wired so it was easier than threading all the parts on the wire and trying to assemble them with the wire in the way. For this chandelier - and possibly it may be a somewhat standard sort of thing - the assembly goes from the candle socket to the threaded brass pipe (the candle socket cover fits over the socket after it's wired so not necessary to put that on just yet), slip on the decorative brass washer the candle sits on, then the brass "spindle", then a clear plastic washer, then the crystal bobèche, then another clear plastic washer and all that threads into the end of the solid brass arm. Oh, yeah, there's a couple of extra "jam" nuts in there that clinch it all together. All that times eight arms, I pity the poor folks that have those massive chandeliers which have twenty or more arms!
There's a hole from the end of each brass arm that lets the wire out to run along the arm itself. Since the wire is visible there, we opted for the cloth covered wires in a dark gold color. There's also a hole into the hollow ball "body" of the fixture next to where each arm is pinned to the ball.

Box of Parts
(there were actually two boxes by this time)
The body, arms and pins to attach the arms to the body seem very specific to this particular light fixture. There weren't any matching parts available at Grand Brass Lamp Parts, although they did have a few chandelier "bodies" available that used screw in arms. Should you want, you could order all the assorted parts and build a chandelier for yourself starting from just parts, although I haven't a clue how expensive that would all add up to. The individual parts weren't too expensive, it was just multiplying everything by eight arms that added it all up.
By the time all the ordering was done, this chandelier has about a $150 in parts. But, the order included the crystal bobèches along with some extra crystals to hang from the top bobèche, the wiring - cloth covered in two different sizes, the sockets, a spare brass loop for the bottom since we hadn't found the original one yet the new loop was smaller and didn't look all that good although it would have worked. The brass chain to hang it with had to be ordered since it's a heavier chain than was available from the local hardware and was probably the most expensive part of the order. Due to the height of the ceiling, we needed two lengths of chain, too, so double up the most expensive part. Brass wire for hanging the crystals, crystal clips, candle sockets, plastic washers, brass washers, etc., etc. It was a lot of parts so even though $150 seems expensive, it was a good value.

Ready to Wire
There was a bit of head scratching to figure out how to wire it all up. Should the arms be assembled and fitted to the body or should the wire be put together and then attached to the arms?

Beginning at the Center
(seemed easier than to work with the arms attached)
It wasn't too hard to figure out how to attach the eight wires together. Instead of all one mass of eight wires meeting up with each other, they meet up in groups of two going to one wire and then those wires are paired. Eventually it gets down to two wires.

Result of Ordering Mistake
(the wire almost fits, but not quite)
The smaller diameter wire wasn't so bad to fit together and fit inside the chandelier body, but the larger diameter wire became "interesting". I should have ordered a smaller diameter wire and wire with only two wires, that was my mistake in ordering. That's the problem with online ordering, you can't get your hands on things before they appear. Had this been available at the local hardware, it would have been an obvious mistake. But reordering the wire would take awhile so making the thicker wire work seemed worth a shot.
The thicker wire is threaded through the hanging chain and enters the chandelier body through this hole up near the top of the body. The other end of the wire gets "interesting" where it meets the "canopy" (the metal fixture that has the loop to hang the chandelier from the ceiling), but that's a problem for later.
This thicker wire didn't quite fit into the brass body, however, it's a brass body and brass is a fairly soft metal.

Bigger Holes are Good
A drill press is a really useful tool, everyone should have one.
Since this is a rescued fixture and not a new one, it doesn't seem like much of a bad thing to alter it. Had it been a new fixture, well, had it been new it probably would have come with the proper sized wires and this wouldn't have been necessary? Oh well, a bit of drilling and it's all better.

Wired and Ready for Arms
(that almost sounds military, doesn't it?)
There's been quite a bit of fussing to get it to this point and there's still no arms attached. So the next phase will be times eight. Again, let's pity the poor folks who have twenty four armed chandeliers? Although, I kinda doubt the folks with that level of light fixture are fixing it themselves. We can pity their workers? Hopefully, light fixture repairs are custom enough to garner a specialist's fees.

Armed but not Wired
Just pinning the arms on was fairly quick, it's getting the wires attached to the brass arms that's gonna take awhile.
Ome of the options to get the wire along the arms was to use brass wire. Which I had, but it was pretty visible. Using fishing line was less visible but a bit more fussy to tie on than brass wire. I didn't try any kind of glue, although that may have worked. Finding something that would stick to brass and not be a mess was more than I wanted to deal with so the fishing line option was used. It was at the level of somewhat tedious, but hopefully will only need to be done once.

Wire "hiding" along arms?
The wire is still visible since it doesn't go inside the arms themselves like it does on some chandeliers. However, it kinda blends in pretty well since it's the cloth covered wire. It isn't ideal, but at least it looks a lot less tacky than the clear or amber colored plastic wire which had originally been used.

It's Alive!
Resurrection works!
The other end of the wire has a plug into an outlet instead of hardwired into the house, but it works! Up until this point, that hadn't been anything certain. Now, it will become the dining area light fixture. Ha! Not bad for some poor forlorn fallen out of an avocado tree thing.

From the outside looking in
(still a bit too close to the table)
From the outside looking in, it will be visible when it's down low. It will still probably be visible even when it's higher, too. At the moment, it's not on it's final cable system, that still needs installation as well as figuring out how to balance it. Probably counterweights and some sort of locking system to keep it in place? Well, that will be a problem for later. Gotta get the cable system installed first.
To Bling or Not To Bling
always an important question

Adding "Bling"
(found from a yard sale years ago)
Well, continuing the tradition of non-traditional sources, the bling for this light fixture came from a yard sale. It wasn't a recent yard sale, but one a few years ago. I'd kinda thought at the time they would look good spread across a glass plate with a light behind them but hadn't quite figured out how to make that happen or where to put it if it was done. So, these crystals have just been sitting in a box and a bag for the past few years.
I really wonder about folks who throw away everything that they aren't using at that specific time. They say "if you haven't used it in a year, throw it out". Hmpf! Well, fortunately for us, frequently they sell it at a yard sale instead of throwing it out.
I did buy the crystal drops hanging from the upper bobèche from Grand Brass Lamp Parts since we didn't have any that size or shape. They are also a better quality than some of the other crystal bits. Some of the bling is actual crystal, some of it pressed glass. The crystals seem to sparkle with colors better than the pressed glass, should you need to know when choosing your own chandelier crystals.

From Below, Looking Up
(better to view the bling)
It may not be the final arrangement of the bling, but this arrangement might be somewhat similar to the final one. It's kinda fun to hang the bling in different ways to see what it looks like. This thing is a pretty fun toy!

Different Options
(betcha this ain't gonna be the final one)
There's a whole variety of ways to hang bling, some of them are better than others. I don't think this is gonna be one that will be used, but it was interesting to see what it looked like.

Official Road Test
(first "live" test)
Gotta make sure it's gonna work in a real life situation, don't we? It's also our first official "dinner party" in the new house? Good thing we have very understanding friends!
If you like, you can send us an email and ask about bunnies, yarn, Hawaii things, what we should have on our webpage or just about anything else.
Mail to: Hillside Farm Hawaii