( our hearts and best hopes go to everyone impacted by the Covid-19 virus.
Just because we're doing non-Covid things, doesn't mean we have forgotten the folks suffering from the virus. We also really appreciate all those folks out there keeping things going and keeping everyone as healthy as possible )
March 28th, 2020
New Garden!
must be springtime around here somewhere
I'm not sure if any of the rest of you out there on the other side of the computer and cell phone screens have been haunting seed sales websites, but planting gardens must be very popular in this springtime of Covid quarantine since some of the seed websites are shut down due to too much traffic. When does that ever happen?
We are definitely living in different times these days.

Baker Creek Seed Order for 2020
Fortunately, this being Hawaii and all, our actual planting season - which happens about three or even four times a year - happened around January so most of our new seed supply for this year was delivered before this whole supply line kerfluffle happened. I've never seen seed company websites shut down from too much traffic before, though, even in springtime so I'm thinking this is a virus related event. I guess everyone is at home for quarantine and they have all decided to plant a garden this year. Perhaps from a sense of better food security? I'd gone to the Baker Creek seed website to get some information about time to harvest (I was too lazy to go get the seed packet and read the back of it) and it was really surprising to see their website closed. The really heavier than normal traffic was mentioned on more than one seed website, they all seem to have much heavier traffic than usual this year.
Our favorite seed site is Baker Creek Seeds. They only have open pollinated seeds and there's loads of interesting varieties that don't show up with other seed companies. Their germination rates are really high, too, it seems about every seed planted sprouts. Which is why we have been giving away celery plants and have too much celery in the current salad garden.
Had I known there'd be a problem with getting more seeds, I would have ordered another variety of tomato. Probably 'Stupice', and some of those 'Wasabi' radishes, but maybe if their website opens again, I can put in another small order or perhaps, let other folks who didn't get any seeds yet get in their orders and just do without any extras at the moment.
This year's seeds included turnips, which I've not grown before, but we're hoping they will be like a really mild radish. There's a bizarre type of kale 'Jagello Nero', which is supposed to be very tasty. And an oddball squash 'Tahitian Melon' which will hopefully grow well here. There's two packets of free seeds, too. 'Cosmic Purple' carrots (we've grown them before, they're very tasty) and some purple basil. How do they know we like purple?
We get 'heirloom' and 'open pollinated' varieties so we can save seeds. Not that we don't expect the seed websites to open up again, but it's always good to keep seeds from year to year since the saved seeds were grown here and adapted to our micro-climate. Also, heirloom seeds are ones that are usually tastier since they're selected for taste and not shipping qualities. Our favorite Romaine lettuce is called 'Crisp Mint' and we're on generation seven or eight since we got the original seed. Lettuce loves to go to seed and it's easy to collect, so if you're new to seed saving, it might be fun to start with lettuce seeds. Marigolds and nasturtiums are another easy to collect seed choices.

Good Mother Stallard soup beans
These are 'Good Mother Stallard' beans, they are an excellent soup bean. Really tasty and make an excellent broth. We got our first seeds from Rancho Gordo in Napa Valley, California and this is going on generation four since then.
We're working on the third generation since the original seed of 'Good Mother Stallard' soup bean. As you can see from the picture above, there's options when saving and planting seeds. Usually, I'll plant the biggest, roundest seeds with the most color, but there's an option to plant the whiter colored ones as well. Usually when selecting which seeds to save, for beans - it's the earliest producing which we save and the ones which have the most beans in each pod.

This is the next generation of 'Crisp Mint' Romaine lettuce seeds. Those little yellow flowers are going to be seed pods eventually. Lettuce goes to seed easily and makes a lot of seeds, so it's a good choice to start with if you want to try saving seeds yourself. Get an 'heirloom' or 'open pollinated' variety and save seeds from the last one to go to seed. With lettuce, where you eat the leaves, you want to select for a plant that takes as long as possible to go to seed. We also like the leaf varieties of lettuce instead of the heading varieties since we can just harvest a few leaves that we want and leave the rest of the plant to grow more.

This is a new variety, 'Greasy Grits' green beans. They're called 'greasy beans' since they have shiny pods. They're supposed to stay tender and have better taste than other types of string green beans. We will see. In any case, these are the first beans being set by the plant, so those will be the ones saved for seed. Beans are a good plant to put in a garden since they fix nitrogen into the soil for the other plants to use. Plus there's tasty beans! Beans are also enthusiastic growers, that's always a joy as well.
The gardens here are raised bed gardens, not only because it's loads easier to weed when the gardens are much easier to reach, but it terraces the hillside as well. We are on a hillside and mowing the really steep parts are quite difficult so putting a garden there saves having to mow. The raised beds also keep over enthusiastic weed whackers at bay.
The raised beds also use less water and fertilizer. It's a defined fairly small space so it's a small garden, but it's a very productive garden, especially considering the size. For Hawaii, we need a few veggies pretty much all year around, we don't need a huge harvest to be canned or frozen to be used during the winter when there's no gardening. In Hawaii, we plant the 'winter' crops of tender lettuces like Manoa and green leaf types, along with the cool weather crops like peas and cole types. During the summer, we grow plants which like warmer temperatures such as the Romain, red and Buttercrunch types of lettuces, tomatoes, pumpkins, etc.

This is the second raised bed garden that was built here. It's right outside the back door and is a 'salad' garden. Lettuces, celery, carrots, onions, tomatoes, etc. The first raised bed garden kinda ended up with trees in it, ooops! I'd put a mulberry cutting in it so it could root and intended on moving it but never did and now the tree is too large to move. The Bleak Hall Sea Island cotton is at the other end of that garden, as well as a grape vine and papaya tree. The bay laurel and mamaki (Hawaiian plant used to make tea) were in pots set alongside the garden but were ignored too long so they rooted themselves. No moving them at the moment, either..
I do have a tendency to overplant the gardens, though. Which, since there's a lot of bunny 'berries' (manure) dug into the top layer of soil and lots of watering if there's not enough rain, does work although it's entirely against all the recommended planting distances. But, since they are such small gardens, overplanting allows for a much higher production.


Gardens without borders
not everything needs to be fenced in
If you don't have room for an official garden, there's still options. Edible landscaping can still provide you with tasty things. After we ate a pineapple we'd gotten from the grocery, the top was twisted off and pushed into the soil over near the bunny hutch. It takes two years for a pineapple to produce, so this only works if you have a yard that doesn't freeze. Although a two gallon pot would probably be big enough to grow a pineapple? It still seems to take forever before they get ripe. This one will probably be ready sometime past mid-summer?
There's a variety of tomato called 'Silvery Fir Tree' which has pretty foliage and can hide really well in a flower garden. We had a red curly kale which would also be a good choice in a decorative planting. So when planting a decorative flower bed, look through the vegetable and herb selections to see if any of them will fit in. Or plant edible flowers.
The other edible landscaping options are when planting trees, to pick a fruit or nut tree. There's some decorative fruit trees which have lovely flowers in the spring. Some of the nut trees have valuable hardwood later, although that will be most likely decades away.
If you don't even have room in the yard for edible landscaping, then there's always windowsill 'gardening'. In this case, it's a quart Mason jar with a screened lid. Cut any sort of somewhat stiff screen (preferable non-rusting type) into a circle to fit inside the jar lid ring and then you have a sprouting jar. I like the wide mouth ones since it's easier to get the sprouts out. Alfalfa, mung, lentils, radish, etc., etc., there's all types of sprouting seeds. Your local health food store may have some. We've got alfalfa seeds started in this one. Put the seeds in the jar, add a couple inches of water, screw on the lid and let it sit for an hour. Then, pour off the water and set the jar in the window. Rinse the seeds in the morning and evenings and let them there until they look like sprouts. I have two jars so one is sprouting while the other is in the refrigerator.
Building a Terraced Raised Bed Garden
also known as 'war on Guinea grass'

Looks like this site seriously needs a terraced raised bed garden
When we bought this house, it hadn't been lived in for twenty seven years. The yard except for a narrow area mowed around the house was a bit, well, let's just call it 'overgrown'. The tall grass in the backyard was brushing up against the back of the house. There was brush and trees in with the tall grasses. We beat it back about fifteen feet, but there was a lot of other work to be done when we first got the house. Some of them were more than we'd expected when we bought the house such as replacement of the water lines (because the old ones had rusted solid!), replacement of the electrical systems, painting, general repairs, clearing out the side yard (which was required to replace the water lines and needs clearing again), building new bunny hutches, etc., etc. Which was a lot of work and after the first year of it, we got lazy and didn't pile into projects as much. Which gave that tall grass the chance to keep getting taller.
Several years ago, we had an excavator come in and remove the excessive growth, but then we went on a six week vacation and when we got back it was too tall to mow. We were coinsidering getting the excavator to come back again, but then there would still be the difficulty of mowing a slope. So, this year, we're hoping to get sheep to keep the back yard mowed. We will have to initially scythe it down so they will be able to keep it down, but at the moment, getting it flat doesn't keep it that way.
As part of the 'fencing the back yard for sheep project', a lot of the tall grass at the back of the house was beat up. Not removed or even mowed flat, just merely beat up a bit. So, to continue that beating back of the grass as a good start, it was determined that a garden there on the steep part of the slope would not only keep the grass away, but would terrace the hillside as well. That's how we came up with this what looks like an unlikely site as a perfect spot for a garden.

It took a few days to clear the area, especially to get the cane and Guinea grass roots dug out of the way. Then the hole into the hillside was dug to make room for the tin in the back, concrete blocks on the side and then another piece of tin roofing was placed across the front. It's all held in with fence posts and some bits of cut off fence posts we found at the local dump. It's handy when things like that just appear out of basically thin air. In order to keep the tall grasses from coming up through the garden, it was lined with weed mat. With cane, Guinea, Reznor & elephant grass, the weed mat may only slow it down, but we're hopeful that it will redirect the grasses to outside the garden area.
Behind the back of the garden, it was leveled off to make a path between the garden and the sheep fence. There's almost three feet between the levels of the paths in back of the garden as in front of the garden. The other reason to get rid of the grass and terrace the slope is that we hope at some point to be able to park a car between the house and the new garden so keeping the tall grass away from the area in back of the house is huge part of making that project happen.


Screening the roots and rocks out
rooster approved, too!
We had a handy floor plate for a bunny hutch which made a dandy screen for the garden soil. It has a wire mesh of 1" x 1/2" which is perfect for screening out roots and rocks. Ricky the Rooster seemed to like the screen, he'd go stand there to crow in the mornings during the several days it took us to fill the garden. He also helped when screening the soil to make sure any bugs were dispatched before they got into the garden. We did save all the earthworms, though, and put them in the garden. Ricky can eat the other bugs.


New Garden! Yay!
with anti-rooster fencing
There was a rather appalling amount of work to create this garden, but it was a combination of projects and not just constructing a garden. Clearing the area was a huge project all in itself. Diggin, terracing, building the garden walls, then filling with good soil took about a week's worth of several hours a day of working on it and finally adding seeds and fencing was merely an afternoon's effort.
Now, it's just watering as necessary and waiting for things to sprout. There will be a bit of weeding now and then, but these raised bed gardens are easy to weed. Hopefully there will be sweet corn and watermelons for Fourth of July. Not sure what the next crop will be after that.
After a bit of rest, the next garden will be in that big tall grassy area on the far side of the picture of the new garden. But, I think there will be some work on the actual sheep fencing as well as some work on the lanai under construction before starting on the next garden. Plus some bunny organization, they need haircuts again. Finishing the next garden should pretty well organize the whole back of the house area between the house and the sheep fence. It's been an under utilized kinda catch all sort of place, it might be nice to get a nice sitting and garden area out of it.
Covid-19 Quarantine Food
food stretching for less trips to the grocery

Refrigerator Soup
'Refrigerator Soup' is sort of what can be made from what's on hand. This is a fairly easy soup, especially for folks who go to Costco. Not that we're gonna go there until sometime after this virus since everyone on this island seems to want to go there and the only Costco on the island is in Kailua-Kona which seems to have the most exposure to the virus. But, anyway, we're talking about making soup. So, get a roast chicken from where ever you get a roast chicken. If you like (novel idea!) roast one at home instead of buying it already roasted. But, since Costco's already roasted chickens are a whole lot less expensive than a whole raw chicken, we usually get one of those instead of roasting one at home anymore. Maybe the next one will be a home roasted one since our local grocery has a lot less traffic than Costco so less chance for virus germs. Maybe that Ricky rooster will annoy me enough that he will become soup! Chicken soup is gauranteed to cure crowing. Ha! (eh, no worries, we like Ricky even though he's a pest) Well, anyway, to make this soup, start out with a roasted chicken


Eat a lot of the chicken saving the skin and bones as you go. Then, put the carcass into a pot of water. We like to add some chopped dried onion flakes as well as some bay leaves and a couple of star anise pods. Don't really boil it, just simmer it for about an hour or so.


When it smells wonderful and it's gone from being bones in water to being bones in broth, it's done. Let it cool down and pour off the broth. Then remove the bones and skin putting all the meat bits back into the broth. Now you've got chicken broth with tasty chicken bits in it. Add in some chopped up veggies such as carrots, potatoes, celery. Even summer squash, pick your favorite veggies. Simmer that until they're soft. Then add noodles and you've got essentially free chicken soup!
If you want to make noodles, take about three or four tablespoons of the broth, add in an egg, some powdered sage (this is chicken soup, sage goes well with chicken soup), some ground black pepper and a bit of salt if you like. Stir that all together, then start adding flour until it becomes a stiff dough. If you have a noodle machine, now is the time to break it out. Otherwise, spread some flour on the counter top and then roll out the dough as thin as you can. A quarter inch thick or less is good. Then roll it up - you can cut it into smaller piece to make it easier to handle. Roll it up and then cut off thin slices the wideness you want your noodles. Uncurl them, hang them over something if you want to dry them or toss them with flour to keep them from sticking. Put them in the soup and simmer them until they're done.

Refrigerator soup. Pretty much put together out of nothing or from things that would have been thrown away. Cooking using ingredients instead of buying premanufactured food allows for all kinds of creativity as well as saves trips to the store as well as money. You also know what's in your food.
another option for Covid-19 Quarantine Food
but it's best if it's planted last year or even a lot earlier

If you have the right kind of yard, there's also the option of 'yard food' or 'food from heaven'. Around here, it seems like food just pretty much falls out of the sky. The mulberries are from that cutting we got several years ago at a yard sale in Kailua-Kona. It was the people's favority mulberry and they brought a cutting with them when they moved to this island. We've given cuttings to three other folks so far, too bad we don't know if it's a named variety or not. "Kona Garage Sale", perhaps? It's now a tree with tasty berries. The peaches are "Florida Prince" which is a low chill variety that produces in Hawaii. These peaches are from next door. Our neighbor gave them to us since our peach tree is still too young. The oranges are from another neighbor, there's lots of citrus available around here since citrus thrives in Hawaii. So, when gardening, opt for edible trees, if you can.
"Fabric Face Coverings"
for some reason, they don't call them 'face masks'?

Make it yourself Face Mask
Not sure exactly why, but the news folks covering the Covid-19 crisis don't refer to these as 'face masks' but usually as 'fabric face coverings'. Well, whatever you wanna call 'em, they're now required in the state of Hawaii when you're going out into the public areas. There's a lot of websites out there on how to make them without sewing or make them out of a coffee filter or some such, but I'm expecting we will be using these masks for several months, if not longer so a sturdier one may be useful.
This one is made of one layer of Aloha print batik cotton fabric (or a part of a sheet or pillowcase will do fine) and one layer of purple flannel. When selecting fabrics, put them together in as many layers as the finished mask and try spraying a mist of water through them. A basic bottle of Windex will do fine if you don't happen to have any plant mist bottles of water laying about. If you have colored fabric, don't use anything with bleach, of course. If the spray easily goes through the fabric, then keep adding layers until the mask stops the spray or use different fabrics. This mask is supposed to stop water droplets, either in or out.


As with many things, this mask started as a sketch on the back of an envelope. That's a legal sized envelope, should you want to make a mask of your own. The lowew edge of the long strap piece should be cut on the fold, you'll notice the part is twice as wide after it's cut out from the pattern.
Also, in the picture, the purple lining looks to be wider than the print fabric part, that extra half inch gets cut off, but the pattern pieces in the picture are when I was thinking of a different way to wear the mask. Tying it on with ribbons would make it harder to use, I think. So, when cutting out the masks parts, make the outer layer and the lining the same size.

These are shown on a piece of regular 8-1/2" x 11" paper so you can make them yourself if you like. I should draw them out and make a .PDF file. If you want, send me an email and ask and I'll send you some plans.
I'd further modify these pieces to make the curve on the mask part - the longest side - much flatter. The top of that part goes halfway up the nose, the lower edge ends up just below the chin. Between the point of the nose and the point of the chin, I'd flatten that curve to a straight line. The finished mask has a bit of poochiness right there that flaps in and out when breathing. Also, when fitting the mask to your face, measure between the tip of your nose and the tip of your chin and adjust the height of the mask to fit. I should draw that out so it will be more clear, but if it's confusing, just send me an email and ask.


It starts with the center seam. The top more pointed end will end up on top of your nose. This is the seam that I'd flatten out to make the mask better in Phase II, but I've not gotten that far yet. Anyway, sew the center seam, clip the curves. Do this for the outer covering and the inner lining.
Now, pin right sides together matching the center seams. Sew the TOP seam and the BOTTOM seam. Leave the ends open.


Since this mask will end up on your nose for quite some time, perhaps, it's best to keep any lumps out of where it will be touching your nose. Clip the curves and clip away the excess at the center seam area to keep the lumps away. After clipping the seams, turn the mask rightside out.
Get a piece of soft wire about four inches long, preferably stainless if you can, other wise a paperclip will do. Bend over the edges to keep them from poking thru the fabric. Kinda shape it into the same shape as the top seam on the mask. Put it inside the mask up as close to the upper seam as possible, centered in the middle of the mask. This wire will adjust the mask to fit to your face and will keep any gaps from being near your nose.


Use a zipper foot on your sewing machine if you have one so you will be able to sew as close as possible to the wire to hold it in place.


Now fold the straps lengthwise and then sew about an inch and half on the wider end. Then take the open edges of the mask and pin them into folds. Make the pinned area as wide as the end of the strap. An option at this point is to pin a scrap of fabric on the end to use as a pulling strip for the next step.


Now take the folded and pinned end of the mask and starting at the narrow end of the strap, push it up on the inside of the strap to the wide end of the strap. If you have a handy string or strip of fabric pinned to the folded part, this can make it a bit easier, although it's not too hard without it. The seam on the strap should be towards the bottom of the mask, which is the part without the wire in the seam. Adjust the folds and pin together.
Cut two pieces of elastic about 4" long. Overlap one on the end of a fabric tab (the smallest mask part) by about a half inch. Sew in place. Safety pin a string or strip of fabric to the other end of the elastic to make it easier to pull it through the strap later.
Now place the fabric tab with the attached elastic and string/fabric strip to the outside of the strap you just pinned together that has the folds inside.


Sew and then clip the curves, it's nice to trim the ends back as much as possible (yet still leave it sturdy as possible) to keep bumps from being where the strap attaches. Then turn right side out.
Now the only thing left is to finish the strap. Turn over the edges and either pin or iron them flat.


If the elastic is pretty wide, it can be useful to fold it in half while finishing the straps. Pin the strap edges together and then top stitch.
You can use the attachment method of your choice on the ends of the straps. Pull the string or fabric strip attached to the elastic to adjust the fit. Pin the elastic in place, remove the fabric strip and sew the elastic in place. Then add a button, hook and eyes, snaps, Velcro or whatever you want to use to secure the mask. You could make really long straps and tie them, if you wanted a bow.
Hybrid Angora Bunnies
although by now, they're mostly English
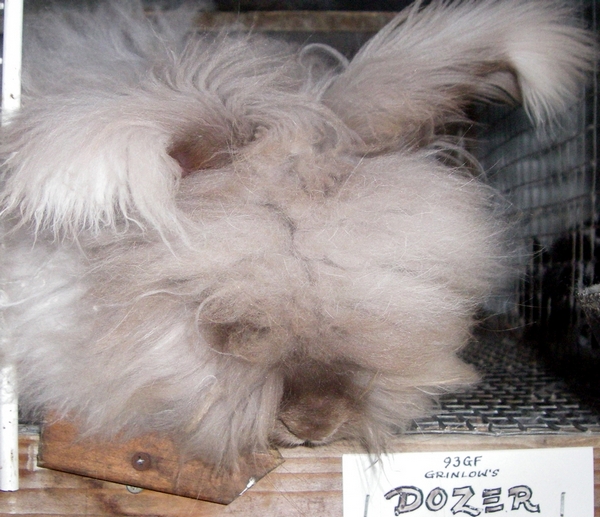
We raise primarily English angora rabbits since they have the softest wool and they help us make 'Hula Bunny' yarn. However, we are on an island with limited genetics to work with so we did borrow a hybrid Satin angora/ German angora buck several years ago. The picture above is a pure English angora buck, Dozer, and as you can see he has a lot of 'furnishings' on his face. This is one of the primary characteristics of the English angora. It makes them really cute as well as a touch absurd, but it also take more maintenance. It's also - as far as I can tell - a pretty recessive trait.


Hybrid Angora Bunnies
four months old

Aster, sire of the hybrids
he's pure English, although he could use a fuzzier face
As you can see, the hybrid angoras don't have the same level of fuzzy face as the pure English ones do. The black bunny next to the two white ones is a pure English with the typical face 'furnishings'. The two white ones are now four months old and old enough to have gotten their final coats so I don't expect them to grow fuzzy faces.
These are hybrid angoras with the black Satin/German buck, Zorro, as their great grandparent. Zorro met up with Suzie, an albino pure English doe. They had a black hybrid son, Nero. Nero met up with Jessie who is a pure English black doe. They had and albino daughter, Petunia II, who met up with a pure albino English angora buck, Aster.
All that makes these two albino angoras as 3/4ths English and 1/8th Satin and 1/8th German. I'd have expected the face furnishings of the English to have been reappeared by now. They are Iris and Camellia and Iris will be going to a new home at some point and Camellia may be bred to a pure English buck just to see how far the clear faces will remain in a hybrid line of angora rabbits. We also still need as much genetic diversity as possible, but we've not been using the hybrid angoras very much in the breeding herd until they get back ot being 'English' again.
Should you be interested in Iris, send us an email, he's old enough for a new home now. I should go update the 'available bunnies' page, but this page is taking too long so it won't happen today.
Pure English angora baby bunnies
gotta have some cute baby bunny pictures!


It's almost obligatory to have cute baby bunny pictures, isn't it? These are pure English angora babies from Black Rose and Caesar, a tort buck. There's actually five of them, there's two black ones that were eating out of the other food dish with their mum. They're six weeks old now.
Click on the picture above for the previous blog entry
or check the list of older blog posts at the bottom of this page

Click on the bunny for the Home Page