Our hearts and best hopes go to everyone impacted by the Covid-19 virus.
Just because we're doing non-Covid things, doesn't mean we have forgotten the folks suffering from the virus.
We also really, really appreciate all those folks out there keeping things going and keeping everyone as healthy as possible.
It's still out there and getting fiercer! Be vigilant and continue to be safe!
Wear your mask!
Wash your hands!
yeah, I know, it sucks, but do it anyway
November 8th, 2020
Wear your mask!
Wash your hands!
yeah, I know, it sucks, but do it anyway
Deadline! Busy, busy, busy!
Getting it ready to rent

Towards the end of the restoration
it's only been a year or so
Way back when, this restoration of the 'Little House' was only supposed to take one or two months. Of course, we're not very fast workers and we've not been very dedicated about getting it done soon. We've been way more focused on getting it done right. I suppose we should have had some tee shirts made with a slogan 'it's only a rental' emblazoned on them or some such thing. That may have gotten it done sooner? But! Now there's a renter showing up the first of December, so now we have an actual deadline. We are now in a frantic scramble to git'er done! But there's been so much effort put in during the year before that we still want it done right and not just done any old way. But, us being us, our 'frantic scramble' is still not all that frantic.
The big front windows are one of the nicest things in this little house and the ocean view is immense. Which means it's important to get it repaired and functional. It was built in 1953 and it's in need of repair - but it's fairly easily repairable. Try that with a 'modern' aluminum framed nail on window.

It's an old wood framed multi-pane window. They have an authentic look and feel because, well, they're original and authentic. Each pane of glass is set into it's own frame so there's no fake plastic muntin grid or anything else trying to imitate this look. Old windows have much more of a multi-layered look, there's usually much bigger trim, much more depth to them. They aren't the shallow one dimention modern metal framed windows. You can still get modern wood framed windows. although they're pretty expensive and they're all pretty much going to show up with double pane window glass. Which, Hawaii doesn't really need since we don't have the extremes of weather.
The old glazing putty had fell out of some of the areas and there were some portions of the frame that needed a bit of repair. BUT, a tub of glazing compound is $8.99, which is a LOT less than a replacement window would cost. This window is over eight feet wide and over four foot tall, it wouldn't be an inexpensive replacement. So rescuing these windows makes sense from an economic standpoint as well as an aesthetic one.
Window glaze/putty is a lot like Play-Doh in consistency. It just gets pushed into the edges and then the excess cut off with a putty knife, chisel, butterknife, whatever you'd got at hand. It's supposed to dry for a day or two before being painted over.
Should you be setting in a new glass pane or resetting an existing pane, clear off all the old putty. Then put a layer of putty on the inside edge of the frame. Set the glass on it and then take a palm sander without any sandpaper on it, put a towel over it as well and then use that to vibrate the window pane into the putty. Much easier than trying to press it into place with less chance of breaking the glass.

With this old house, the window trim is actually structural. There's not much holding up the roof at the front corner except the window trim inside and out. At that front corner, there's two 1" thick x 7-1/4" wide wall boards and some 1" x 8" (actual size 3/4" x 7-1/2" since it's new lumber) window trim holding up the corner. This style of construction is no longer 'to code' but it's okay for this house since it has a building permit from 1953. Fortunately, the roof is aluminum and doesn't weigh much. Also, there's never any snow or ice load so it doesn't require much structural strength. We're not going to worry about wind uplift, the house has been here for sixty seven years so there's not a lot of hurricanes that come ashore here.
The horizontal 'racing stripes' are also structural. They hold the vertical boards that make up the walls together. As a 'single wall' Hawaii construction type of house, those one inch thick boards are the entirety of the walls. No wall cavities mean no place for bugs to hide, but no place to hide the electrical wiring or plumbing, either.

It's actually quite striking to have the big window completely open. Wish there was some way to hinge the windows so they'd completely fold out of the way, but if one wants the unobstructed ocean view, there's always the front lanai.
I should probably put some corner braces up on the front lanai posts to the roof beam, but I can't decide quite what they should look like yet. Once that is figured out, then there will probably be some corner braces up there. There's enough shear strength by the roof being attached on one edge that it isn't absolutely necessary, but it wouldn't hurt to have some there. Needs something somewhat 50's looking, though. They will be very visible so they should look nice.

It's a pretty small house. This is the view from the kitchen. Having the big cut out in the wall between the living room and the kitchen is a good thing, it really makes the little house seem larger. Although the folks who were originally cutting out all the walls didn't quite get the idea of needing a beam to hold up the ceiling when the walls were taken out. If you've been following the restoration of this little house, you'll remember that the ceiling was down by about 3" at one point. The front corner where the windows meet was also down by three or four inches. Gravity is relentless, but fortunately so is a 4" x 4" post.

I suppose some folks go to a curtain store and order curtains that actually fit the windows they're working on. As usual, we found something at a yard sale and are fixing it to work for the project at hand. We found three traverse rods (the kind of curtain rod that lets the curtains be opened by pulling a cord) and the curtains to go on them at a yard sale last year. So there's enough for the two big living room windows and the big window in the front bedroom to have a traverse type curtain rod.
Once the curtains are hemmed to fit the windows, there will probably be enough fabric left over to make curtains for the shorter kitchen window, the dining room window and the shorter bedroom windows. Maybe even a really short curtain - just a ruffle, really, above the refrigerator to cover up the gap between the fridge and the top of the fridge niche. If I remember correctly, we gave the folks with the yard sale some miniscule amount for the curtains. It may have been $5, it was much less than $20 although I forget the exact amount. Things can be very inexpensive if get things from folks who don't want them anymore and you're willing to do a bit of work.


The view from the front lanai
it doesn't fit in one picture
If it weren't for this view, we'd not have to do as much work on big windows and the lanai. But it is a grand place to sit in the evenings and watch the clouds go by. It's almost whale season again, so soon there will be whales to look for, too.
Restoring the Wall
now the little house is a two bedroom house again


The wall between the living room and the front bedroom
a year can make a big difference
Not having the wall there does make the little house feel a lot bigger. But, not having the wall there also makes it a one bedroom house.
The side by side pictures show the wall as it was when we got the little house and as it is now. (I'm sure you can tell which is which) You may notice there's a doorway missing from where we started to the current floorplan. By removing the second doorway into the hall from the corner of the living room, that makes that corner useful instead of a pathway to somewhere else. There's enough room for a small desk, a storage cabinet or a chair. When a house is this small, every extra bit of usable space is important.

Hallway to bedrooms & bath
why did they need the other door?
Originally, there was an actual door between the kitchen and the living room. Apparently, back in the middle of the last century, it was considered a good thing to be able to completely shut the kitchen off from the rest of the hosue. The additional door or doorway from the living room to the hallway would have allowed folks to move into the bedrooms or bathroom without going thru the kitchen. That separation between the kitchen and the rest of the house seems pretty odd to us today, but they almost always used to have doors between the kitchen and everywhere else.
Now the only access to the bedrooms is through the kitchen, but the doorway between the kitchen and living room is much bigger than it used to be so it doesn't seem like only one hallway entrance will be a problem. It's a very short hallway.
I don't know if the doorway between the living room and the hallway (the one we covered up) was a door or a doorway. The trim had been removed by the time we met the house so it's hard to tell if there had been a door there or not. All the doors had been removed, even the bathroom door. Not quite sure why, but they weren't there when we started. Between the kitchen and the living room was a door at one time, though, since the there was still enough marks to tell it had been there.
What also isn't all that apparent between the 'before' and 'after' pictures is how many holes and other things have been repaired. The ceiling didn't quite have 'popcorn' on it, but it had been heavily textured with holes and other damage over the years. By the time we are done, the whole house will have been basically resurfaced inside and out. Not only resurfaced, but 'finished flat' and not irregularities covered over with textured paint.
Planting Time Again
as well as planting twice what with the chickens around

"Bunny berries" to fertilize the garden
Yay Bunnies!

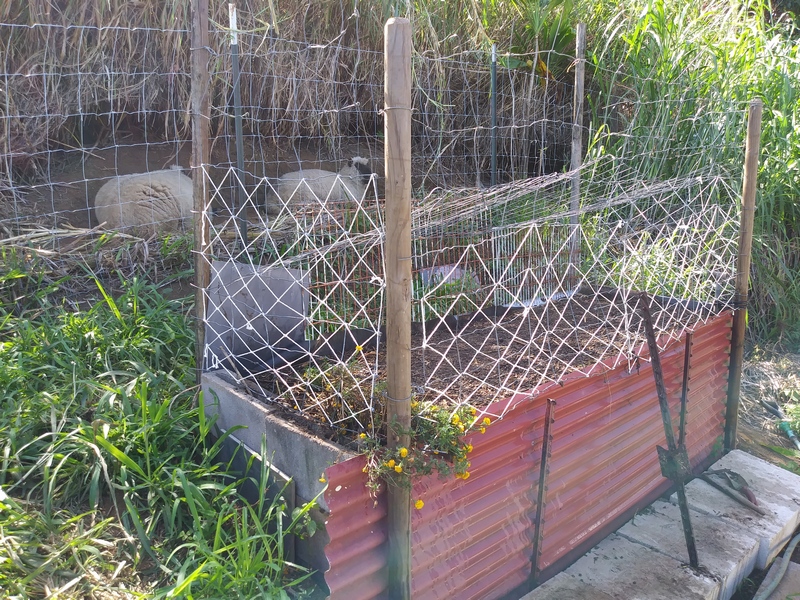
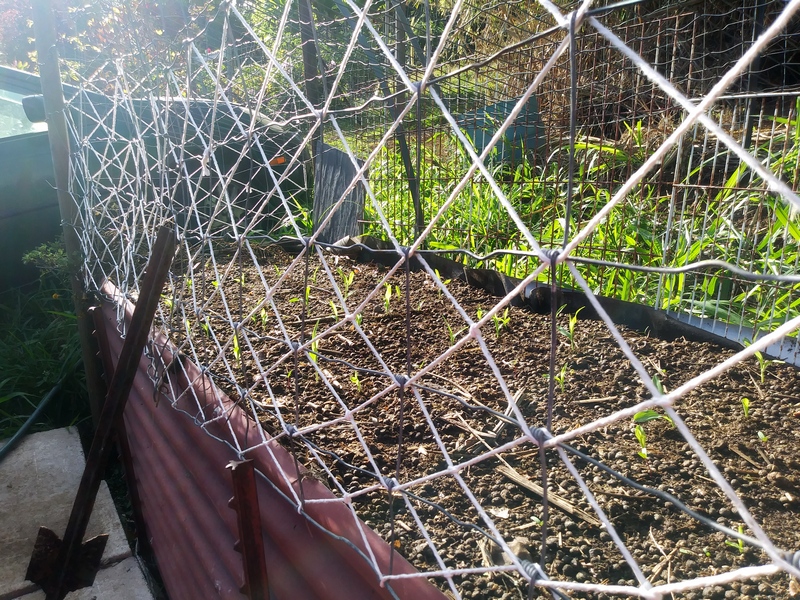
Trying to chickenproof the garden
the first try didn't work
Our 'apocalypse garden' with the third corn planting for this year
"lucky we live Hawaii"
Back at the beginning of this year, we put in an additional vegetable garden since what with the beginnings of Covid, it seemed like there was an impending apocalypse. Plus it sounds like a fun name and our Sheepie Friends also called their new garden an "apocalypse" garden so it sounded like a trend. We can be trendy if it's fun.
Because we're about 2,500 miles away from just about everything else, shipping things in is expensive. Garden fertilizer being one of those expensive shipped in things. So 'Bunny Berries" are the only fertilizer we use. Fortunately, the bunnies can help us out with those and the garden seems to thrive with nothing other than a thick layer of bunny manure added to the top whenever we replant the garden.
In areas of high rainfall, a lot of nutrients get washed away, so 'bio-char' (charcoal that doesn't have chemicals added to it) is added in when the garden is first made. The nutrients get trapped in the bio-char just like the charcoal filter on a water faucet. That keeps the nutrients within reach of the plant roots. We also add in oyster shell which is usually given to chickens to increase the shell thickness of eggs. That sweetens the soil a little bit, kinda like adding lime to the soil except the oyster shells don't wash away like powdered lime.
The garden was 'chicken proofed' and seeded. The next day we found out our chicken proofing wasn't all that actually chicken proof. One or more of the chickens had gotten in there and eaten up almost all the seeds, so it was chicken proofed better and reseeded. Soon as we get that little house fixed up enough to be rented, building a chicken trap is pretty high up on the "to do" list. Of the seven new chicks from this year, I think four of them are roosters. Chicken soup will keep them out of the garden.
We usually try to save seed for the next planting, but when the chickens eat up the seeds before they sprout, that plan doesn't work well. We used up all the last of the seed we had and then sent off for more in case the chickens get in again. We get the sweet corn seed from University of Hawaii Seed Proram since it's a tropical (non-GMO) open pollinated sweet corn. They have a limited variety of seeds available, but they're seeds for our climate so we get what we can from them.
Most of the rest of our seeds come from Baker Creek Seeds. Baker Creek seems to be in the process of changing their name over to 'Rare Seeds', which kinda makes sense since that would match their URL. They have an excellent germination rate on their seeds. They're not the least expensive option, but they do have good seed.
Those wretched chooks ate up all the beans I'd planted and those were the only 'golden eye' bean seeds I had. Hmpf! I'll plant some more 'Good Mother Stallard' which is also a good bean, but I'd hoped for the Golden Eye beans instead.
Finally finished Loom Project
it's only been a couple of years
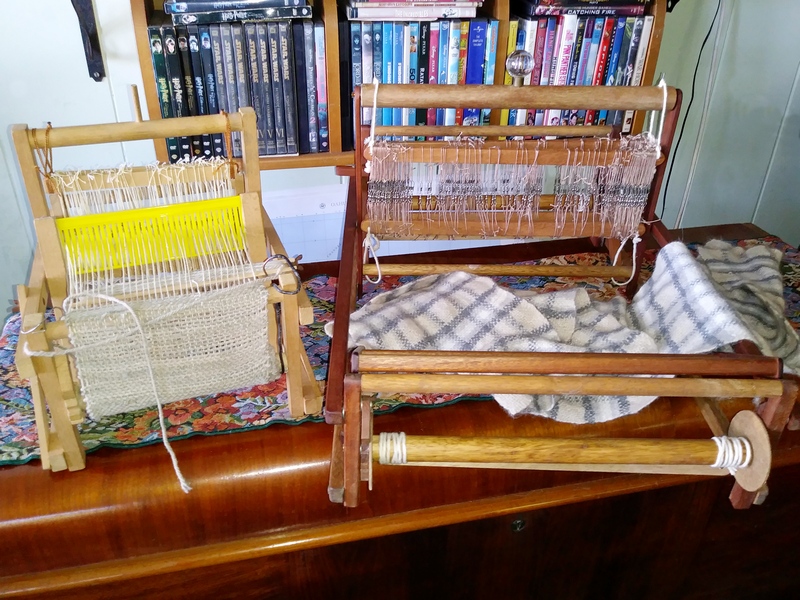
Two little looms
Several years ago, we bought a spinning wheel at a yard sale. As we were taking it away, they handed us another box and said 'here, this goes with it". The box had a small kid's loom in it, not something I'd actually been wanting at the time, but it seemed a 'fibery' thing, so we took it away as well. It's the smaller loom with the bright yellow 'reed'. I think that's what that part is called in 'loom speak'.
It was originally set up for small projects so I added more 'heddles' to it so a wider project could be woven on it. Heddles are those little rings on string loops held in a 'harness' that the 'warp' strings/yarn go through so they can be moved up and down while the 'weft' string/yarn is woven in. Looms have a serious amount of new terminology to them, I still don't quite know all the names of the parts and strings and things, but it was still fun to get the little loom up and functional. Someone told me these two little looms are 'two harness, string heddle' looms. So now you know as much as I do as to what we're looking at. Fortunately, we don't need to know the correct names to get it to work.
Several scarves were made on the little loom, but it just wasn't quite wide enough to make a 'proper' scarf. So, I started making a new slightly larger loom several years ago but got busy with something else and never finished the project. When the new Hula Bunny yarn came back from the mill earlier this year, we had enough of it and in different colors that weaving a few scarves seemed like a good thing to do and so the 'loom project' was finally finished.

Making a lot of 'string heddles'


Finally finished loom & first project


The smaller one fits inside the other but they're both still small. They both fold flat, too.

First Finished Project
made with Hula Bunny yarn, it's very soft
The board with the nails in it worked pretty good for making 'string heddles'. I also used fishing swivels so when stringing or 'warping' the loom, when a mistake is made it's easier to fix it. Usually, once a warp string is put through the little loop of the heddle, in order to fix it, the string has to be taken our and restrung. With the fishing swivels, they can just be opened up and the string changed to where it should be.
The newer slightly bigger loom seems to work pretty well. I could make a few adjustments, but overall it works great. It's small enough to carry around easily, especially when it's folded flat.
The first scarf is finished. It wasn't made with the full width of the new loom, but it's wider than the smaller loom could have made. I think the next project will be to see if I can 'warp' on three scarves at the same time. The work rolls up on the rollers at either end as it's woven. I think there's enough room for multiple scarves to wind up on there. Guess we will find out with the next project.
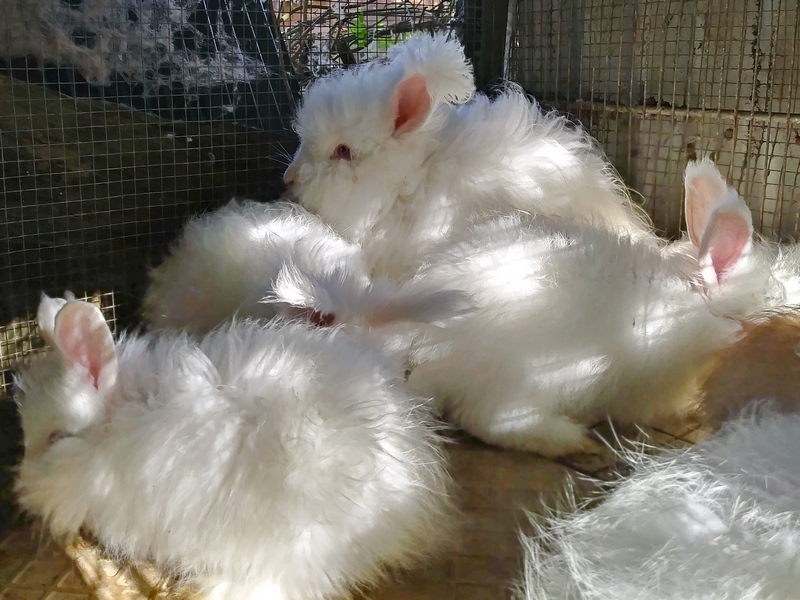
Bunny Pictures!
Gotta have a few bunnies in there somewhere
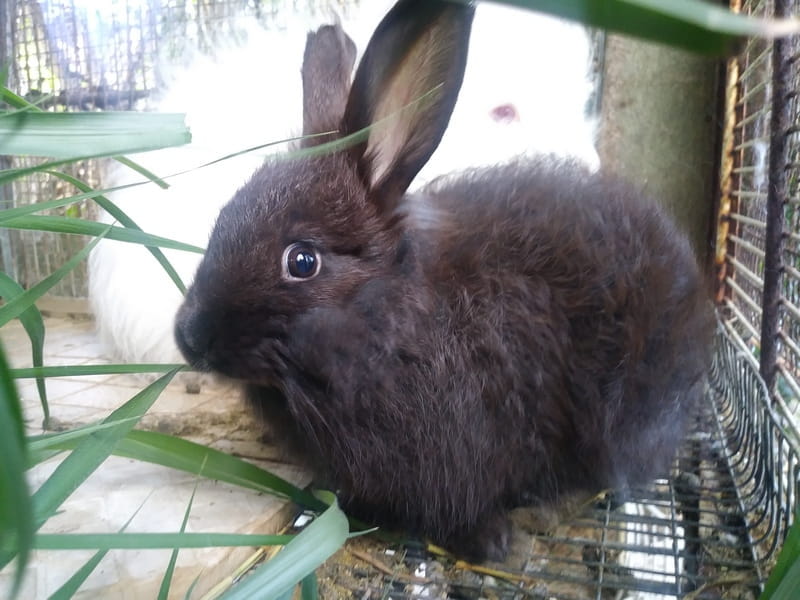
Daisy with her eight week old babies

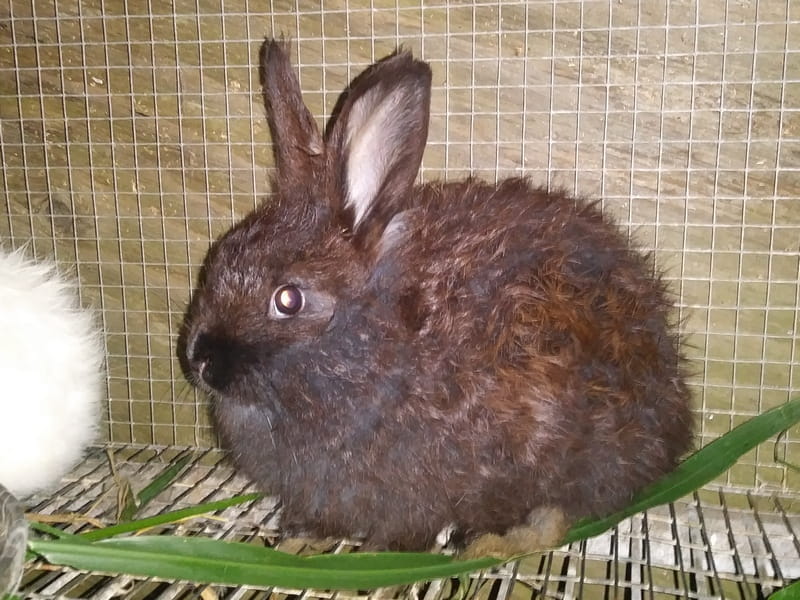
Seven week old baby bunny
not quite sure what color she is

Same bunny a week younger
still not sure what color she is
Daisy & Caesar's babies are eight weeks old now and quite cute. Five of them are albino, one of them is tortoiseshell and I don't quite know what color the last one may be. I'd originally thought it was a black bunny, it was very dark at birth. Now the black has lightened to a very dark chocolate color, but darker than most chocolates. The flash on the camera lightens the color up, when viewing it without the flash it looks like a not-quite-black bunny. This may be 'dark sable'? I think it may be a female, in any case, we will probably keep this one here at Hillside Farm. If we can get more bunnies of this color, maybe we can come up with another color of Hula Bunny yarn? Hula Bunny yarn doesn't have dye and relies on the color of the bunnies for the color of the yarn, so another color of bunny and we can have another color of yarn.


Pure English Angora x hybrid angora
still very fuzzy bunnies
The first really fluffy bunny is Daisy, she is a full English angora. She has fluffy ears, a fluffy face and really long fluffy 'wool'. She's pretty much what an English angora is supposed to look like. They're one of the smallest angora breeds and are usually around six pounds.
The second picture is Iris, he's a hybrid angora bunny. Mostly English, but has some Satin and German angora in there as well. Originally, the reason we used a halfbred Satin/German angora buck was because we were trying to keep the herd from being inbred. However, the fiber quality and body conformation hasn't bred back to English even after several generations of breeding back to a pure English angora. So, we're pretty much not going to be breeding hybrid angoras anymore and will be sticking to pure English. Once this Covid virus has lessened, gotten a vaccine or gone, we should be able to bring in some more breeding stock. At that time we will get another pure English buck to keep the levels of inbreeding down.
Oh, Iris does have eyes, it's just that the sun is glaring off his white wool so you can't see them in there. He has less wool on his ears and much thicker ears than a pure English. He also doesn't grow his wool as fast as a pure English angora, although he does seem to have a long 'wool' coat. It's not as soft or silky as an English, though. I'd hoped to get slightly larger English angoras from the hybrid cross, but it's not worth it if we lose the exquisite softness of the English angora's fiber quality.

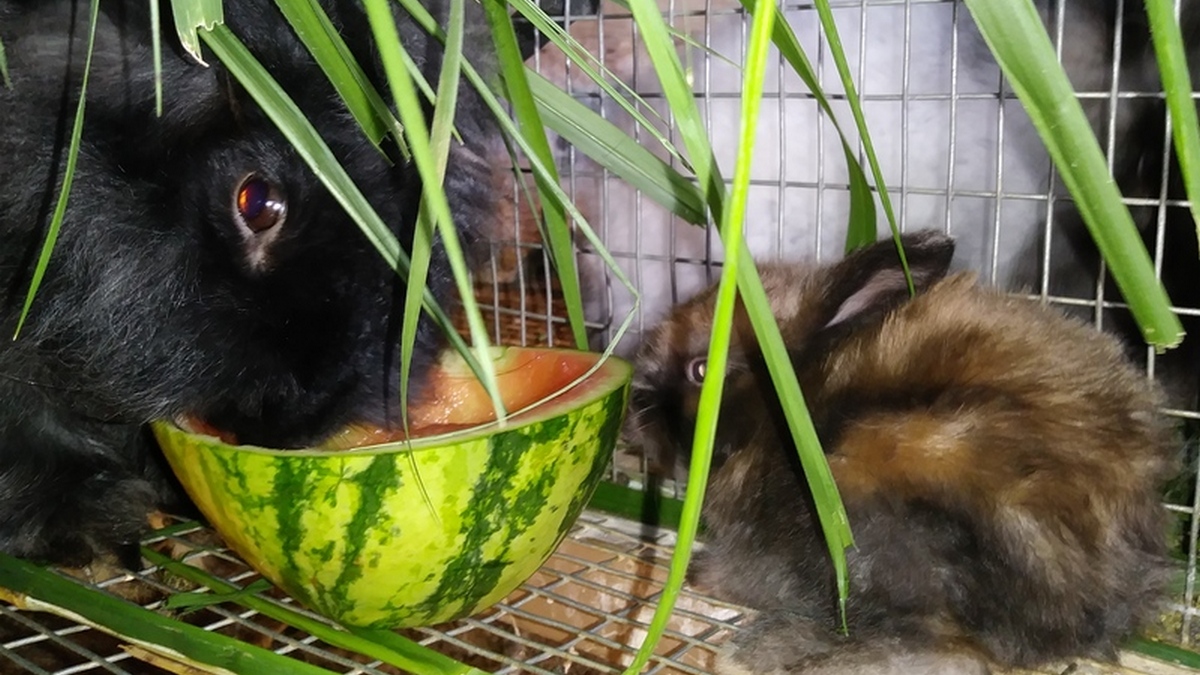
Rose & Caesar's babies
more cuteness!
Rose & Caesar's babies are about the same age as Daisy & Caesar's babies. They're all about old enough now to go to new homes so it's time to select the ones who will be staying here at Hillside Farm. If we send away the very best ones, we won't be able to breed better ones here. Although we also have other selection criteria since our prime directive is "trying to make the best yarn in the universe, one bunny at a time" so we also make bunny selections depending on who we need to help us with making yarn.
I need to update the "Available Bunnies" page as well as the "In the Nestbox" page. With this many baby bunnies, there should be enough for everyone, although there's a waiting list so many of them already have new homes once they're big enough. But, I think there's still a few more than are being asked for, so if you want a bunny of your own - send us an email. Click on the 'Mail To' link below.
Mail to: Hillside Farm Hawaii
The male bunnies are usually $50 and the females are usually $75. They have a four generation pedigree and most of them are pure English angora. They are all pure angora, although some of them have a touch of Satin and/or German angora several generations back in their pedigrees.
If you're interested in setting up a breeding herd, ask about unrelated pairs. Due to the difficulty of getting good bloodstock in from the mainland, it will be great when we have more folks in Hawaii raising angora bunnies. If there's several herds, then we can occasionally swap bucks back and forth to keep down the levels of inbreeding and have healthier bunnies.
We can fly bunnies to Maui, Oahu, Molokai and Lanai. They can also go to Kauai, although that has some additional fees since there's a long layover on Oahu which needs a bunny sitter and a second airfare on Aloha Air Cargo to get them to Kauai. Email and ask for details.
Click on the picture above for the previous blog entry
or check the list of older blog posts at the bottom of this page

Click on the bunny for the Home Page